-
×InformationNeed Windows 11 help?Check documents on compatibility, FAQs, upgrade information and available fixes.
Windows 11 Support Center. -
-
×InformationNeed Windows 11 help?Check documents on compatibility, FAQs, upgrade information and available fixes.
Windows 11 Support Center. -
- HP Community
- Printers
- Printer Ink Cartridges & Print Quality
- Bad 65xl cartridge

Create an account on the HP Community to personalize your profile and ask a question
03-25-2022 12:56 PM - edited 03-25-2022 12:59 PM
I put in a brand new HP 65xl cartridge into my printer. (HP 5000) It printed 5-6 pages just fine and then began not printing a line or two on a document and then it stopped printing completely. I ran the printer through all of the cleaning, aligning, etc. It just wouldn't print at all. Luckily, I had purchased another cartridge at the same time because I like to have one on hand. I took the bad one out and popped in the second new one. That has worked just fine. The place I bought both cartridges at said I had to go directly to HP with the issue of the bad cartridge. Can I get a refund or an exchange? The bad cartridge shows it was made in Malaysia with an October 2023 expiration date.
03-30-2022 03:02 PM
@earn1
Welcome to the HP support community.
Provide the complete printer model number or the product number for further assistance.
Here is the link to find the product number:- Click here
Sandytechy20
I am an HP Employee
05-11-2022 03:49 AM
@earn1
Try these steps on the defective cartridge to fix the issue.
Clean the ink cartridges
- Load the printer with plain white paper.
- On the printer control panel, swipe left on the display, and then touch Setup
 .
. - Touch Tools, and then touch Clean Cartridges.
- Examine the print quality on the Print Quality Diagnostic report.
- If the print quality is acceptable, touch No. You can stop troubleshooting.
- If the print quality is unacceptable, touch Yes when prompted to perform the next level of cleaning.
Manually clean the area around the ink nozzles
- Gather the following materials:
- A clean, lint-free cloth or a clean, dry cotton swab
- Distilled or bottled water
- CAUTION:
- Do not use tap water because it might contain contaminants that can damage the printhead.
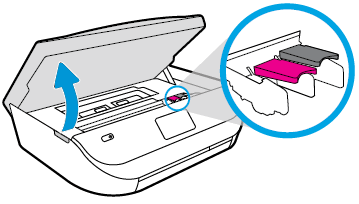
- Gently grasp the handles on either side of the printer, and then raise the ink cartridge access door until it locks into place.
- The carriage moves to the center of the printer.

- Wait until the printer is idle and silent before you continue.
- Lift up the lid on the ink cartridge slot, and then pull up on the ink cartridge to remove it from the slot.

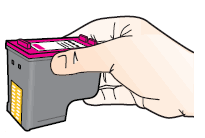
- Hold the ink cartridge by its sides.

- Lightly dampen a clean, lint-free cloth or swab with bottled or distilled water.
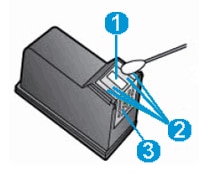
- Clean the face and edges around the ink nozzle with the cloth or swab.
- CAUTION:
- Do not clean the ink nozzle plate.
- Nozzle plate - Do not clean
- Area surrounding ink nozzle - Do clean
- Ink cartridge contacts - Do not clean
- Wait for the cleaned area to dry before you continue (approximately 10 minutes).
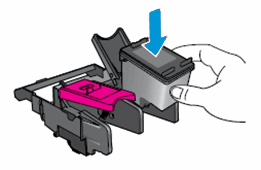
- With the nozzles toward the printer, insert the ink cartridge into its slot until it snaps into place.
- NOTE:
- Install the color ink cartridge on the left and the black ink cartridge on the right.

- Close the lid on the ink cartridge slot to secure the ink cartridge into place.
- Repeat these steps to clean around the nozzles on the other ink cartridge.
- Close the ink cartridge access door.
Refer to this HP document for further assistance:- Click here
Keep me posted.
If this helps, please mark the public post as an accepted solution so that it benefits several others.
Cheers.
Sandytechy20
I am an HP Employee

