-
×InformationNeed Windows 11 help?Check documents on compatibility, FAQs, upgrade information and available fixes.
Windows 11 Support Center. -
-
×InformationNeed Windows 11 help?Check documents on compatibility, FAQs, upgrade information and available fixes.
Windows 11 Support Center. -
- HP Community
- Printers
- Printer Ink Cartridges & Print Quality
- Re: Big blank section across printed pages and scanned print...

Create an account on the HP Community to personalize your profile and ask a question
03-21-2021 12:49 PM
When I print a file, in black or in colour, there is a big blank section. I have cleaned print cartridges and aligned cartridges but the problem persists. Virtual assistant couldn't help. Anybody know what might be the cause ofthe problem and what I can try?
03-24-2021 10:05 AM
Welcome to HP Support Community
I would like to help
Do you experience the same issue when making Photocopies or when printing a Quality Diagnostic Page?
Thank you
If the information I've provided was helpful, give us some reinforcement by clicking the "Solution Accepted" on this Post and it will also help other community members with similar issue.
KrazyToad
I Am An HP Employee
03-26-2021 07:24 AM
HI@dogsden,
Welcome to HP Support Community
If you have not installed the full feature software, follow these steps to download the most recent version of the printer software.
-
Turn on the printer.
-
Disconnect the USB cable from the printer, if necessary. The software installation prompts you to connect the cable if needed.
-
If a Let's identify your product to get started page displays, click Printer, type your printer model number, and then click Submit.
-
If you need to change the operating system, click Change, select your version, and then click Change.
-
Under the Driver heading, click Download for the full software package, or click Basic Drivers for other driver options.
Solution one: Use genuine HP cartridges
HP recommends that you use genuine HP ink or toner supplies. HP cannot guarantee the quality or reliability of non-HP or refilled cartridges. If you do not use genuine HP cartridges, the steps in this document might not resolve the issue. To check the authenticity of your cartridges, go to the HP anti-counterfeit webpage (in English).
Purchase replacement cartridges and other supplies from the HP Store or local retailers.
Solution two: Check the estimated ink levels
Low ink can contribute to poor print quality. Follow these steps to check the estimated ink levels, and then replace any low or empty cartridges.
Step 1: Check the estimated ink levels
Follow these steps to check the estimated ink levels.
-
Open the printer software.
-
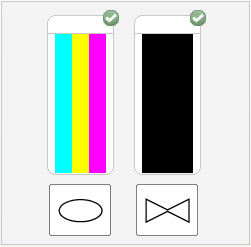
Click Estimated Ink Levels. A graphic that represents the estimated ink levels for your printer displays.
Figure : An example of the Estimated Ink Levels graphic displaying full cartridges
NOTE:Ink level warnings and indicators provide estimates for planning purposes only. When an indicator shows low ink levels, consider having a replacement ink cartridge available to avoid possible printing delays. You do not need to replace ink cartridges until print quality becomes unacceptable.
-
If none of the ink cartridges are low on ink, you do not need to replace them yet. Continue to the next solution.
-
If any of the ink cartridges are low on ink, continue to the next step to replace them.
Step 2: Replace any low or empty cartridges
Follow these steps to replace any low or empty cartridges.
-
Press the Power button to turn on the printer, if it is not already on.
-
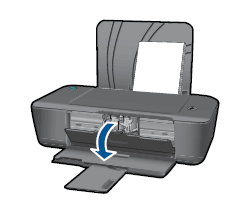
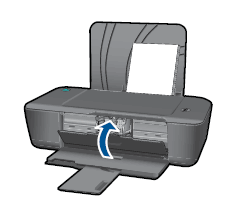
Open the cartridge door, and then wait for the carriage to move to the center of the printer. Wait until the carriage is idle and silent before you proceed.
Figure : Open the cartridge door
-
Press down lightly on the cartridge that you want to replace to release it, and then pull it toward you out of its slot.
Figure : Remove the old cartridge
-
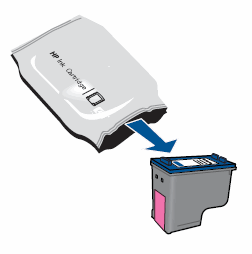
Remove the new cartridge from its package.
Figure : Remove the cartridge from the package
-
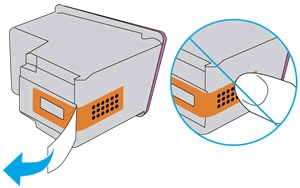
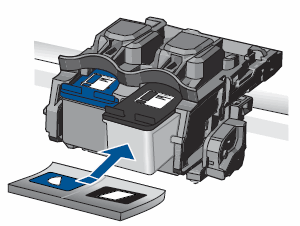
Use the pull tab to remove the plastic protective tape from the new cartridge.
Figure : Remove the protective tape
CAUTION:
Do not touch the copper-colored contacts or the ink nozzles. Touching these parts can result in clogs, ink failure, and bad electrical connections. Also, do not re-tape the cartridges. Doing so can result in clogs, ink failure, and bad electrical connections.
Figure : Do not touch electrical contacts or ink nozzles
-
Slide the new cartridge into its slot until it snaps firmly into place.
Figure : Slide the cartridge into its slot
-
The tri-color cartridge (
) goes in the slot on the left
-
The black cartridge (
) goes in the slot on the right
-
-
Repeat these steps to replace the other cartridge, if necessary.
-
Close the cartridge door.
Figure : Close the cartridge door
Solution three: Use an automated tool to clean the cartridges
Cleaning the cartridges resolves many print quality issues.
-
Open the printer software.
-
-
Right-click the Start button (
) in the lower left corner of the screen, and then click Search.
-
Type HP in the search box.
-
Click your printer (
). The printer software opens.
NOTE:
You can also open the printer software from your computer desktop: double-click the icon for your printer (
).
-
-
-
-
-
In the printer software, double-click Printer Actions (
).
-
Double-click Maintenance Tasks (
). The HP Toolbox opens.
-
Click the Device Services tab.
-
Click Clean Ink Cartridges, and then follow the on-screen instructions to clean the cartridges.
-
After running the tool, click Print to print a test page. If the print quality is still unacceptable, follow the on-screen instructions to run a Second-level clean.
If the nozzles are badly clogged, you might need to clean the cartridges several times before print quality becomes acceptable.
NOTE:To avoid issues that require cleaning, always turn the printer off with the Power button.
Solution four: Replace the problem cartridge
Follow these steps to replace the problem cartridge if you saw defects on the test page and the preceding steps did not resolve the issue, even if the cartridge is not low on ink. The problem cartridge is the one that printed the defects on the test page.
Step 1: Identify the problem cartridge
-
Review the test page you printed in the previous solution.
-
Check the text and color blocks on the test page.
-
If you identify any defects with the black text on the page, the black ink cartridge is the problem.
-
If you identify any defects with the colored blocks on the page, the tri-color ink cartridge is the problem.
Step 2: Check the cartridge warranty status
If you have a defective cartridge or printhead, it might be under warranty. To check the warranty on your ink or toner supplies, go to Printer and Page Yield Overview, and then review the limited warranty information for your supplies.
Step 3: Replace the problem cartridge
-
Press the Power button to turn on the printer, if it is not already on.
-
Open the cartridge door, and then wait for the carriage to move to the center of the printer. Wait until the carriage is idle and silent before you proceed.
Figure : Open the cartridge door
-
Press down lightly on the cartridge that you want to replace to release it, and then pull it toward you out of its slot.
Figure : Remove the old cartridge
-
Remove the new cartridge from its package.
Figure : Remove the cartridge from the package
-
Use the pull tab to remove the plastic protective tape from the new cartridge.
Figure : Remove the protective tape
CAUTION:
Do not touch the copper-colored contacts or the ink nozzles. Touching these parts can result in clogs, ink failure, and bad electrical connections. Also, do not re-tape the cartridges. Doing so can result in clogs, ink failure, and bad electrical connections.
Figure : Do not touch electrical contacts or ink nozzles
-
Slide the new cartridge into its slot until it snaps firmly into place.
Figure : Slide the cartridge into its slot
-
The tri-color cartridge (
) goes in the slot on the left
-
The black cartridge (
) goes in the slot on the right
-
-
Repeat these steps to replace the other cartridge, if necessary.
-
Close the cartridge door.
Figure : Close the cartridge door
Step 4: Use an automated tool to align the cartridges
-
Open the printer software.
-
If you are not using the latest version of Windows 8, the information in these steps might not match. You can get the latest version from the Microsoft Store.
-
Right-click the Start button (
) in the lower left corner of the screen, and then click Search.
-
Type HP in the search box.
-
Click your printer (
). The printer software opens.
NOTE:
You can also open the printer software from your computer desktop: double-click the icon for your printer (
).
-
-
-
-
-
Double-click Printer Actions, and then double-click Maintenance Tasks. The HP Toolbox opens.
-
Click the Device Services tab, and then click Align Ink Cartridges. The printer aligns the cartridges and then prints an alignment page.