-
×InformationNeed Windows 11 help?Check documents on compatibility, FAQs, upgrade information and available fixes.
Windows 11 Support Center. -
-
×InformationNeed Windows 11 help?Check documents on compatibility, FAQs, upgrade information and available fixes.
Windows 11 Support Center. -
- HP Community
- Printers
- Printer Ink Cartridges & Print Quality
- Clogged inkjet

Create an account on the HP Community to personalize your profile and ask a question
Your account also allows you to connect with HP support faster, access a personal dashboard to manage all of your devices in one place, view warranty information, case status and more.
Check some of the most frequent questions about Instant Ink: HP INSTANT INK, HP+ PLANS: INK AND TONER.
Check out our Black or Color Ink Not Printing, Other Print Quality Issues info about: Print quality and Cartridge Issues.

It has been a while since anyone has replied. Simply ask a new question if you would like to start the discussion again.
8 REPLIES 8
10-25-2020 03:47 AM
 HP Recommended
@CN48, Welcome to the HP Support Community!
If you have already cleaned the printhead up to 2 cycles and the issue persists, you may have to replace the ink cartridge (If the issue is only with the cyan).
Try step 9 from this document to clear the ink cartridge.
For more info on resolving print quality issues, refer to - Black or Color Ink Not Printing, Other Print Quality Issues
To resolve any ink cartridge related errors - HP Printer Does not Print and Error Indicates Faulty Ink Cartridge
Hope this helps! Keep me posted.
Please click “Accept as Solution” if you feel my post solved your issue, it will help others find the solution.
Click the “Kudos, Thumbs Up" on the bottom right to say “Thanks” for helping!
Have a great day!
KUMAR0307
I am an HP Employee
10-29-2020 04:54 AM
HP Recommended
If you have already replaced the ink cartridge and the issue persists, I'm afraid this is an issue with the printer. Please reach out to the HP Technical Support team in your region regarding the service options for your printer.
You may create a case on the website to obtain a case number if required. Kindly watch this video to know how.
Keep me posted for any other assistance.
KUMAR0307
I am an HP Employee
10-29-2020 04:59 AM
HP Recommended
To clean the printhead:
-
From the printer control panel, open the Setup
 menu.
menu. -
Open the Printer Maintenance menu.
-
If necessary, open the Tools menu, and then touch Clean Printhead.
-
If the print quality is unacceptable, touch Clean Again to continue the next level of cleaning. If necessary, repeat these steps for the third cleaning cycle.
NOTE: If the printhead is badly clogged, it might require another cleaning cycle. If so, wait 30 minutes before you perform all three levels of cleaning again.
Also, make sure the ink cartridges are properly vented and seated correctly
Check the vents on the top of the ink cartridges. If they are clogged or obstructed, the ink cartridges might not work properly, which can affect print quality.
NOTE: To avoid print quality issues and dried out ink cartridges, do not leave any ink cartridges outside the printer for longer than 30 minutes.
-
Turn on the printer, if it is not already turned on.
-
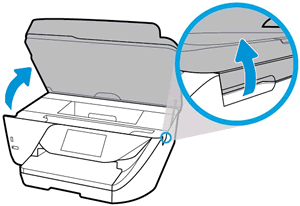
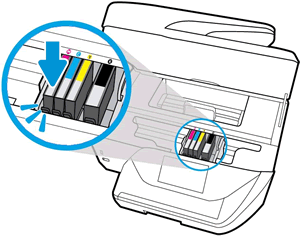
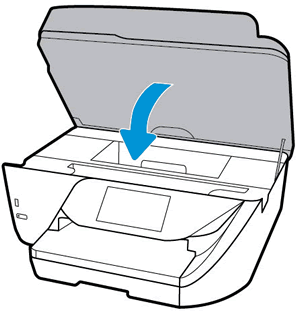
Open the ink cartridge access door.
The carriage moves to the center of the printer.
-
Wait until the carriage stops moving before you continue.
-
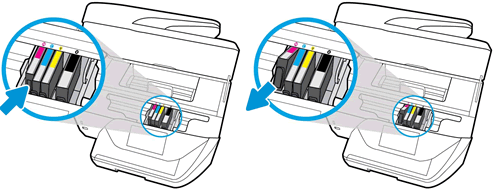
Press the tab inward on the front of the old ink cartridge to release it, and then pull up on the ink cartridge to remove it from the slot.
-
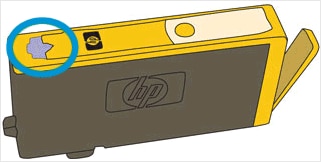
Examine the vent area above the HP logo on the top of the ink cartridge.
-
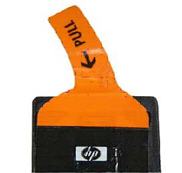
If the ink cartridge still has the orange pull-tab attached, pull to remove it.
-
If the vent is clogged, use a straight pin to gently remove excess adhesive from the vent.
-
Clogged vent
-
With a straight pin, gently remove excess adhesive from the vent
-
Unclogged vent
-
-
Turn the ink cartridge so that the ink cartridge contacts face downward, and then match the label color with the color dot on the carriage.
-
Slide the ink cartridge into its slot, and then gently press the ink cartridge down until it snaps into place.
-
Repeat these steps to inspect the vents on each of the ink cartridges.
-
Make sure each ink cartridge is firmly installed in its slot. Run your finger along the top of the ink cartridges to feel for any that are protruding, and if any are, press down firmly until each ink cartridge snaps into place.
-
Close the ink cartridge access door.
These steps are mentioned in the document that I have attached in my initial post. Check the same for more info.
Hope this helps! Keep me posted.
Please click “Accept as Solution” if you feel my post solved your issue, it will help others find the solution.
Click the “Kudos, Thumbs Up" on the bottom right to say “Thanks” for helping!
KUMAR0307
I am an HP Employee
Be alert for scammers posting fake support phone numbers and/or email addresses on the community.
If you think you have received a fake HP Support message, please report it to us by clicking on "Flag Post".
† The opinions expressed above are the personal opinions of the authors, not of HP. By using this site, you accept the Terms of Use and Rules of Participation.


Didn't find what you were looking for?
Ask the community
† The opinions expressed above are the personal opinions of the authors, not of HP. By using this site, you accept the <a href="https://www8.hp.com/us/en/terms-of-use.html" class="udrlinesmall">Terms of Use</a> and <a href="/t5/custom/page/page-id/hp.rulespage" class="udrlinesmall"> Rules of Participation</a>.