-
×InformationNeed Windows 11 help?Check documents on compatibility, FAQs, upgrade information and available fixes.
Windows 11 Support Center. -
-
×InformationNeed Windows 11 help?Check documents on compatibility, FAQs, upgrade information and available fixes.
Windows 11 Support Center. -
- HP Community
- Printers
- Printer Ink Cartridges & Print Quality
- HP INKTANK 415 CANT FILL TANK

Create an account on the HP Community to personalize your profile and ask a question
03-23-2021 02:48 PM
Hi I have a HP Inktank Wireless 415. The black ink level is low in the reservoir. When I put the ink bottle on the reservoir nipple, the ink does not flow through to the reservoir. I tried it first with an open bottle of ink, and the ink did not flow. Next, I opened a new bottle of ink and tried again. The ink still does not flow from the bottle to the reservoir. There seems to be some obstruction in the tank's filler neck. Can anyone help? Thanks
03-26-2021 01:24 PM
Hi @EdP,
I'd like to help!
Try the below suggestions -
-
Open the ink tank lid.
Figure : Opening the ink tank lid

-
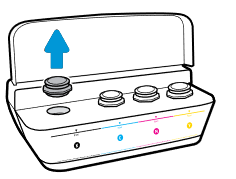
Remove the plug from the ink tank you are refilling.
CAUTION:
There might be ink on the underside of the plug. Place the plug upright to avoid ink transfer.
Figure : Removing the ink tank plug

-
Remove the cap from the ink bottle, pull the seal tab off, replace the cap, and then flip open the lid.
Figure : Preparing the bottle

-
Hold the ink bottle on the tank spout, gently push down, and then let the ink drain into the ink tank. Fill the ink tank to just below the maximum fill line on the tank.
If the bottle does not start draining, remove and reinsert the bottle onto the tank spout. Do not squeeze the bottle.
Figure : Example of filling the ink tank

CAUTION:
Do not squeeze the bottle, and do not overfill the ink tank.
-
After the ink tank is filled, pull the ink bottle straight up.
Close the ink bottle lid, set the bottle upright, and then push the ink tank plug into its slot on the ink tank.
Figure : Example of replacing the ink tank plug

-
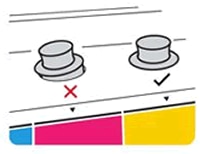
Make sure the ink tank plugs are pressed firmly into place.
Figure : Making sure the ink tank plugs are secure

-
Repeat the previous steps to fill any other low or empty ink tanks.
CAUTION:
Store any bottle with remaining ink in a cool, dry place for later use.
-
Close the ink tank lid.
Figure : Closing the ink tank lid

Also, refer to -An 'Incompatible' or 'Ink Cartridges Missing' Error Message Displays
Hope this helps! Keep me posted.
And, Welcome to the HP Support Community.
Please click “Accept as Solution” if you feel my post solved your issue, it will help others find the solution.
Click the “Kudos, Thumbs Up" on the bottom right to say “Thanks” for helping
04-10-2021 01:13 PM
Hi @gleboca,
I'd like to help!
Try the below suggestions -
-
Open the ink tank lid.
Figure : Opening the ink tank lid

-
Remove the plug from the ink tank you are refilling.
CAUTION:
There might be ink on the underside of the plug. Place the plug upright to avoid ink transfer.
Figure : Removing the ink tank plug

-
Remove the cap from the ink bottle, pull the seal tab off, replace the cap, and then flip open the lid.
Figure : Preparing the bottle

-
Hold the ink bottle on the tank spout, gently push down, and then let the ink drain into the ink tank. Fill the ink tank to just below the maximum fill line on the tank.
If the bottle does not start draining, remove and reinsert the bottle onto the tank spout. Do not squeeze the bottle.
Figure : Example of filling the ink tank

CAUTION:
Do not squeeze the bottle, and do not overfill the ink tank.
-
After the ink tank is filled, pull the ink bottle straight up.
Close the ink bottle lid, set the bottle upright, and then push the ink tank plug into its slot on the ink tank.
Figure : Example of replacing the ink tank plug

-
Make sure the ink tank plugs are pressed firmly into place.
Figure : Making sure the ink tank plugs are secure

-
Repeat the previous steps to fill any other low or empty ink tanks.
CAUTION:
Store any bottle with remaining ink in a cool, dry place for later use.
-
Close the ink tank lid.
Figure : Closing the ink tank lid

Also, refer to -An 'Incompatible' or 'Ink Cartridges Missing' Error Message Displays
Hope this helps! Keep me posted.
And, Welcome to the HP Support Community.
Please click “Accept as Solution” if you feel my post solved your issue, it will help others find the solution.
Click the “Kudos, Thumbs Up" on the bottom right to say “Thanks” for helping
