• ×
    Information
    Windows update impacting certain printer icons and names. Microsoft is working on a solution.
    Click here to learn more
    Information
    Need Windows 11 help?
    Check documents on compatibility, FAQs, upgrade information and available fixes.
    Windows 11 Support Center.
  • post a message
  • ×
    Information
    Windows update impacting certain printer icons and names. Microsoft is working on a solution.
    Click here to learn more
    Information
    Need Windows 11 help?
    Check documents on compatibility, FAQs, upgrade information and available fixes.
    Windows 11 Support Center.
  • post a message
Guidelines
If you're having print quality issues Click here for more tips!
Check some of the most frequent questions about Instant Ink: HP INSTANT INK, HP+ PLANS: INK AND TONER.


Check out our Black or Color Ink Not Printing, Other Print Quality Issues info about: Print quality and Cartridge Issues.
HP Recommended
HP OFFICEJET 5255
Microsoft Windows 10 (64-bit)

WHEN PRINTING ONLY BLANK PAGES COMES OUT

1 REPLY 1
HP Recommended

@NATIFAHAITI Welcome to HP Community!


I understand that you are getting blank pages.


Are you using HP genuine ink cartridges?


Follow these steps to check the ink levels, and then replace any low or empty cartridges.

Step 1: Check the estimated ink levels

Follow these steps to check the estimated ink levels.

NOTE: 

Ink level warnings and indicators provide estimates for planning purposes only. When an indicator shows low ink levels, consider having a replacement ink cartridge available to avoid possible printing delays. You do not need to replace ink cartridges until print quality becomes unacceptable.

  1. Load plain white paper in the paper tray.

  2. Touch the button () next to the Setup icon () in the lower-left corner of the control panel.

  3. Touch the Right Arrow button () to select Tools, and then touch OK.

  4. Touch the Right Arrow button () to select Estimated Ink Levels, and then touch OK.

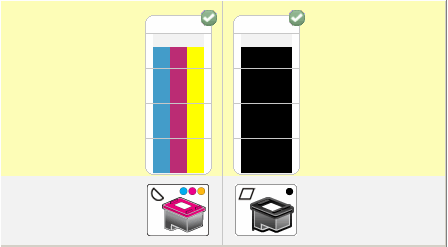
    Figure : Estimated ink levels graphic that shows full cartridges

    Image: Estimated ink levels
  • If none of the ink cartridges are low on ink, you do not need to replace them yet. Continue to the next solution.

  • If any of the ink cartridges are low on ink, continue to the next step to replace them.

Step 2: Replace any low or empty cartridges

Follow these steps to replace any low or empty cartridges.

  1. Load plain white paper in the input tray.

  2. Press the Power button to turn on the printer.

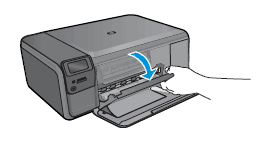
  3. Open the cartridge door. Wait until the printer is idle and silent before you continue.

    Figure : Open the cartridge door

    Image: Open the cartridge door
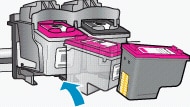
  4. Lightly press down on the cartridge to release it, and then pull the cartridge out to remove it from its slot.

    Figure : Remove the cartridge

    Image: Remove the cartridge
       CAUTION: 

    Do not touch the copper-colored contacts or ink nozzles. Also, donot re-tape the cartridges. Doing so can result in clogs, ink failure, and badelectrical connections.

    Figure : Do not touch the contacts or nozzles

    Image: Do not touch the contacts or nozzles
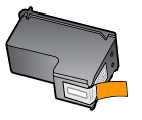
  5. Remove the new cartridge from its packaging, and then pull the pull tab to remove the plastic tape.

       CAUTION: 

    Do not touch the copper-colored contacts or ink nozzles. Also, donot re-tape the cartridges. Doing so can result in clogs, ink failure, and badelectrical connections.

    Figure : Remove the plastic tape

    Image: Remove the plastic tape
  6. Hold the cartridge by its sides with the nozzles toward the printer, and then insert the cartridge into its color-coded slot until it snaps into place. Make sure that the icon on the cartridge matches the icon on the slot.

    • Insert the tri-color cartridge in the slot on the left.

    • Insert the black cartridge in the slot on the right.

    Figure : Color-coded cartridge slots

    Image: Color-coded cartridge slots

    Figure : Example of inserting the tri-color cartridge

    Image: Reinserting the cartridge
  7. Push the cartridge forward into its slot until it snaps into place.

  8. Repeat these steps to replace the other cartridge, if necessary.

  9. Close the cartridge door.

Step 3: Align the printer

Follow the steps below to align the cartridges.

  1. Make sure the printer is turned on and paper is loaded.

  2. Touch the button () next to the Setup icon () in the lower-left corner of the control panel.

  3. Touch the Right Arrow button () to select Tools, and then touch OK.
  4. Touch the Right Arrow button () to select Align Printer, and then touch OK. The printer prints an alignment page.

  5. Lift the printer lid.

  6. Place the alignment page on with the printed-side down on the right-front corner of the scanner glass. See the engraved guide next to the scanner glass for help loading the alignment page.

    Figure : Place the alignment page on the scanner glass

    Image: Place the alignment page on the scanner glass
  7. Close the lid, and then press OK to complete the alignment.

  8. Wait while the printer scans the alignment sheet and completes the alignment process.

Solution three: Use an automated tool to clean the printhead

If you have printing issues, the printhead could be clogged. Follow these steps to run an automated tool to clean the printhead.

  1. Load plain white paper in the input tray.

  2. Touch the button () next to the Setup icon () in the lower-left corner of the control panel.

  3. Touch the Right Arrow button () to select Tools, and then touch OK.

  4. Touch the Right Arrow button () to select Clean Printhead, and then touch OK. The printer starts the cleaning process.

    NOTE: 

    Mechanical noises during the cleaning process are normal. A test page prints when the cleaning process finishes.

  5. Review the print quality on the printhead test page. If the print quality is still unacceptable, follow the instructions to run a Second-level clean. You might need to clean the printhead several times to restore optimal print quality.

NOTE: 

To avoid issues that require cleaning, always turn the printer off with the Power button.

If the issue still persists, you have to replace the ink cartridges.

HP Customer Support - Software and Driver Downloads 


Keep us posted,

If you would like to thank us for our efforts to help you, 


Give us a virtual high-five by clicking the 'Thumbs Up' icon below, followed by clicking on the "Accept as solution" on this post, 


Have a great day!

† The opinions expressed above are the personal opinions of the authors, not of HP. By using this site, you accept the <a href="https://www8.hp.com/us/en/terms-of-use.html" class="udrlinesmall">Terms of Use</a> and <a href="/t5/custom/page/page-id/hp.rulespage" class="udrlinesmall"> Rules of Participation</a>.