-
×InformationNeed Windows 11 help?Check documents on compatibility, FAQs, upgrade information and available fixes.
Windows 11 Support Center. -
-
×InformationNeed Windows 11 help?Check documents on compatibility, FAQs, upgrade information and available fixes.
Windows 11 Support Center. -
- HP Community
- Printers
- Printer Ink Cartridges & Print Quality
- Poor print quality

Create an account on the HP Community to personalize your profile and ask a question
Your account also allows you to connect with HP support faster, access a personal dashboard to manage all of your devices in one place, view warranty information, case status and more.
Check some of the most frequent questions about Instant Ink: HP INSTANT INK, HP+ PLANS: INK AND TONER.
Check out our Black or Color Ink Not Printing, Other Print Quality Issues info about: Print quality and Cartridge Issues.
It has been a while since anyone has replied. Simply ask a new question if you would like to start the discussion again.
1 REPLY 1
09-15-2022 05:06 AM
@JeffBee
Welcome to the HP support community.
I understand that you are getting print quality issues, I am glad to assist you.
Manually clean the area around the ink nozzles
- Gather the following materials:
- A clean, lint-free cloth or a clean, dry cotton swab
- Distilled or bottled water
- CAUTION: Do not use tap water because it might contain contaminants that can damage the printhead.
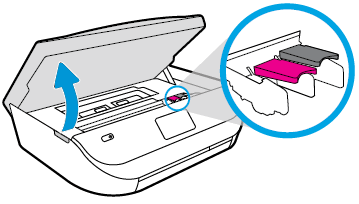
- Gently grasp the handles on either side of the printer, and then raise the ink cartridge access door until it locks into place.
- The carriage moves to the center of the printer.

- Wait until the printer is idle and silent before you continue.
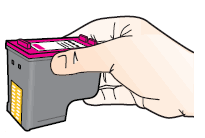
- Lift up the lid on the ink cartridge slot, and then pull up on the ink cartridge to remove it from the slot.

- Hold the ink cartridge by its sides.

- Lightly dampen a clean, lint-free cloth or swab with bottled or distilled water.
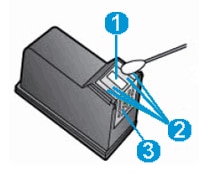
- Clean the face and edges around the ink nozzle with the cloth or swab.
- CAUTION:Do not clean the ink nozzle plate.

- Nozzle plate - Do not clean
- Area surrounding ink nozzle - Do clean
- Ink cartridge contacts - Do not clean
- Wait for the cleaned area to dry before you continue (approximately 10 minutes).
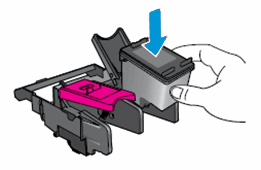
- With the nozzles toward the printer, insert the ink cartridge into its slot until it snaps into place.
- NOTE:Install the color ink cartridge on the left and the black ink cartridge on the right.

- Close the lid on the ink cartridge slot to secure the ink cartridge into place.
- Repeat these steps to clean around the nozzles on the other ink cartridge.
- Close the ink cartridge access door.
Refer to this HP document for further assistance:- Click here
Keep me posted.
If this helps, please mark the public post as an accepted solution so that it benefits several others.
Cheers.
Sandytechy20
I am an HP Employee
Be alert for scammers posting fake support phone numbers and/or email addresses on the community.
If you think you have received a fake HP Support message, please report it to us by clicking on "Flag Post".
† The opinions expressed above are the personal opinions of the authors, not of HP. By using this site, you accept the Terms of Use and Rules of Participation.
Didn't find what you were looking for?
Ask the community
† The opinions expressed above are the personal opinions of the authors, not of HP. By using this site, you accept the <a href="https://www8.hp.com/us/en/terms-of-use.html" class="udrlinesmall">Terms of Use</a> and <a href="/t5/custom/page/page-id/hp.rulespage" class="udrlinesmall"> Rules of Participation</a>.
