-
×InformationNeed Windows 11 help?Check documents on compatibility, FAQs, upgrade information and available fixes.
Windows 11 Support Center. -
-
×InformationNeed Windows 11 help?Check documents on compatibility, FAQs, upgrade information and available fixes.
Windows 11 Support Center. -
- HP Community
- Printers
- Printer Ink Cartridges & Print Quality
- Printer Trouble! Help

Create an account on the HP Community to personalize your profile and ask a question
06-26-2022 12:13 PM
Hi. Hoping someone can help. I have a HP Photosmart 6520 printer. Its never given me any trouble. I've had it for quite awhile, and that may be my issue...just have trouble believing that all of a sudden I am having trouble printing.....so, I still had colors left magenta, teal and yellow and black...when i printed, there was no black...I bought several black cartridges and none of them worked. Print Quality report showed nothing in black. I cleaned heads, aligned....and now since i've done all that and nothing helped..i have practically nothing in the colors. I don't want to purchase for 90.00 a set to have nothing happen and i can't return the inks.
I'm at the point of believing, Printers die eventually... I mean it was purchased in 2010.
Do you agree with me? Anybody have recommendations for new printer then? there is no support repair centers, should i even bother??????
I'm really done with cartridges too....if you don't print everyday which i don't then they dry out.
Someone help me please.
THANK YOU SO MUCH.
06-29-2022 07:16 AM - edited 06-29-2022 07:16 AM
Hi @Lilpeach9,
Welcome to the HP Support Community
I understand you are facing an issue with your HP Photosmart 6520 printer. I appreciate all your efforts in trying to troubleshoot with the printer. Don’t worry, I assure you I will try my best to get this sorted.
Please verify if you have already tried all the steps mentioned below:
Step 1: Run a Print Quality Diagnostic report
Printhead cleaning is the most effective solution for unsatisfactory prints, especially streaky or missing black or colors. Use a Print Quality Diagnostic report to check if the printhead needs to be cleaned or if there is an ink cartridge alignment issue.
Load plain white paper in the tray.
On the printer, touch Settings , touch Tools, and then touch Print Quality Report.
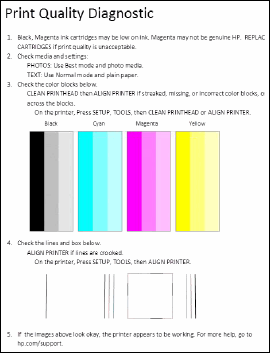
Review the following table for examples of defects on the report that reflect the most common print quality issues.
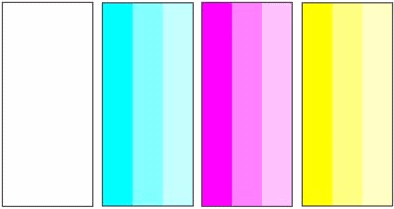
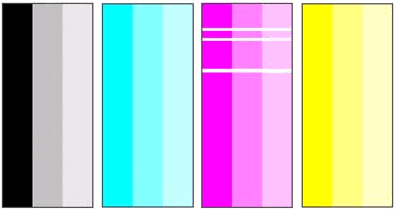
Examples of defects on a Print Quality Diagnostic report
Defect
Example
Irregular streaks
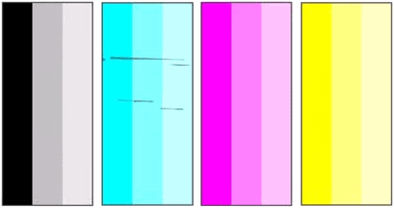
Faded color bars

Missing color
Color bars with regular white streaks
Jagged alignment patterns

If there are defects in the color bars, clean the printhead. Touch Settings , touch Tools, and then touch Clean Printhead. If print quality is unacceptable on the page that prints, touch Clean Again to perform a second cleaning, and then continue to the next step.
If there are defects in the alignment patterns, align the printhead. Touch Settings, touch Tools, and then touch Align Printer. Continue to the next step after the alignment completes.
If there are no defects on the report, skip to the step to check ink levels.
Step 2: Run another Print Quality Diagnostic report
Print another Print Quality Diagnostic Report, and then check for color bar and alignment defects.
If there are still defects in the color bars, continue to the next step.
If there are still alignment pattern defects, skip to the step at the end of this document to service the printer.
If there are no defects on the report, try to print. If the issue persists, skip to the step to check ink levels.
Step 3: Check the ink cartridge vents
Inspect the ink cartridges for clogged vents and for any remaining original packaging.
NOTE:
Avoid leaving unprotected ink cartridges out of the printer for an extended period of time.
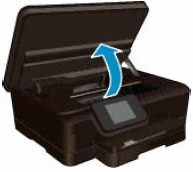
Open the ink cartridge access door.
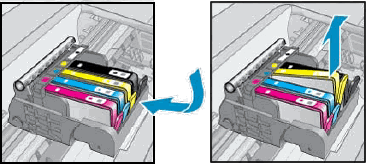
Press the tab on the front of the ink cartridge to release it, and then pull it out of the slot.
Examine the vent area on the top of the ink cartridge.
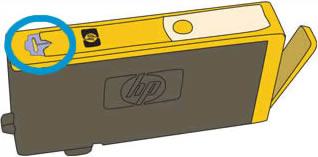
If the vent is clogged, use a pin to gently remove excess adhesive from the vent.
Clogged vent
Gently remove excess adhesive from the vent
Unclogged vent
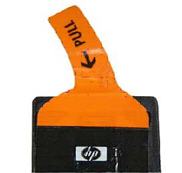
Make sure the orange pull tab is completely removed.
Insert the ink cartridge into its slot. Press down until it snaps into place.
Repeat these steps for any other ink cartridges with defects on the report.
After reinserting all the ink cartridges, run your finger along the top of the ink cartridges. If any are protruding, press down firmly until each ink cartridge snaps into place.
Print another Print Quality Diagnostic report.
If there are still defects for a specific color bar, replace that ink cartridge. If you have a defective ink cartridge, it might be under warranty. Go to HP Printers - Ink Cartridge and Printhead Limited Warranty for more information.
If there are no defects on the report, try to print. If the issue persists, continue to the next step.
Step 4: Check ink levels
Low or empty ink cartridges can cause print quality issues. Check ink levels to see if any ink cartridges need to be replaced.
On the printer, touch Settings , touch Tools, and then touch Estimated Ink Levels.
NOTE:
Ink level warnings and indicators provide estimates for planning purposes only. When an indicator shows low ink levels, consider having a replacement ink cartridge available to avoid possible printing delays. You do not need to replace ink cartridges until print quality becomes unacceptable.
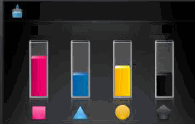
If any ink cartridges are critically low or empty, replace them with new genuine HP ink cartridges. Go to HP Deskjet, Photosmart 6520 Printers - Replacing Ink Cartridges for steps and more information.
If all ink cartridges have sufficient ink but the issue persists, continue to the next step.
Step 5: Check the print settings
Incorrect print settings can impact print quality. Select your operating system, and then check the print settings to make sure they are appropriate for your print job.
Windows
Check the print settings for your print job in Windows.
In the software application, you are trying to print from, click File, and then click Print.
The Print window opens.
Open the Properties dialog box.
Depending on the software application, the button might be Properties, Options, Printer Setup, Printer, or Preferences.
Depending on your print job, you might consider modifying the following settings:
Paper Type: If you are printing on photo paper, select the type of photo paper you are attempting to print on.
Print Quality: If you are dissatisfied with the quality of your printouts, increase the print quality. To print more quickly, decrease the print quality. These options typically include Best, Normal, and Draft modes.
Paper Size: If you are printing on a different size of paper than you normally print on, select the correct paper size.
Black and White: If you want to print in black and white only, select the grayscale option.
After selecting the print settings, click OK to apply the settings, and then click Print.
Try to print. If the issue persists, continue to the next step.
If the issue persists then I'm sending out a private message to assist you with the next course of action. Please check your Private message icon on the upper right corner of your HP Community profile Next, to your profile Name, you should see a little blue envelope, please click on it or click on this link.
Hope this helps! Keep me posted.
Please click “Accepted Solution” if you feel my post solved your issue, it will help others find the solution. Click the “Kudos/Thumbs Up" on the bottom right to say “Thanks” for helping!
ANAND_ANDY
I am an HP Employee
