-
×InformationNeed Windows 11 help?Check documents on compatibility, FAQs, upgrade information and available fixes.
Windows 11 Support Center. -
-
×InformationNeed Windows 11 help?Check documents on compatibility, FAQs, upgrade information and available fixes.
Windows 11 Support Center. -
- HP Community
- Printers
- Printer Ink Cartridges & Print Quality
- The ink access door on my 8035 won't open.

Create an account on the HP Community to personalize your profile and ask a question
03-09-2022 09:19 AM
Hi@Joan3,
Welcome to the HP Support Community! I'd like to help!
I see you are experiencing Ink access door issues with the HP OfficeJet Pro 8035 All-In-One Printer.
Follow the steps below to replace the ink cartridges-
-
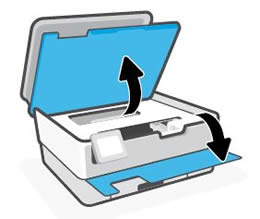
Open the front door, and then lift the ink cartridge access door.

-
Wait until the carriage stops moving before you continue.
-
Remove the ink cartridge from its slot.
-
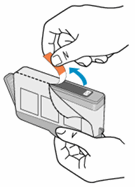
Remove the new ink cartridge from its package, and then pull the orange pull-tab straight back to remove the plastic wrap.
-
CAUTION:
Make sure you remove the orange pull-tab and plastic wrap completely before you remove the orange cap in the next step. Otherwise, ink might leak from the ink cartridge. When you remove the plastic wrap, the paper label on the top of the ink cartridge tears slightly, which is necessary to properly vent the ink cartridge.

-
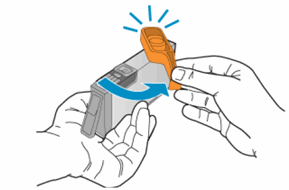
Hold the ink cartridge by its sides, and then twist the orange cap counter-clockwise to remove it from the ink cartridge.

-
Slightly bend the tab on the ink cartridge.
-
CAUTION:
Be careful not to bend the tab out more than 1.27 cm (0.5 in). Moving the tab too far might damage the ink cartridge or cause the tab to break.
-
Bend the tab away from the ink cartridge
-
Do not bend the tab more than 1.27 cm (0.5 in)
-
-
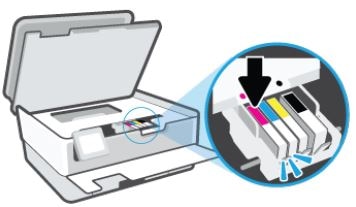
Slide the ink cartridge into its slot, and then press down on the ink cartridge until it snaps into place.

-
Repeat these steps to install any other new ink cartridges.
-
Close the front door and ink cartridge access door.
-
The cartridge door can only be lifted, that is the reason for the cartridge replacement document.
Perform a power reset
- Turn on the printer, if it is not already on.
- Wait until the printer is idle and silent before you continue.
- With the printer turned on, disconnect the power cord from the rear of the printer.
- Wait at least 30 seconds.
- Reconnect the power cord to the rear of the printer.
- Turn on the printer.
Close the cartridge door completely
-
Open, and then close the cartridge door of the product. Make sure that the door rests securely against the body of the product.
-
Check the cartridge door for obstructions
-
Inspect the door and the area around it to make sure that no obstructions prevent the door from closing completely.
-
NOTE: Bits of paper, packing materials, and tape might prevent the door from closing completely.
-
Remove any obstructions.
-
Check the product control panel to see if the error message still displays.
Hope this helps! Keep me posted.
Please click “Accept as Solution” if you feel my post solved your issue, it will help others find the solution.
Click on the YES button to reply that the response was helpful and/or to say “Thank You”.
Have a great day!
