-
×InformationNeed Windows 11 help?Check documents on compatibility, FAQs, upgrade information and available fixes.
Windows 11 Support Center. -
-
×InformationNeed Windows 11 help?Check documents on compatibility, FAQs, upgrade information and available fixes.
Windows 11 Support Center. -
- HP Community
- Printers
- Printer Ink Cartridges & Print Quality
- cant calibrate

Create an account on the HP Community to personalize your profile and ask a question
Your account also allows you to connect with HP support faster, access a personal dashboard to manage all of your devices in one place, view warranty information, case status and more.
Check some of the most frequent questions about Instant Ink: HP INSTANT INK, HP+ PLANS: INK AND TONER.
Check out our Black or Color Ink Not Printing, Other Print Quality Issues info about: Print quality and Cartridge Issues.

It has been a while since anyone has replied. Simply ask a new question if you would like to start the discussion again.
09-18-2020 09:46 AM
 HP Recommended
Product: hp deskjet 3755
Operating System: macOS 10.13 High Sierra
printing quality very poor. won't calibrate, says "paper missing," it has paper! I've run cleaning the cartridges several times and cleaned them manually as well.
Solved! Go to Solution.
1 ACCEPTED SOLUTION
Accepted Solutions
09-21-2020 09:15 AM
HP Recommended
@sondrabythesea Welcome to HP Community!
I understand that you are unable to calibrate the printer and getting out of paper message.
Please perform the below steps and check.
Step 1: Check the paper, and then reload it
Paper feed issues might result from using ripped, dusty, curled, wrinkled, or bent paper. The quality of the paper can also make a difference. Use these guidelines to help avoid the issue.
-
Use only good quality paper that meets printer specifications.
-
Store all paper in a dry, cool place. Paper feed issues occur more often in humid environments.
-
Do not print on paper that is already printed. The dampness of the ink can cause the paper to stick together.
-
Wait for the printer to complete a job or for an Out of paper or Load Paper message to display before you reload the paper.
Make sure the paper you use to print is in good condition, is neatly stacked in the tray, and the paper path and tray are free from obstructions.
-
Remove any paper from the input tray.
-
Remove any severely bent, wrinkled, or torn paper from the stack.
-
Check for obstructions inside the input tray area. Make sure nothing blocks the paper from engaging with the rollers. Even small pieces of paper can cause paper feed issues.
-
With both hands, hold the stack of paper, and then tap the bottom edge of the stack on a flat surface so that the stack is even on all sides.
-
Load the stack of paper into the input tray, and then slide in the paper-width guides against the paper.
Try to print. If the issue persists, continue to the next step.
Step 2: Clean the paper feed rollers
Dust, paper fiber, and other debris might accumulate on the paper feed rollers and cause paper jams and paper feed issues. Clean the rollers inside the printer, and then try to print again.
-
Turn off the printer, and then disconnect the power cord and any other cables.
WARNING:
You must unplug the power cord to move the carriage by hand and reset the paper feed mechanism without the risk of electrical shock.
-
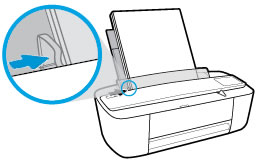
Raise the input tray and the input tray extender.
-
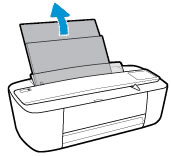
Lift and hold the input tray shield.
NOTE:
Do not remove the input tray shield. The input tray shield prevents foreign debris from falling into the paper path and causing paper jams.
-
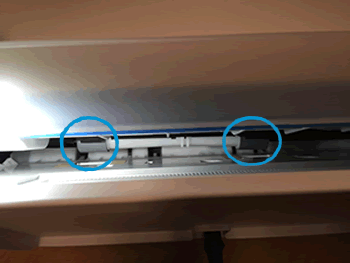
Look down through the open input tray and find the gray paper pick rollers. You might need a flashlight to illuminate the area.
-
Lightly dampen the cotton swab with water, and then squeeze any excess liquid from the swab.
-
Press the swab against the rollers, and then rotate them upward with your fingers. Apply a moderate amount of pressure to remove dust or dirt buildup.
-
Release the input tray shield.
-
Allow the rollers to dry completely (approximately 10 minutes).
-
Reconnect the power cord and any other cables, and then turn on the printer.
Try to print. If the issue persists, continue to the next step.
Step 3: Reset the printer
Sometimes an error persists even though there is no paper feed issue. Reset the printer, and then try to print.
-
With the printer turned on, disconnect the power cord from the printer.
-
Unplug the power cord from the power source.
-
Wait 60 seconds.
-
Reconnect the power cord to a wall outlet and to the printer.
NOTE:
HP recommends plugging the printer directly into a wall outlet.
Keep us posted,
If you would like to thank us for our efforts to help you,
Give us a virtual high-five by clicking the 'Thumbs Up' icon below, followed by clicking on the "Accept as solution" on this post,
Have a great day!
3 REPLIES 3
09-21-2020 09:15 AM
HP Recommended
@sondrabythesea Welcome to HP Community!
I understand that you are unable to calibrate the printer and getting out of paper message.
Please perform the below steps and check.
Step 1: Check the paper, and then reload it
Paper feed issues might result from using ripped, dusty, curled, wrinkled, or bent paper. The quality of the paper can also make a difference. Use these guidelines to help avoid the issue.
-
Use only good quality paper that meets printer specifications.
-
Store all paper in a dry, cool place. Paper feed issues occur more often in humid environments.
-
Do not print on paper that is already printed. The dampness of the ink can cause the paper to stick together.
-
Wait for the printer to complete a job or for an Out of paper or Load Paper message to display before you reload the paper.
Make sure the paper you use to print is in good condition, is neatly stacked in the tray, and the paper path and tray are free from obstructions.
-
Remove any paper from the input tray.
-
Remove any severely bent, wrinkled, or torn paper from the stack.
-
Check for obstructions inside the input tray area. Make sure nothing blocks the paper from engaging with the rollers. Even small pieces of paper can cause paper feed issues.
-
With both hands, hold the stack of paper, and then tap the bottom edge of the stack on a flat surface so that the stack is even on all sides.
-
Load the stack of paper into the input tray, and then slide in the paper-width guides against the paper.
Try to print. If the issue persists, continue to the next step.
Step 2: Clean the paper feed rollers
Dust, paper fiber, and other debris might accumulate on the paper feed rollers and cause paper jams and paper feed issues. Clean the rollers inside the printer, and then try to print again.
-
Turn off the printer, and then disconnect the power cord and any other cables.
WARNING:
You must unplug the power cord to move the carriage by hand and reset the paper feed mechanism without the risk of electrical shock.
-
Raise the input tray and the input tray extender.
-
Lift and hold the input tray shield.
NOTE:
Do not remove the input tray shield. The input tray shield prevents foreign debris from falling into the paper path and causing paper jams.
-
Look down through the open input tray and find the gray paper pick rollers. You might need a flashlight to illuminate the area.
-
Lightly dampen the cotton swab with water, and then squeeze any excess liquid from the swab.
-
Press the swab against the rollers, and then rotate them upward with your fingers. Apply a moderate amount of pressure to remove dust or dirt buildup.
-
Release the input tray shield.
-
Allow the rollers to dry completely (approximately 10 minutes).
-
Reconnect the power cord and any other cables, and then turn on the printer.
Try to print. If the issue persists, continue to the next step.
Step 3: Reset the printer
Sometimes an error persists even though there is no paper feed issue. Reset the printer, and then try to print.
-
With the printer turned on, disconnect the power cord from the printer.
-
Unplug the power cord from the power source.
-
Wait 60 seconds.
-
Reconnect the power cord to a wall outlet and to the printer.
NOTE:
HP recommends plugging the printer directly into a wall outlet.
Keep us posted,
If you would like to thank us for our efforts to help you,
Give us a virtual high-five by clicking the 'Thumbs Up' icon below, followed by clicking on the "Accept as solution" on this post,
Have a great day!
09-22-2020 11:42 AM
HP Recommended
You are most welcome.
We are happy to hear that the provided solutions worked.
In the future, if you have any other concerns.
Please get back to us. We will assist you.
Have a nice day!!
Be alert for scammers posting fake support phone numbers and/or email addresses on the community.
If you think you have received a fake HP Support message, please report it to us by clicking on "Flag Post".
† The opinions expressed above are the personal opinions of the authors, not of HP. By using this site, you accept the Terms of Use and Rules of Participation.


Didn't find what you were looking for?
Ask the community
† The opinions expressed above are the personal opinions of the authors, not of HP. By using this site, you accept the <a href="https://www8.hp.com/us/en/terms-of-use.html" class="udrlinesmall">Terms of Use</a> and <a href="/t5/custom/page/page-id/hp.rulespage" class="udrlinesmall"> Rules of Participation</a>.