-
×InformationNeed Windows 11 help?Check documents on compatibility, FAQs, upgrade information and available fixes.
Windows 11 Support Center. -
-
×InformationNeed Windows 11 help?Check documents on compatibility, FAQs, upgrade information and available fixes.
Windows 11 Support Center. -
- HP Community
- Printers
- Printer Ink Cartridges & Print Quality
- hp 5260 printer cover opens slighly; can't change depleted i...

Create an account on the HP Community to personalize your profile and ask a question
06-19-2022 09:41 PM
I received a HP Instant Ink Replacement Cartridge. When I attempted to lift the printer cover to access the cartridges, it lifted slightly (approx1") then would not open any further. Don't wish to force the cover open yet need printer to function.
06-21-2022 09:12 AM
Hi @black22even,
Welcome to the HP Support Community
I'd like to help!
I understand you are unable to replace the ink cartridges.
Follow the instructions to replace the ink cartridges -
Turn on the printer.
Load plain white paper into the input tray.
Gently grasp the handles on either side of the printer, and then raise the ink cartridge access door until it locks into place.
The carriage moves slightly to the left.
Figure : Opening the ink cartridge access door
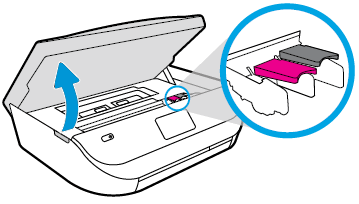
Wait until the carriage is idle and silent before you continue.
Lift up the lid on the ink cartridge slot, and then pull up on the ink cartridge to remove it from the slot.
Lift the lid
Gently push the lid back
Pull up on the ink cartridge
Remove the new ink cartridge from its package. Be careful to only touch the black plastic on the ink cartridge.
Figure : Holding the ink cartridge by its sides
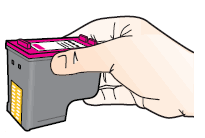
Remove the plastic tape from the ink cartridge.
CAUTION:
Do not touch the copper-colored contacts or the ink nozzles. Do not replace the protective tape on the contacts. Handling these parts can result in clogs, ink failure, and bad electrical connections.
Figure : Removing the plastic tape
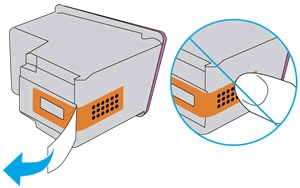
With the nozzles toward the printer, insert the ink cartridge into its slot until it snaps into place.
NOTE:
Install the color ink cartridge on the left and the black ink cartridge on the right.
Figure : Inserting the ink cartridge
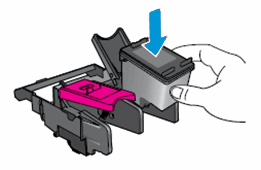
Close the lid on the ink cartridge slot to secure the ink cartridge into place.
Repeat these steps to install the other ink cartridge, if necessary.
Close the ink cartridge access door.
After you install new ink cartridges, the printer automatically prints an alignment page.
If the printer does not print an alignment page, see What if the alignment page did not print? in the Frequently asked questions (FAQs) section.
Pull out the output tray, and then lift the output tray extender.
Figure : Pulling out the output tray and lifting the output tray extender

Wait for the alignment page to fully eject from the printer.
After the alignment page prints, lift the scanner lid, and then place the alignment page with the print side down on the scanner glass. Position it according to the engraved guides around the glass.
Figure : Placing the alignment page on the scanner glass
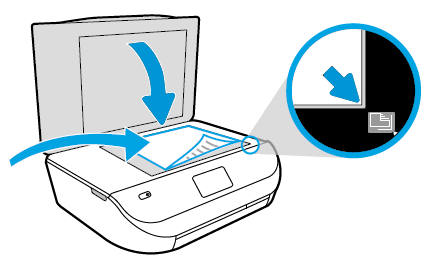
Close the scanner lid, and then touch OK on the printer control panel.
The printer aligns the ink cartridges.
After the printer aligns the ink cartridges, touch OK on the control panel.
You may refer -- Replacing Ink Cartridges
Hope this helps! Keep me posted.
Please click “Accept as Solution” if you feel my post solved your issue, it will help others find the solution.
Click the “Yes" on the bottom right to say “Thanks” for helping
06-21-2022 04:38 PM
I had HP support on a one way cell phone link walk me thru some activity that could possibly repair the problem. After numerous activities produced no results, HP support initiated a replacement printer order; I am waiting on delivery now.
06-21-2022 04:55 PM
I am glad the issue is taken care.
If you need further assistance feel free to reach out to us.
Have a great day ahead!
Please click “Accept as Solution” if you feel I my post solved your issue, it will help others find the solution.
Click the “Yes" on the bottom right to say “Thanks” for helping!
