-
×InformationNeed Windows 11 help?Check documents on compatibility, FAQs, upgrade information and available fixes.
Windows 11 Support Center. -
-
×InformationNeed Windows 11 help?Check documents on compatibility, FAQs, upgrade information and available fixes.
Windows 11 Support Center. -
- HP Community
- Printers
- Printer Paper Jams & Feed Issues
- Re: Paper Tray is Open Error

Create an account on the HP Community to personalize your profile and ask a question
07-04-2023
04:22 PM
- last edited on
07-05-2023
12:34 PM
by
![]() JessikaV
JessikaV
I've already looked through and tried the suggestions. Short of buying a new printer.
It says the paper tray is open. It is not.
I cannot access the menu to try updating the firmware either on the printer, or through HP Smart.
I have tried resetting/restarting. The same error message keeps popping up.
Is there a sensor that I can find and see if there's something preventing it from working? It's already out of warranty. So, tearing it apart for a deep clean is a viable solution. If it might actually solve the problem.
07-08-2023 07:59 AM
Hi @nhilde,
Welcome to the HP Support Community
I understand you are facing an issue with Paper Tray is Open Error with your HP OfficeJet 5255 All-In-One Printer. Not to worry I will help you to get a resolution to resolve the issue.
Let's perform a power drain:
- With the printer turned on, disconnect the power cord from the rear of the printer and also unplug the power cord from the wall outlet.
- Remove the USB cable, if present.
- Wait for 2-3 minutes, press and hold the power button on your printer for about 30 seconds to remove any additional charge.
- Now plug back the power cable straight to a wall outlet without any surge protector or an extension cord (This is important) and then plug back the power cord to the printer.
- Turn on the printer and wait till the warm-up period finishes and the printer is idle
Update the printer firmware
- Click here to download and install the latest printer firmware from your product
- Click here to know different methods of updating the printer firmware.
Solution one: Make sure that the input tray is completely closed
Make sure that you have properly closed the main input tray by pushing the tray into the printer as far as possible.
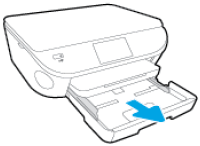
Grasp the handle on the input tray, and then pull the tray toward you to open it.
Figure : Pull out the input tray
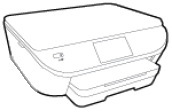
Close the input tray by pushing it into the printer until it locks into place.
Figure : Push in the input tray
NOTE:
The tray clicks into place when it is completely closed, and the printer makes noise.
Check the control panel for the Have You Changed the Paper? message. If you see it and do not touch an option, the message fades after several seconds, and the printer returns to the Home screen. If you do not see the message, continue to the next solution.
Solution two: Reload the paper in the input tray
Paper that is loaded incorrectly in the input tray might prevent the tray from closing completely. Remove any paper from the input tray, and then reload the paper correctly before closing the input tray.
Grasp the handle on the input tray, and then pull the tray toward you to open it.
Figure : Pull to open the paper tray

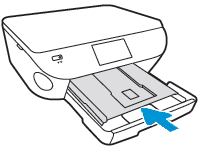
With the paper tray pulled out, push in the photo tray as far as possible.
Figure : Push in the photo tray
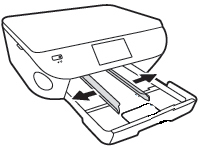
Remove any paper that is loaded into the input tray, and then slide out the paper width guides as far as possible.
Figure : Slide out the paper width guides
With both hands, hold the stack of paper that you removed from the input tray, or a new stack of paper that you want to load, and then tap the bottom edge of the stack on a flat surface so that the stack is even on all sides.
NOTE:
Load only one type of paper at a time. Do not mix different types, weights, or sizes of paper.
Insert the stack of paper into the input tray.
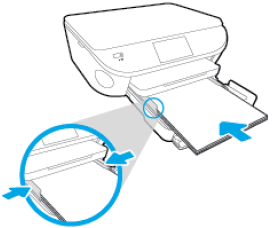
Push the stack of paper toward the rear of the input tray until the paper stops, and then gently slide in the paper width guides until they lightly rest against the edges of the paper.
Figure : Slide the paper back and the paper width guides in
NOTE:
Make sure that the stack of paper is not higher than the top edges of the paper width guides.
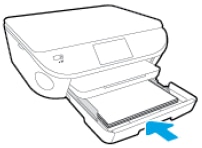
Close the input tray by pushing it into the printer until it locks into place.
Figure : Push in the paper tray
NOTE:
The tray clicks into place when it is completely closed, and the printer makes noise.
Check the control panel for the Have You Changed the Paper? message. If you do not touch an option, the message fades after several seconds, and the printer uses the previous paper settings. Adjust the paper settings as needed.
If you did not change the paper size or type in the input tray or the photo tray, touch OK to return to the Home screen.
If you did change the paper size or type in the input tray or photo tray, adjust the paper settings:
For the input tray: Touch Main Tray, Paper Size, and then your paper size. Touch Paper Type, and then touch your paper type. Touch Done, and then touch OK to return to the Home screen.
For the photo tray: Make sure that 4x6 in., Photo Paper displays in the Photo Tray field. Touch OK to return to the Home screen.
NOTE:
You can also use the 3x5 in., Photo Paper setting for the HP Officejet 8040 e-All-in-One Printer series.
Solution three: Check for obstructions that prevent the input tray from closing
Remove any paper or other obstructions from underneath the printer and inside the gap where the input tray slides into.
Press the Power button to turn off the printer.
Grasp the handle on the input tray, and then pull the tray toward you to open it.
Figure : Pull to open the paper tray

Remove any loose sheets of paper from the input tray or any paper that blocks the photo tray.
Remove the output tray, and then set it aside.
Figure : Remove the output tray
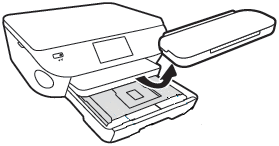
Turn the printer onto its right side so you can access its underside.
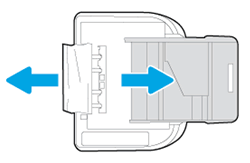
Check the gap where the input tray was. Remove any loose paper or other obstructions in the gap. If any paper is jammed inside the gap, grasp the paper with both hands, and then pull the paper slowly but firmly toward you to remove it. Gently remove any jammed paper and bits of torn paper.
Figure : Turn the printer onto its right side, and then remove any obstructions
CAUTION:
Remove paper from the gap as carefully as possible. If any torn pieces of paper remain inside the printer, a paper jam is likely to occur, which could damage the print mechanism.
Turn the printer back over to its normal position, and then reinsert the input tray, pushing it into the printer until it locks into place.
Figure : Push in the paper tray

NOTE:
The tray clicks into place when it is completely closed, and the printer makes noise.
Grasp the output tray by the sides, and then replace the output tray onto the input tray.
Press the Power button to turn on the printer.
Wait until the printer finishes warming up, and then check the control panel to see if the error message has cleared.
Solution four: Restart the printer
Turning the printer off and then on again can reset the printer and clear the message from the control panel.
Press the Power button to turn off the printer. If the printer does not turn off, disconnect the power cord from the rear of the printer.
Wait 60 seconds.
Reconnect the power cord to the rear of the printer.
Press the Power button to turn on the printer.
NOTE:
The printer might go through a warm-up period, which might last several minutes. Wait until the warm-up period completes before you continue.
Hope this helps! Keep me posted.
Please click “Accepted Solution” if you feel my post solved your issue, it will help others find the solution. Click the “Kudos/Thumbs Up" on the bottom right to say “Thanks” for helping!
A_Gayathri
HP Support Community Administrator.
