Guidelines
We have new content about printers, Click here to check it out!
Check some of the most frequent questions about Instant Ink: HP INSTANT INK, HP+ PLANS: INK AND TONER.


Check out our WINDOWS 11 Support Center info about: OPTIMIZATION, KNOWN ISSUES, FAQs AND MORE.
HP Recommended
Office Jet Pro 9015e

Started setup for printer. Added setup ink as requested. First message said ink was leaking. No leak. When I put it back it in to retry setup it says my setup ink- cyan and magneta -is used and I can go no further. 

Sat on the phone with support which tells me I have to go online. Go online and go through steps of virtual assistant which says it will connect me to an agent, add my personal info and it says - unable to help me. 

This is my second HP printer in a week. I’m strongly considering going to Canon or something. 

1 REPLY 1
HP Recommended

Hi @MM124112,


 I'd like to help!


Try the below suggestions-


Acknowledge the message, and then continue with the print job

Click or press No, OK, or Continue to dismiss the message. The printer continues with the print job.

You might have to dismiss the message every time you print.


 Reset the printer

If you still cannot print or if you are not able to dismiss the error message, reset the printer.

  1. With the printer turned on, disconnect the power cord from the printer.

  2. Unplug the power cord from the power source.

  3. Wait 60 seconds.

  4. Reconnect the power cord to a wall outlet and to the printer.

    NOTE: 

    HP recommends plugging the printer directly into a wall outlet.

Clean the cartridge contacts

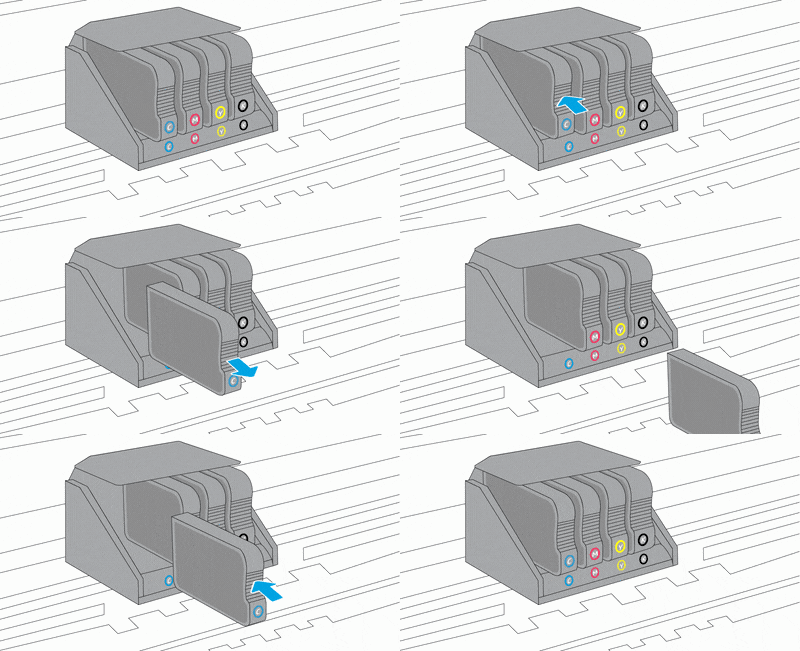
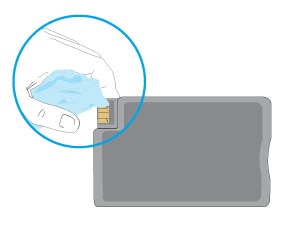
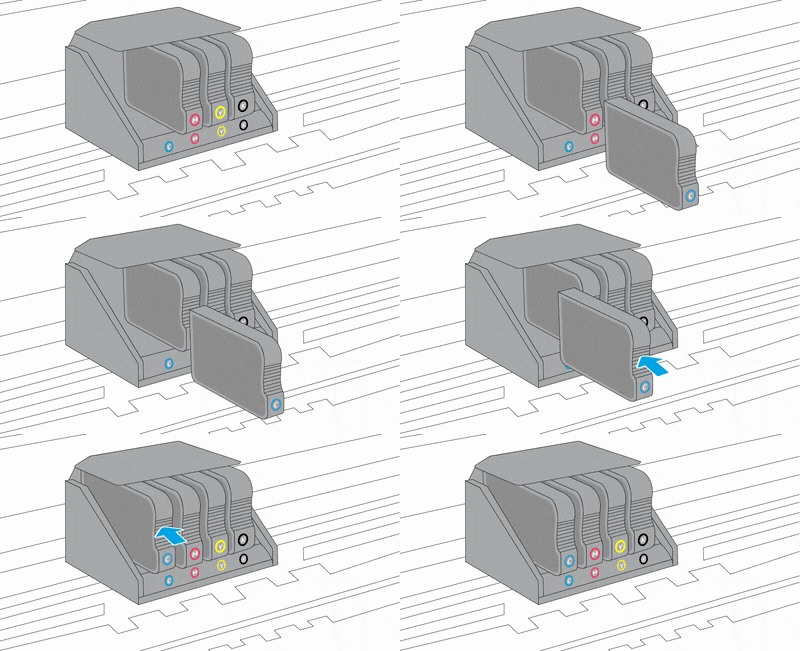
Remove the cartridge indicated by the error message, clean the electrical contacts, and then reinsert the cartridge in its color-coded slot.

  1. Turn the printer on.

  2. Open the door to access to the cartridges.

  3. Wait until the carriage stops moving before you continue.

  4. Push in on the front of the cartridge indicated in the error message, and then remove it.

    Animation of replacing the cartridges

  5. Wipe the electrical contact on the cartridge with a lint-free cloth.

  6. Insert the cartridge into its color-coded slot until it snaps into place.

  7. Repeat these steps for any other cartridges indicated in the error message.

  8. Close the cartridge access door.

Hope this helps! Keep me posted. 


And, Welcome to the HP Support Community. 


Please click “Accept as Solution” if you feel my post solved your issue, it will help others find the solution.

Click the “Kudos, Thumbs Up" on the bottom right to say “Thanks” for helping

† The opinions expressed above are the personal opinions of the authors, not of HP. By using this site, you accept the <a href="https://www8.hp.com/us/en/terms-of-use.html" class="udrlinesmall">Terms of Use</a> and <a href="/t5/custom/page/page-id/hp.rulespage" class="udrlinesmall"> Rules of Participation</a>.