-
×InformationNeed Windows 11 help?Check documents on compatibility, FAQs, upgrade information and available fixes.
Windows 11 Support Center. -
-
×InformationNeed Windows 11 help?Check documents on compatibility, FAQs, upgrade information and available fixes.
Windows 11 Support Center. -
- HP Community
- Printers
- Printer Setup, Software & Drivers
- Can't change photo tray size from 5 X 7 to 4 X 6

Create an account on the HP Community to personalize your profile and ask a question
01-18-2021 06:04 PM
Trying to figure out how to change the default photo paper size from 5 X 7 to 4 X 6. I have 4 X 6 photo paper loaded in the photo tray, but the printer doesn't recognize it. Also there is only a 5 X 7 option to print from the HP Smart App. I'm using an iMac and iPhone. Please help!
01-22-2021 12:18 AM
Hi @sundvlz,
I'd like to help!
Open the print dialog to select and change available settings when printing photos.
NOTE:Print settings and menu names vary by printer and the application you are printing from.
-
Before printing, edit the photo to improve colors, brightness, contrast and any other appearance settings.
-
Open the photo, click File, and then click Print. For the Photos app, select a layout, and then click Print.
The print settings window opens.
-
If you do not see the following options in the window, click Show Details.

-
Select your printer from the Printer menu.
-
Some printers offer predefined Presets for photo printing. From the Presets menu, select an option that applies to your print job or paper type.
-
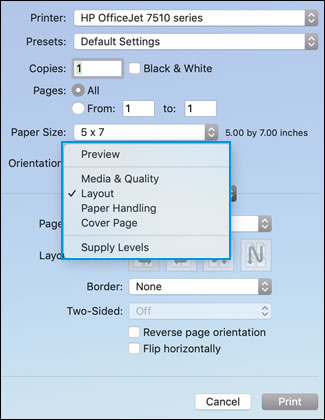
From the Paper Size menu, select the paper you are printing on. If necessary, click the arrow at the top or bottom of the pop-up menu to display more sizes.
Some paper sizes have multiple options. Make sure to select the correct borderless paper size, such as 4x6 in/10x15 cm Borderless, if you want to print a borderless photo.
-
Select the Orientation of the photo (portrait for vertical or landscape for horizontal).
-
Click the unnamed print options menu at the center of the dialog to access more print settings.

-
Make any print job settings changes. Refer to the following list for more information.
-
Paper type: Selecting the correct paper type ensures the printer properly applies the ink to the paper you loaded in the printer. Click Media & Quality, and then click the Paper Type menu.
-
Paper tray: Select the tray you loaded the photo paper into, if your printer has more than one tray. Click Media & Quality, and then select an option from the Feed from menu.
-
Print in color or black and white: Select or de-select Black & White on the main dialog. The Presets menu also includes color and black and white options.
-
Adjust print quality: Click Media & Quality, and then move the Quality slider to the desired setting.
-
Add or remove a border: Click Layout, and then click the Border menu to select a border width or select None for borderless prints.
-
Mirror printing: Reverse an image or document for printing iron-on transfers. Click Layout, and then select the Flip horizontally option.
-
-
Click Print
Hope this helps! Keep me posted.
And, Welcome to the HP Support Community.
Please click “Accept as Solution” if you feel my post solved your issue, it will help others find the solution.
Click the “Kudos, Thumbs Up" on the bottom right to say “Thanks” for helping
