-
×InformationNeed Windows 11 help?Check documents on compatibility, FAQs, upgrade information and available fixes.
Windows 11 Support Center. -
-
×InformationNeed Windows 11 help?Check documents on compatibility, FAQs, upgrade information and available fixes.
Windows 11 Support Center. -
- HP Community
- Printers
- Printer Setup, Software & Drivers
- Drivers for Big Sur macOS

Create an account on the HP Community to personalize your profile and ask a question
02-04-2021 10:07 AM
Updated Mac OS to Big Sur 11.1 and can't find an HP driver for Big Sur on HP website need to use my scanning features! Is HP going to have a driver for Big Sur?
02-09-2021 08:53 AM
Hi @Rosey75,
I'd like to help!
Try updating mac and printer firmware
To update the printer's firmware, refer - HP Printers - Updating or Upgrading Printer Firmware
To update Mac, try these steps - How to update the software on your Mac
Uninstall HP Easy Start
- Click on the Spotlight icon and type HP Uninstaller or by opening HP Easy Start.
- Click on Continue to uninstall the software.
- When prompted for a password, type in your system password
- You can also uninstall by opening HP Easy Start.
Download HP Easy Start and install the printer.
- Download HP Easy Start and follow the on-screen to complete the installation.
You may also add the AirPrint printer to the Mac printer queue
Add the Air Print printer to the Mac printer queue
Confirm you are using Air Print by adding the printer in System Preferences.
- Click the Apple menu, click System Preferences, and then click Print & Scan or Printers & Scanners.
- Check if your printer name displays in the Printers list, and then do one of the following steps.
- If your printer is listed, remove and re-add the printer to confirm it is set up for Air Print. Click the printer name, click the minus sign "-" to delete the printer, click the plus sign "+"click Add Printer or Scanner, click the printer name and then continue to the next step.
- If your printer is not listed, click the plus sign, click Add Printer or Scanner, click the name of your printer, and then continue to the next step.
- Confirm Air Print or Secure Air Print displays in the Use or Print Using menu, and then click Add.
- Open a document or photo, click File, and then click Print.
If the issue persists, try scanning using Apple Image Capture
Apple Image Capture comes with macOS and OS X and provides a quick and simple way to scan.

-
Place the document or photo print side down on the scanner glass, and then close the scanner lid.
If your printer has an automatic document feeder (ADF), use it to scan multiple page documents at one time.
CAUTION:
Do not load photos in the ADF.
-
Open Finder
 , and then click Go in the top menu bar.
 -
Click Applications, and then double-click Image Capture.
-
Click your printer name in the Devices or Shared list.
NOTE:
If a Software for this device is not installed message displays after you select your printer, click Install, and then follow the instructions to complete the installation.
-
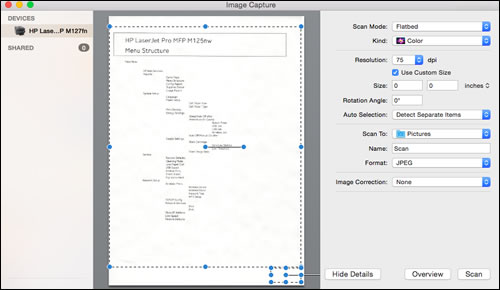
Click Show Details at the bottom of the screen.
A preview of the scan displays, and then change any of the following settings:
-
Scan Mode: Select the scanning bed or automatic document feeder.
-
Kind: Set scan as color, black and white, or optimized for text only documents.
-
Resolution: Higher resolution produces better quality images by using more dots (pixels) per inch. Higher resolution increases the file size of the scan. Use a higher resolution for scans with graphics or items that require the best detail. If you are scanning black and white text, higher resolution is not necessary.
-
Size: Use a standard paper size or select the Use Custom Size option.
-
Scan to: Select the folder you want scans to save to or use the Mail option to attach the scan to an Apple Mail email message.
-
Name: Type a name for the saved scan file.
-
Format: Select the file type for the scan.
NOTE:
To save multiple page documents or multiple images into a single file, select the PDF or TIFF format, and then select the box next to Combine into single document. This feature is only available with these formats.
-
Image Correction: Click the pop-up menu, and then select Manual to display color change options such as brightness and saturation.
-
-
Click Scan.
Hope this helps! Keep me posted.
And, Welcome to the HP Support Community.
Please click “Accept as Solution” if you feel my post solved your issue, it will help others find the solution.
Click the “Kudos, Thumbs Up" on the bottom right to say “Thanks” for helping
