-
×InformationNeed Windows 11 help?Check documents on compatibility, FAQs, upgrade information and available fixes.
Windows 11 Support Center. -
-
×InformationNeed Windows 11 help?Check documents on compatibility, FAQs, upgrade information and available fixes.
Windows 11 Support Center. -
- HP Community
- Printers
- Printer Setup, Software & Drivers
- Re: HP printers don't work

Create an account on the HP Community to personalize your profile and ask a question
Your account also allows you to connect with HP support faster, access a personal dashboard to manage all of your devices in one place, view warranty information, case status and more.
Check some of the most frequent questions about Instant Ink: HP INSTANT INK, HP+ PLANS: INK AND TONER.
Check out our WINDOWS 11 Support Center info about: OPTIMIZATION, KNOWN ISSUES, FAQs AND MORE.

It has been a while since anyone has replied. Simply ask a new question if you would like to start the discussion again.
04-26-2020 09:00 PM
 HP Recommended
Product: HP Envy Photo 6255
Operating System: Microsoft Windows 10 (64-bit)
I have an HP ENVY Photo 6255 printer/scanner. It stopped working the other day. I ran HP Print and Scan Doctor 5.3.1. It failed to resolve the problem (doesn't print). I followed all the steps in HP Print and Scan Doctor 5.3.1. When it failed to resolve problem it sent me to virtual agent. Virtual agent was more worthless than HP Print and Scan Doctor 5.3.1. After virtual agent failed it directed me to this forum. I hope someone on this forum knows more than HP does.
The printer control panel looks fine. HP Print and Scan Doctor identifies the printer. Yes we disconnected power cord and reconnected (that is part of the steps the print/scan doctor walks one through). The printer control panel settings show it is connected. There is not unable to find printer on the computer - it's just that nothing prints. (Yes it has paper in it. When it runs out of paper - the printer tells you it is out of paper). Anyone have an idea?
Solved! Go to Solution.
1 ACCEPTED SOLUTION
Accepted Solutions
05-02-2020 06:51 AM
HP Recommended
I understand your concerns.
We are experiencing longer than expected wait times to reach an agent due to the CoViD-19 impact and there might have been issues in you getting the expected resolution on the issue.
Do not worry. Please try the below steps and let us know.
Please perform the Clean reinstallation of Pre-installed HP drivers
1. In Windows, search for and open Programs and features
2. Select your HP Printer
3. Select Uninstall
4. In Windows, search for and open Devices and printers
5. In the Devices and Printers windows look for your HP printer. If you see it listed right-click on it and choose ‘Delete’ or ‘Remove Device’
6. Open up the run command with the “Windows key + R” key combo.
7. Type printui.exe /s and click Ok. (Note: there is a space in between “printui.exe” and “/s”)
8. Click on the “Drivers” tab
9. Look for HP Printer driver. If you see it Click on it and click Remove at the bottom
10. Select Ok
11. Select Apply and Ok on the Print Server Properties windows
12. Close Devices and Printers, restart the computer.
Click here to download the HP Full-featured driver.
Once downloaded, make sure to run the file to start the installation and follow the on-screen instructions.
Have a nice day!!
6 REPLIES 6
05-01-2020 03:39 PM
HP Recommended
@righthere Welcome to HP Community!
I understand that you are getting out of the paper message.
Do not worry. I will try to fix the issue.
During a print or copy job, the printer does not feed paper from the paper tray. The printer might make noises as though it is printing, but no paper moves through it. A Load Paper in Tray message displays on the printer or an Out of Paper message displays on the computer.
Step 1: Check the paper, and then reload it
Review paper type and handling guidelines, and then check and reload paper in the input tray.
-
Review these guidelines on paper quality, condition, and handling to prevent paper feed issues.
-
Use only good quality paper that meets printer specifications.
-
Store all paper in a dry, cool place. Paper feed issues occur more often in humid environments.
-
Do not print on paper that is already printed. The dampness of the ink can cause the paper to stick together.
-
Wait for the printer to complete a job or to display a Load Paper in Tray message before loading more paper.
-
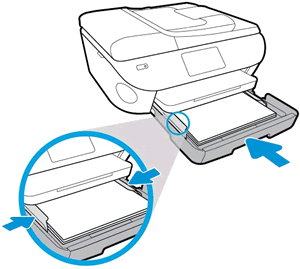
-
Remove any paper from the paper tray.
-
Remove any severely bent, wrinkled, or torn paper found in the stack.
-
Check for obstructions inside the paper tray. Make sure nothing blocks the paper from engaging with the rollers. Even small pieces of paper can cause paper feed issues.
-
Hold the stack of paper with both hands, and then tap the bottom edge of the stack on a flat surface so that the stack is even on all sides.
-
Load the stack of paper into the paper tray until the paper stops, and then gently slide in the paper width guides until they lightly rest against the edges of the paper.
-
Push the paper tray in until it snaps into place.
-
Select or confirm the paper size you loaded on the control panel display.
Try to print. If the issue persists, continue to the next step.
Step 2: Clean the paper tray rollers
Clean dust and fibers from the paper tray rollers underneath the printer.
-
Carefully lift the printer and set it on its side.
-
While supporting the printer with one hand, pull the paper tray open to expose the paper rollers underneath the printer.
-
Lightly dampen a lint-free cloth with distilled water, and then squeeze any excess liquid from the cloth.
-
Press the cloth against the rollers inside the printer, and then rotate the rollers upwards with your fingers. Apply a moderate amount of pressure to remove any dust or dirt buildup.
-
Allow the rollers to dry completely (approximately 10 minutes).
-
Close the paper tray, and then set the printer upright.
Try to print. If the error persists, continue to the next step.
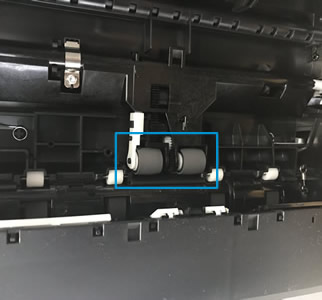
Step 3: Clean the paper feed rollers
Clean dust and fibers from the paper feed rollers inside the ink cartridge access area.
-
Turn off the printer, and then disconnect the power cord.
warning:
To avoid risk of injuries or electric shock, disconnect the power cord before reaching inside the printer.
-
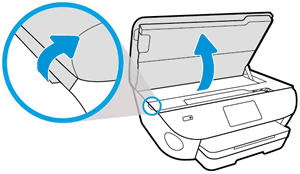
Open the ink cartridge access door.
-
Lightly dampen a lint-free cloth with distilled water, and then squeeze any excess liquid from the cloth.
-
Press the cloth against the rollers inside the printer, and then rotate the rollers upwards with your fingers. Apply a moderate amount of pressure to remove any dust or dirt buildup.
-
Allow the rollers to dry completely (approximately 10 minutes).
-
Close the ink cartridge access door.
-
Reconnect the power cord to the rear of the printer, and then turn on the printer.
Try to print. If the error persists, continue to the next step.
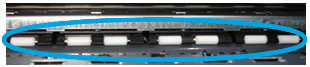
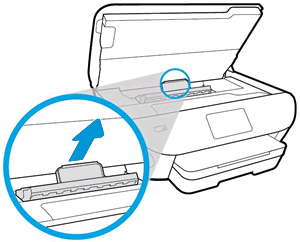
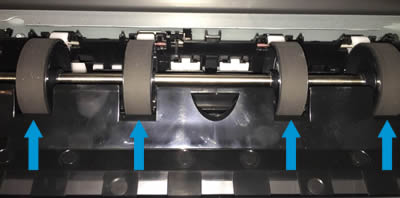
Step 4: Clean the duplexing rollers
Clean dust and fibers from the duplexing rollers behind the ink access area.
-
Turn off the printer, and then disconnect the power cord.
warning:
To avoid risk of injuries or electric shock, disconnect the power cord before reaching inside the printer.
-
Open the ink cartridge access door.
-
Pull out the paper path cover.
-
Lightly dampen a lint-free cloth with distilled water, and then squeeze any excess liquid from the cloth.
-
Press the cloth against the rollers, and then rotate them upward with your fingers. Apply a moderate amount of pressure to remove any dust or dirt buildup.
-
Allow the rollers to dry completely (approximately 10 minutes).
-
Insert the paper path cover back into the printer.
-
Close the ink cartridge access door.
-
Reconnect the power cord to the rear of the printer, and then turn on the printer.
Try to print. If the error persists, continue to the next step.
Step 5: Reset the printer
Sometimes an error persists even though there is no paper feed issue. Reset the printer, and then try to print.
-
With the printer turned on, disconnect the power cord from the printer.
-
Unplug the power cord from the power source.
-
Wait 60 seconds.
-
Reconnect the power cord to a wall outlet and to the printer.
note:
HP recommends plugging the printer directly into a wall outlet.
Keep us posted,
If you would like to thank us for our efforts to help you,
Give us a virtual high-five by clicking the 'Thumbs Up' icon below, followed by clicking on the "Accept as solution" on this post,
Have a great day!
05-01-2020 03:54 PM
HP Recommended
I did not say there was a paper jam issue, I said the printer doesn't work! I have two HP computers. I can print from one of the computers, but not the other computer. The HP desktop pavillion computer is unable to print to the printer. The same computer can use the printer for scanning, but not for printing! So it can make a connection - but it can not print. Configuration is the same on both computers. HP printers don't work!
05-01-2020 04:15 PM
HP Recommended
Thank you for the update.
In that case, I would suggest you contact our phone support and check for the support option. They will help you.
Here is how you can get in touch with phone support.
1)Click on this link - www.hp.com/contacthp/
2)Select the product type.
3)Enter the serial number of your device or select let HP detect your product option.
4)Select the country from the drop-down.
5)You should see the HP phone support number or Chat option listed.
Have a nice day!!
05-01-2020 04:26 PM
HP Recommended
Your first response was correct information - irrelevant but correct.
Your second response contains false information.
I am logged in at the link you provided in the second response. THERE IS NO OPTION FOR PHONE SUPPORT!
I entered the product information with serial number I selected it as well as country. I am given the option to use the virtual agent. I went through that twice once two days ago and again yesterday. There is also a messenger option. I tried the messenger option. The chat option states that most mesesnger submissions are responded to in less than 2 hours. I am not waiting on 28 hours with NO RESPONSE. support fails! Phone support doesn't seem to exist. i can not find it on the web page you provided. If phone support does exist why don't you post it here directly? Let me get a screen shot to post for you. I will put it in the next message.
You claimed phone support exists. I can not find it and your link doesn't show any phone number to call! False information.
05-01-2020 04:33 PM
HP Recommended
OK here is a screen shot of the webpage you sent me to after I logged in and selected the problematic product information. I edited the screenshot to partially erase the serial number. As you can see there is no phone number provided for phone support. As I mentioned previously I used messenger yesterday and today and no one ever responds. Where is HP support? I see no support for products under warranty!

05-02-2020 06:51 AM
HP Recommended
I understand your concerns.
We are experiencing longer than expected wait times to reach an agent due to the CoViD-19 impact and there might have been issues in you getting the expected resolution on the issue.
Do not worry. Please try the below steps and let us know.
Please perform the Clean reinstallation of Pre-installed HP drivers
1. In Windows, search for and open Programs and features
2. Select your HP Printer
3. Select Uninstall
4. In Windows, search for and open Devices and printers
5. In the Devices and Printers windows look for your HP printer. If you see it listed right-click on it and choose ‘Delete’ or ‘Remove Device’
6. Open up the run command with the “Windows key + R” key combo.
7. Type printui.exe /s and click Ok. (Note: there is a space in between “printui.exe” and “/s”)
8. Click on the “Drivers” tab
9. Look for HP Printer driver. If you see it Click on it and click Remove at the bottom
10. Select Ok
11. Select Apply and Ok on the Print Server Properties windows
12. Close Devices and Printers, restart the computer.
Click here to download the HP Full-featured driver.
Once downloaded, make sure to run the file to start the installation and follow the on-screen instructions.
Have a nice day!!
Be alert for scammers posting fake support phone numbers and/or email addresses on the community.
If you think you have received a fake HP Support message, please report it to us by clicking on "Flag Post".
† The opinions expressed above are the personal opinions of the authors, not of HP. By using this site, you accept the Terms of Use and Rules of Participation.


Didn't find what you were looking for?
Ask the community
† The opinions expressed above are the personal opinions of the authors, not of HP. By using this site, you accept the <a href="https://www8.hp.com/us/en/terms-of-use.html" class="udrlinesmall">Terms of Use</a> and <a href="/t5/custom/page/page-id/hp.rulespage" class="udrlinesmall"> Rules of Participation</a>.