-
1
×InformationNeed Windows 11 help?Check documents on compatibility, FAQs, upgrade information and available fixes.
Windows 11 Support Center. -
-
1
×InformationNeed Windows 11 help?Check documents on compatibility, FAQs, upgrade information and available fixes.
Windows 11 Support Center. -
- HP Community
- Printers
- Printer Setup, Software & Drivers
- How do I change my wifi network on my printer?

Create an account on the HP Community to personalize your profile and ask a question
08-28-2018 09:54 AM
i have just bought a macbook air 2017. i want to set up my printer to the macbook and cannot do so. i have changed my wifi network since ive had my printer and was wondering how i can change it on the computer? i have contacted apple and the problem isnt on their end its on yours.
08-29-2018 03:23 PM - edited 08-29-2018 03:44 PM
Welcome to HP Support Forums.
I came across your post and would like to assist you.
I understand that you would like to change the wifi network on your HP Deskjet 2540 All-in-One Printer.
Check for obstructions between the printer and the router: Remove any metal objects between the printer, the computer, and the access point (router). Objects such as refrigerators or metal bookcases can interfere with wireless signals.
Check for other devices that emit radio and wireless signals: Move any devices that emit radio signals, such as microwaves and cordless telephones, farther away from the printer. They can interfere with wireless signals.
Let us restore the printer's network settings and then have the printer connect the wireless network. The following steps will help to restore the network settings.
- Press the Wireless button and the Cancel button from the printer control panel at the same time, and then hold them for 5 seconds.
To connect the HP Deskjet 2540 series to an integrated wireless WLAN 802.11 network, you will need a wireless 802.11b/g/n network that includes a wireless router or access point. The HP Deskjet 2540 series only supports connections using 2.4GHz.
Please perform the following steps to connect the printer to the wireless network:
- The printer and the Mac computer must be on the network to communicate.
- Press and hold the Wireless button
for three seconds until the wireless light blinks. Press the WPS button on your router, and then wait while the printer connects to the network.
You may print a network configuration page to confirm that the printer is connected to the wireless network:
- Once the printer appears to be connected to the wireless network, you may carry out the following steps on your Macbook.
Click the Apple menu, click System Preferences, and then click Print & Scan or Printers & Scanners.
Figure : Example of the Printers & Scanners window
Check if your printer name displays in the Printers list, and then do one of the following steps.
If your printer is listed, remove and re-add the printer to confirm it is set up for AirPrint. Click the printer name, click the minus sign
to delete the printer, click the plus sign
, click Add Printer or Scanner, click the printer name and then continue to the next step.
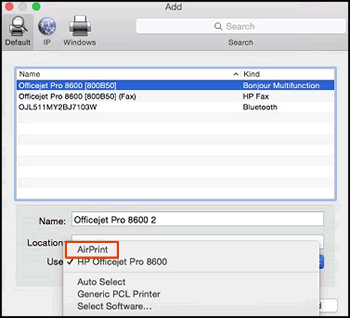
If your printer is not listed, click the plus sign, click Add Printer or Scanner, click the name of your printer, and then continue to the next step.
Confirm AirPrint displays in the Use or Print Using menu, and then click Add.
Figure : AirPrint displays in the Use menu
Open a document or photo, click File, and then click Print.
If the wireless printer is not found while adding it in Mac OS then please perform the following steps:
Check the network environment for issues and make sure the computer and printer are up to date if the Mac does not locate the AirPrint printer.
Step 1: Check the network status and printer connection
Make sure your network is working correctly and that the printer is ready for the AirPrint setup.
On the printer, open the Wireless network or Settings menu to make sure the wireless signal is turned on and enabled. Make sure the Wireless icon
light is on and steady.
On the Mac, click the network icon
in the menu bar to view the network name and status of the connection.
If the selected network is not yours (for instance, if you connected to a neighbor's or a guest network), you must connect to your own network to complete the printer setup.
If the network signal strength is weak, move the computer and printer closer to the router, position the devices away from large metal objects such as bookcases, and move away from devices that emit radio signals such as microwaves and cordless phones.
If the network status is not connected, confirm that your network is working correctly, then check the status again. Make sure a check mark displays next to the network name.
If you are using a wireless router, review the router’s documentation or support site to confirm the following requirements and updates:
Check the router band: Many routers can operate in both 2.4 GHz and 5.0 GHz frequency bands, but not all HP printers support both bands. Make sure the 2.4 GHz router band is enabled and broadcasting. If the router broadcasts separate network names (SSIDs) for each band, connect the printer to the 2.4 GHz band SSID.
Bonjour support: HP recommends routers that support Bonjour, Apple's network discovery software. Connecting with Bonjour is the best way to find the printer and support wireless printing.
Check for updated router firmware: Outdated router firmware can impact performance and security, or prevent the router from accessing the Internet.
Add the AirPrint printer to the Mac.
If the printer is not found, continue to the next step.
Step 2: Check for Mac updates and the latest printer firmware
Update the Mac and the printer firmware to ensure the latest features are available.
On the Mac, click the Apple menu, click About this Mac, click Software Update, select any available updates, and then click Update All.
NOTE: You might need to refresh the page to view the latest updates. Click Store in the top menu bar, and then click Reload Page to update the list. If no updates display, the Mac is up to date.
Go to Updating Firmware on the Printer for steps to download and install any new version of the printer firmware.
Try to print. If the issue persists, continue to the next step.
Step 3: Restart the computer, printer, and router
Restart the computer, printer, and router to resolve any network or communication error states.
NOTE: These steps temporarily disconnect network and Internet connections and require restarting your computer. Complete any tasks or downloads in progress before continuing.
Disconnect the power cord from the router.
Turn off the printer.
Close all running programs on your computer, including the HP software installation window, and then shut down the computer.
Reconnect the power cord to the router, and then wait for the Internet activity light to display a normal connected status.
Turn on the printer.
Turn on the computer.
Try adding the AirPrint printer to the Mac.
Step 4: Reset the printing system
Resetting the Mac printing system can be useful for resolving printer connection and installation problems.
CAUTION: This process removes all printers and scanners from the printers queue and clears all print jobs and print settings from the system, including printers and scanners that are not from HP.
Click the Apple menu, click System Preferences, and then click Print & Scan or Printers & Scanners.
Right-click (or Ctrl + click) anywhere inside the Printers pane, and then click Reset printing system.
Figure : Click Reset printing system
Click Reset or OK.
If prompted, type your user name and password, and then click OK to confirm the reset.
Turn off the printer, wait five seconds, and then turn the printer on.
In the Printers window, click the Add button
to re-add the printer as Airprint to the Mac.
I genuinely hope this helps. Feel free to keep me posted.
Good luck!