-
1
×InformationNeed Windows 11 help?Check documents on compatibility, FAQs, upgrade information and available fixes.
Windows 11 Support Center. -
-
1
×InformationNeed Windows 11 help?Check documents on compatibility, FAQs, upgrade information and available fixes.
Windows 11 Support Center. -
- HP Community
- Printers
- Printer Setup, Software & Drivers
- How to hock up another computer to HP Envy Photo 7855.

Create an account on the HP Community to personalize your profile and ask a question
03-15-2021 01:28 PM
I have 2 computers. A laptop and a desktop. The choices I have to scan to are for the same computer. How do I add the other one? (One is wireless, and one is not.
03-18-2021 08:54 PM
HI@Foxglove77, Welcome to the HP Support Community!
Request you to follow the below troubleshooting steps
Use the steps in this document to troubleshoot wired home network issues in Windows 10. Test the network connection after performing each step. If the problem is not fixed, continue to the next step.
Step 1: Completing the network connection checklist
Use the following checklist to solve many problems with home networks in Windows 10:
-
Check all of the network cables and wires. A loose or disconnected cable or wire prevents a network connection and Internet access. Check the following connections:
-
Network cable from the modem to the network hub (or router).
-
Network cable from the network hub to the RJ-45 network port on the computer.
-
Network cable between two computers.
-
-
Check the lights on the network hub. The lights can often show the location of a connection problem.
-
If you are trying to connect to another computer on the network, make sure that computer is turned on.
-
Check the firewall settings on all the computers on the network. The firewall settings may be preventing network access.
After performing the items in the checklist, try to connect to the network.
-
If you do not experience further problems with the network, you are done.
-
If you are still experiencing problems with the network, check the network status.
Step 2: Checking the network status in the Network and Sharing Center
Use the following steps to open the Network and Sharing Center to check the network status in Windows 10.
-
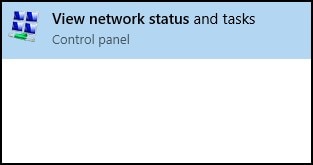
Type view network status in the search box on the taskbar, then select View network status and tasks from the search results.
-
Check the View your active networks section at the top of the page. If the computer is not connected to a network, a You are currently not connected to any networks message displays.
-
If you are not connected to a network, perform the steps in the network connection checklist to check the cables and hardware.
-
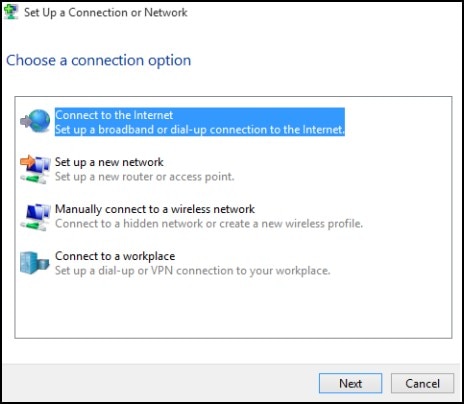
If still not connected to a network, click Set up a new connection or network, then click Connect to the Internet.
-
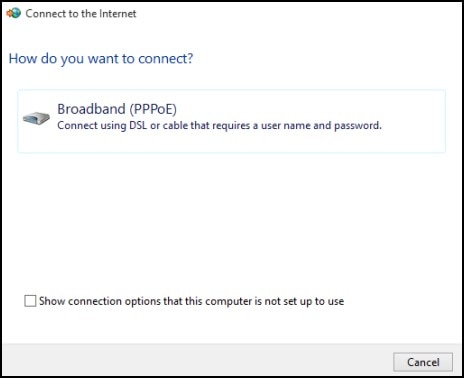
Click Broadband (PPPoE).
-
Enter the User name and Password for the network connection, give the connection a name, and then click Connect.
If you do not experience further problems with the network, you are done.
If you are still experiencing problems with the network, enable network discovery and file sharing.
Step 3: Setting advanced sharing options
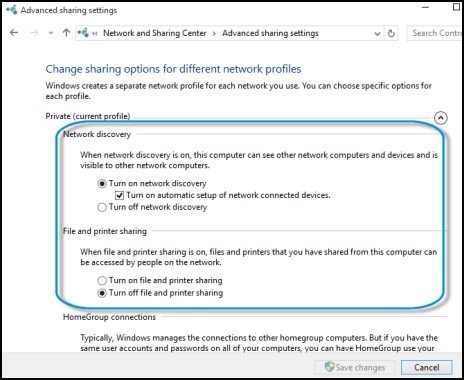
Windows 10 enables you to set up network discovery and file sharing across the network. Enabling network discovery and file sharing sometimes fixes network problems. Follow these steps to set the advanced sharing options and turn on network discovery in Windows 10:
-
Type view network status in the search box on the taskbar, then select View network status and tasks from the search results.
-
Click Change advanced sharing settings.
-
Select Turn on network discovery and Turn on file and printer sharing.
-
Click Save changes.
-
If you do not experience further problems with the network, you are done.
-
If you are still experiencing problems with the network, use the Windows 10 diagnostic and troubleshooting tools.
-
Step 4: Using Windows 10 diagnostic and troubleshooting tools
Windows 10 includes a network diagnostic tool and a network troubleshooter. Both tools help to identify network problems and provide possible solutions.
Running Windows Network Diagnostics
Using the Windows 10 Network and Internet Troubleshooter
Step 5: Reinstalling the network adapter software in Device Manager
Network problems might be caused by an issue with the network adapter. Follow these steps to reinstall the network adapter in Windows 10 Device Manager:
-
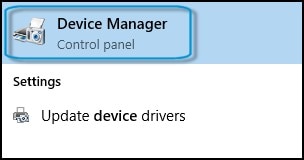
Type device manager in the search box on the taskbar, then select Device Manager from the search results.
-
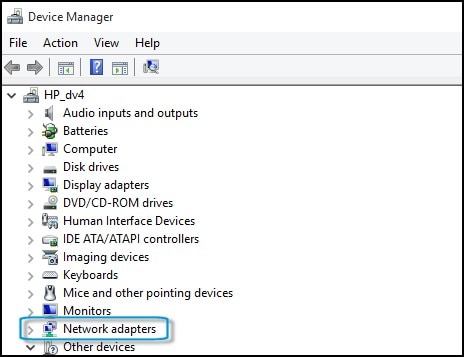
Double-click the Network adapters category.
-
Right-click the name of the Network Adapter and select Uninstall.
-
On the Confirm Device Uninstall window, click OK.
-
When the network adapter software had been uninstalled, restart the computer. The computer will reinstall the device driver software.
-
After the computer restarts and completes the installation of the device driver software, try connecting to the Internet.
If you do not experience further problems with the network, you are done.
If you are still experiencing problems with the network, update the network drivers.
Step 6: Updating the network drivers
Network problems might be caused by outdated network drivers. Using a computer that has Internet access, check the HP Customer Support page for network drivers for your product. If one is available, download and install the latest update for the network hardware that you use. Use the following steps to download and install the latest driver for your hardware.
-
Go to the HP Customer Support - Software and Driver Downloads page.
-
If a Let's identify your product to get started page displays, click Laptop or Desktop.
-
Type the model name for your computer in the Or, enter your serial number field, and then click Submit. For example, type Pavilion HPE h8-1360t Desktop, and then click Submit.
-
If a Matching products web page opens, select your model number from the list.
The software results page for your computer displays with the default operating system selected.
-
From the list of available software and driver categories, click Driver-Network, and then find the network or modem driver update (for example, Realtek RTL8139 LAN Driver Update).
-
Click Download, and then follow the on-screen instructions to download and install the update.
-
When done, restart the computer and connect to the Internet again.
-
If you do not experience further problems with the network, you are done.
-
If you are still experiencing problems with the network, use Microsoft System Restore.
-
Step 7: Using Microsoft System Restore
Microsoft System Restore uses automatically-saved information to restore your computer to a certain point in time. Using Microsoft System Restore can restore your computer to a time when the Internet connection was working properly. For more information, refer to Using Microsoft System Restore.
When you have restored your computer, try connecting to the Internet again. If you do not experience further problems with the network, you are done.
If you are still experiencing problems with the network, use HP System Recovery.
Step 8: Reset your computer
Microsoft provides a reset feature that repairs your computer by reinstalling the operating system. Before using this option, make sure you back up all your important files. For more information, see Resetting Your Computer (Windows 10).
Hope this helps! Keep me posted.
Please click “Accept as Solution” if you feel my post solved your issue, it will help others find the solution.
Click the “Kudos, Thumbs Up" on the bottom right to say “Thanks” for helping!
Have a great day!