-
×InformationNeed Windows 11 help?Check documents on compatibility, FAQs, upgrade information and available fixes.
Windows 11 Support Center. -
-
×InformationNeed Windows 11 help?Check documents on compatibility, FAQs, upgrade information and available fixes.
Windows 11 Support Center. -
- HP Community
- Printers
- Printer Setup, Software & Drivers
- How to set custom photo print paper sizes

Create an account on the HP Community to personalize your profile and ask a question
Your account also allows you to connect with HP support faster, access a personal dashboard to manage all of your devices in one place, view warranty information, case status and more.
Check some of the most frequent questions about Instant Ink: HP INSTANT INK, HP+ PLANS: INK AND TONER.
Check out our WINDOWS 11 Support Center info about: OPTIMIZATION, KNOWN ISSUES, FAQs AND MORE.

It has been a while since anyone has replied. Simply ask a new question if you would like to start the discussion again.
11-28-2018 12:30 AM
 HP Recommended
Product: HP Photosmart Premium C309a
Operating System: Microsoft Windows 10 (64-bit)
I cannot set the custom photo paper size for printing abnormal photos. When I set Custom for paper size I find a dialog box to set the size. I find I am requested to reset Printer properties before I can sucessfully complete the size selected e.g. 4X6.5 ins using 4X6 paper with tab. Since the tab extends the horizontal print to 6.5 ins when selecting borderless printing, I can fit the photo I wish to print. I have tried various property settings several times without being able to progress past the dialog box loop after I enter the size. What are the precise steps to successfully set a custom size?
5 REPLIES 5
11-29-2018 01:10 PM
HP Recommended
Welcome to HP forums, I see that you want to create a custom size to print photos.
-
Load the custom-size paper into the paper input tray.
-
Open the item you want to print.
-
Click File, and then click Print.
-
In the Print window, click Preferences, Properties, or Printer Properties.
-
Click the Paper/Quality tab, and then click Custom.
NOTE:
If you do not see a Custom button on the Paper/Quality tab of the printer properties window, skip to the section to Create custom paper sizes from Devices and Printers.
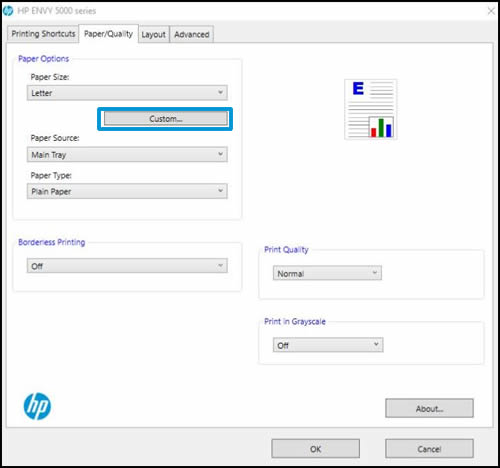
-
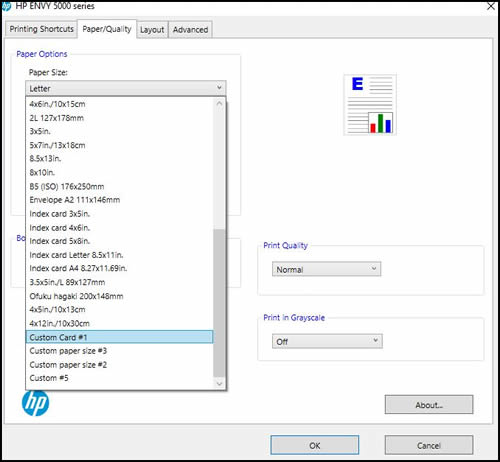
In the Custom Paper Size window, click New.
-
Type a name for your custom paper size, adjust the width and height to your preference, and then click OK.
-
Your custom paper size is now saved. You can select this custom paper size in the future and edit it if needed.
-
Click OK, click the Paper Size drop-down menu, and then scroll down and select your custom paper size.
-
Make any other preference changes if necessary, and then click OK.
-
Click OK or Print to print the document.
You can refer to this HP document for more assistance:- Click here
Let me know how it goes.
To thank me for my efforts to help you, please mark my post as an accepted solution so that it benefits several others.
Cheers.
Sandytechy20
I am an HP Employee
12-01-2018 12:33 PM
HP Recommended
I cannot use your recommendations because the C309a does not use "Properties" or "Preferences" at the beginning of a routing to "Custom". Rather, it uses "Settings" instead. When reaching the setting for "Custom" under the heading "HP Photosmart C309a series Properties", this is the only mention of "Properties". "The Custom Paper Size" dialog box contins the name "Custom" including a "Borderless" tick box, "Width" and "Length" entry boxes for Inches or Millimeters. At the top is a dialog "The custom paper size you have just defined will not become available for selection until you have exited and re-entered the Printing/Preferences/Properties."
I could be wrong but so far I have not found such a path is available. It appears that the "Custom" subroutine selected when the C309a program was written does not match any path to such a subroutine. Hence I find myself in a loop with combinations of selections under "Settings".
Is there an alternative or perhaps a bug that was corrected. I have downloaded the C309a program a few times over several years directly from HP to avoid cold booting the C309a program to reset the Fax portion. I still cold boot so it appears that any bugs, if so, have not been fixed.
12-04-2018 02:15 PM
HP Recommended
Thanks for the reply.
I appreciate your time and effort.
I am sending you a private message. Please check the mailbox icon at the top-right corner of this screen.
I hope this helps resolve this issue completely.
Cheers.
Sandytechy20
I am an HP Employee
Be alert for scammers posting fake support phone numbers and/or email addresses on the community.
If you think you have received a fake HP Support message, please report it to us by clicking on "Flag Post".
† The opinions expressed above are the personal opinions of the authors, not of HP. By using this site, you accept the Terms of Use and Rules of Participation.


Didn't find what you were looking for?
Ask the community
† The opinions expressed above are the personal opinions of the authors, not of HP. By using this site, you accept the <a href="https://www8.hp.com/us/en/terms-of-use.html" class="udrlinesmall">Terms of Use</a> and <a href="/t5/custom/page/page-id/hp.rulespage" class="udrlinesmall"> Rules of Participation</a>.