-
×InformationNeed Windows 11 help?Check documents on compatibility, FAQs, upgrade information and available fixes.
Windows 11 Support Center. -
-
×InformationNeed Windows 11 help?Check documents on compatibility, FAQs, upgrade information and available fixes.
Windows 11 Support Center. -
- HP Community
- Printers
- Printer Setup, Software & Drivers
- Hp 7110 Printer Setup Cartridge Problem

Create an account on the HP Community to personalize your profile and ask a question
Your account also allows you to connect with HP support faster, access a personal dashboard to manage all of your devices in one place, view warranty information, case status and more.
Check some of the most frequent questions about Instant Ink: HP INSTANT INK, HP+ PLANS: INK AND TONER.
Check out our WINDOWS 11 Support Center info about: OPTIMIZATION, KNOWN ISSUES, FAQs AND MORE.

It has been a while since anyone has replied. Simply ask a new question if you would like to start the discussion again.
11-23-2020 11:48 PM
 HP Recommended
Product: HP 7110
Operating System: Microsoft Windows 10 (64-bit)
Greetings,
I have a like-new 7110 printer with the original 4 setup cartridges. However, the black one (932) keeps "flashing". I have done numerous on-off cycles. It still flashes. I cannot initialize the printer. There seems to be some procedure that can be run to bypass or reset the printer, according to my searches. A private message would be just fine. Thank you. LGBU
Solved! Go to Solution.
1 ACCEPTED SOLUTION
Accepted Solutions
11-25-2020 08:29 PM
HP Recommended
I think I have solved my own problem (HP 7110) In my case, the printer could not pass 'initialization', complaining about the black setup cartridge (932). I tried all the reset stuff, which did not work.
Out of desperation, I took apart the printhead assembly, cleaned the contacts behind the control board. Still, it complained about 932. After several rounds, I found, surprisingly, that the Ink Cartridge Connector Board (not sure about its proper name; it has 4 blue connectors and 4 springs) has a thin film below it, which was loose on the black cartridge end. It was very hard to notice. I just added a touch of super glue around the edge with a thin piece of paper, pressed it hard for a few minutes. After that, all went well. The printer passed the initialization and was able to print. There seem to be two sealing films (flimsy indeed) on the 932/933 printhead assembly -- one over the top of the ink reservoirs and the other at the bottom of the connector board. It turns out all my setup cartridges are still almost full. Hope this might be helpful for others struggling with the same problem. LGBU
4 REPLIES 4
11-24-2020 10:01 AM
HP Recommended
Hi @lgbu,
I'd like to help!
Try the below suggestions -
Reset the product
- With the printer turned on, disconnect the power cord from the rear of the printer.
- Unplug the power cord from the wall outlet.
- Wait at least 60 seconds.
- Plug the power cord back into the wall outlet.
- Reconnect the power cord to the printer.
- Turn the printer on. HP recommends plugging the printer directly into a wall outlet.
Clean the cartridge contacts
Remove the cartridge indicated by the error message, clean the electrical contacts, and then reinsert the cartridge in its color-coded slot.
-
Turn the printer on.
-
Open the door to access to the cartridges.
-
Wait until the carriage stops moving before you continue.
-
Push in on the front of the cartridge indicated in the error message, and then remove it.

-
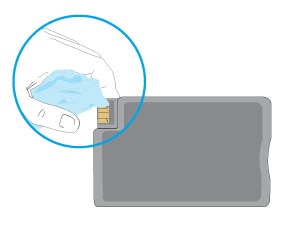
Wipe the electrical contact on the cartridge with a lint-free cloth.
-
Insert the cartridge into its color-coded slot until it snaps into place.

-
Repeat these steps for any other cartridges indicated in the error message.
-
Close the cartridge access door
Hope this helps! Keep me posted.
And, Welcome to the HP Support Community.
Please click “Accept as Solution” if you feel my post solved your issue, it will help others find the solution.
Click the “Kudos, Thumbs Up" on the bottom right to say “Thanks” for helping
11-24-2020 02:14 PM
HP Recommended
Thank you so much for your prompt reply. I tried what you mentioned before and tried it again when I saw your response. However, the alert light is still on. I shook the Black (932) setup cartridge. I could hear liquid sound. There seems to be ink inside. The contact seems clean and I wiped it anyway. Still no progress. Do have have a dead setup cartridge?
Any suggestion to bypass this "setup stage" . Looking forward to hearing from you again.
lgbu
11-25-2020 08:29 PM
HP Recommended
I think I have solved my own problem (HP 7110) In my case, the printer could not pass 'initialization', complaining about the black setup cartridge (932). I tried all the reset stuff, which did not work.
Out of desperation, I took apart the printhead assembly, cleaned the contacts behind the control board. Still, it complained about 932. After several rounds, I found, surprisingly, that the Ink Cartridge Connector Board (not sure about its proper name; it has 4 blue connectors and 4 springs) has a thin film below it, which was loose on the black cartridge end. It was very hard to notice. I just added a touch of super glue around the edge with a thin piece of paper, pressed it hard for a few minutes. After that, all went well. The printer passed the initialization and was able to print. There seem to be two sealing films (flimsy indeed) on the 932/933 printhead assembly -- one over the top of the ink reservoirs and the other at the bottom of the connector board. It turns out all my setup cartridges are still almost full. Hope this might be helpful for others struggling with the same problem. LGBU
11-28-2020 05:13 PM
HP Recommended
I am glad the issue is resolved.
If you need further assistance feel free to reach out to us.
Have a great day ahead!
Please click “Accepted Solution” on my public post if you feel my post solved your issue, it will help others find the solution. Click the “Kudos/Thumbs Up" on the bottom right to say “Thanks” for helping!
Be alert for scammers posting fake support phone numbers and/or email addresses on the community.
If you think you have received a fake HP Support message, please report it to us by clicking on "Flag Post".
† The opinions expressed above are the personal opinions of the authors, not of HP. By using this site, you accept the Terms of Use and Rules of Participation.


Didn't find what you were looking for?
Ask the community
† The opinions expressed above are the personal opinions of the authors, not of HP. By using this site, you accept the <a href="https://www8.hp.com/us/en/terms-of-use.html" class="udrlinesmall">Terms of Use</a> and <a href="/t5/custom/page/page-id/hp.rulespage" class="udrlinesmall"> Rules of Participation</a>.