• ×
    Information
    Need Windows 11 help?
    Check documents on compatibility, FAQs, upgrade information and available fixes.
    Windows 11 Support Center.
  • post a message
  • ×
    Information
    Need Windows 11 help?
    Check documents on compatibility, FAQs, upgrade information and available fixes.
    Windows 11 Support Center.
  • post a message
Guidelines
Join the HP Community Solve‑a‑thon | Help Others & Share Your Solutions | Live on Zoom | 2:30 PM to 2:30 AM IST | Every Wednesday Click here to know more
Check some of the most frequent questions about Instant Ink: HP INSTANT INK, HP+ PLANS: INK AND TONER.


Check out our WINDOWS 11 Support Center info about: OPTIMIZATION, KNOWN ISSUES, FAQs AND MORE.
HP Recommended
Example: Hp Envy 7640
Microsoft Windows 10 (64-bit)

Hi; My Hp Envy 7640 is giving out a Hard Rumbling Dragging Scraping like Noise when printing. Almost like it needs Oiling. Does it? Or is a driver going out? It's also jamming a lot when printing. It's only 2-3yrs old.


1 REPLY 1
HP Recommended

@Le_Aust98


Clean the paper feed and pick rollers


Use the following steps to clean the rollers inside the printer, and then try to print a Printer Status Report.

Gather these materials:

  • Long, lint-free cotton swabs

  • A clean, lint-free cloth, or any cloth that does not come apart or leave fibers

  • Distilled, filtered, or bottled water (tap water might damage the printer)

Step 1: Clean the paper feed rollers

Follow these steps to clean the paper feed rollers.

  1. Remove any paper in the printer before you clean the rollers.

  2. Press the Power button to turn off the printer, if it is not off already.

  3. Disconnect the power cord from the rear of the printer.

       WARNING: 

    You must disconnect the power cord before reaching inside the printer to avoid risk of injuries or electric shock.

  4. Open the cartridge access door.

    Figure : Open the cartridge access door

    Image: Open the cartridge access door
  5. Locate the paper path cover, grasp the handle, and then lift up to remove it.

    Figure: Remove the paper path cover

    Image: Remove the paper path cover
  6. Lightly dampen a clean swab with the water, and then squeeze any excess liquid from the swab.

  7. Press the swab against the rollers inside the printer, and then rotate the rollers upwards with your fingers. Apply a moderate amount of pressure to remove any dust or dirt buildup.

    Figure : Clean the rollers in the paper path access area

    Image: Clean the rollers in the paper path access area
  8. Replace the paper path cover, and then close the cartridge access door.

    Figure: Close the cartridge access door

    Image: Close the cartridge access door
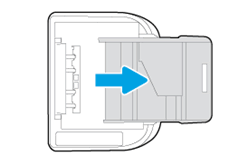
  9. Gently turn the printer onto its right side, and then pull open the input tray so that you can access its underside.

    Figure: Turn the printer onto its right side

    Image: Turn the printer onto its right side
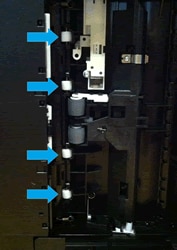
  10. Lightly dampen a clean swab with the water, and then squeeze any excess liquid from the swab.

  11. Clean the rollers in the gap behind the input tray. Make sure that none of the rollers are not missing, that they turn easily, and that they are springy when you press them.

    Figure: Clean the rollers behind the input tray

    Image: Clean the rollers behind the input tray
  12. Before you turn the printer over to its normal position, continue to the next step to clean the paper pick rollers.

Step 2: Clean the paper pick rollers


Follow these steps to clean the paper pick rollers.

  1. Make sure that the printer is turned off, the power cord is disconnected, and the printer is turned onto its right side with the input tray open.

  2. Lightly dampen a clean swab with the water, and then squeeze any excess liquid from the swab.

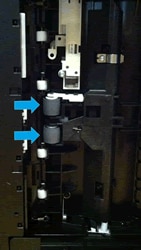
  3. Press the swab against the rollers inside the printer, and then rotate the rollers upwards with your fingers. Apply a moderate amount of pressure to remove any dust or dirt buildup.

    Figure: Clean the paper pick rollers

    Image: Clean the paper pick rollers
  4. Make sure that the rollers turn easily when you press them.

  5. Allow the rollers to dry for 10 to 15 minutes.

  6. Turn the printer over to its normal position.

  7. Reconnect the power cord to the rear of the printer, and then press the Power button to turn on the printer.

Step 3: Clean the ADF rollers and the separator pad (optional)


If you are trying to copy or fax a document, and the document does not feed into the Automatic Document Feeder (ADF), clean the ADF rollers and the separator pad. If you are not using the ADF, continue to the next step.

  1. Turn off the printer.

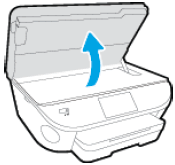
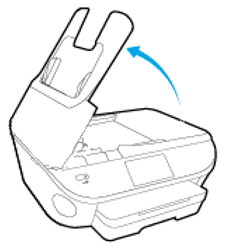
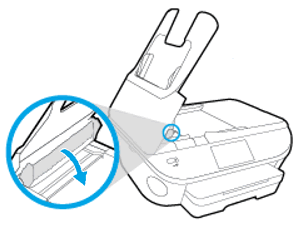
  2. Lift the ADF cover.

    Image: Lift the ADF cover

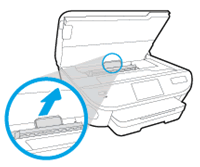
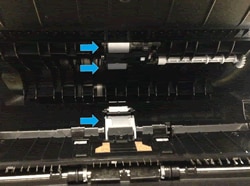
  3. Pull down the ADF mechanism to access the rollers and separator pad.

    Image: Pull down  the ADF mechanism.

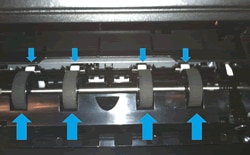
  4. Lightly dampen a clean, lint-free cloth with distilled water, and then squeeze any excess liquid from the cloth.

  5. Press the cloth against the rollers, and then rotate them upward with your fingers. Apply a moderate amount of pressure to remove any dust or dirt buildup.

    Image: Clean the rollers and separator pad

  6. Allow the rollers to dry for 10 to 15 minutes.

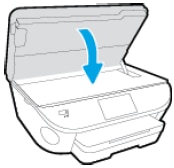
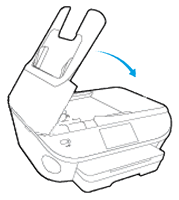
  7. Close the ADF cover.

    Image: Close the ADF cover

  8. Reconnect the power cord to the rear of the printer, and then turn on the printer.

Keep me posted, how it goes!

If the information I've provided was helpful, give us some reinforcement by clicking the Accepted Solution and Kudos buttons, that'll help us and others see that we've got the answers!


Thank you for joining the HP Community.

Have a great day!

Cheers:)

Raj1788
I am an HP Employee 

† The opinions expressed above are the personal opinions of the authors, not of HP. By using this site, you accept the <a href="https://www8.hp.com/us/en/terms-of-use.html" class="udrlinesmall">Terms of Use</a> and <a href="/t5/custom/page/page-id/hp.rulespage" class="udrlinesmall"> Rules of Participation</a>.