-
×InformationNeed Windows 11 help?Check documents on compatibility, FAQs, upgrade information and available fixes.
Windows 11 Support Center. -
-
×InformationNeed Windows 11 help?Check documents on compatibility, FAQs, upgrade information and available fixes.
Windows 11 Support Center. -
- HP Community
- Printers
- Printer Wireless, Networking & Internet
- Weird Connectivity Issue with MFP 137fnw

Create an account on the HP Community to personalize your profile and ask a question
07-31-2021 08:16 AM
I've got a brand new MFP 137fnw here and I'm running out of ideas on how to get it properly set up.
Here's the situation:
The printer is connected to WiFi successfully, and is set to have a static IP, but for some reason, none of the computers in the network (Windows 10) are able to auto-discover the printer.
If, however, the printer is added manually using its IP and selecting the driver from the list, everything works.
I've been trying to look for a solution for a while now but no luck thus far, so hoping someone here will be able to help.
Thanks in advance!
08-03-2021 08:09 AM
Hi @Bryan0001,
I'd like to help with the printer connectivity issue.
Please follow the below suggestions to resolve the issue -
Use HP Print and Scan Doctor to check connectivity
Download a special version of HP Print and Scan Doctor specifically created to help with printer offline conditions.
- Download HP Print and Scan Doctor.
- Run HPPSdr.exe from the download location on your computer.
- Once HP Print and Scan Doctor opens, click Start, and then select your printer.
- If your printer in not in the list, turn it off and on, and then click Retry.
- If there is a connection problem, follow the instructions in HP Print and Scan Doctor.
- If a screen prompts you to turn on printer updates, click Yes.
- If a screen prompts you to make your printer the default printer, click Yes.
Connect the printer to TCP/IP port
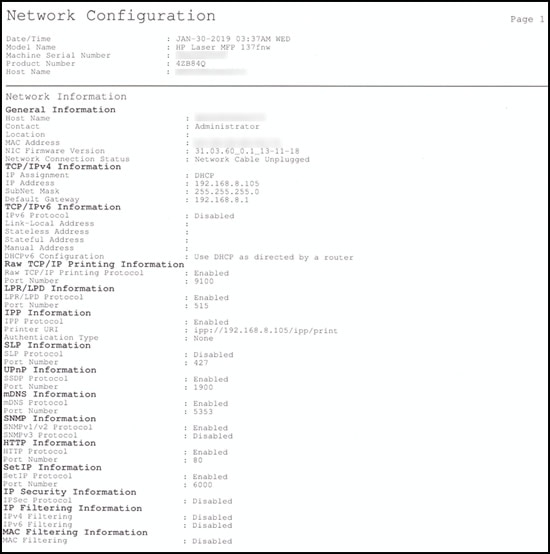
Print a Network Configuration report
-
Turn on the printer.
-
On the printer control panel, press the Menu button
 .
. -
Select Network, and then press OK.
-
Select Network Conf., and then press OK.
-
Select Yes, and then press OK.
The Network Configuration report prints on two pages.

a. Click Start/Devices and Printers. Right-click on your HP Printer. Select Printer Properties. Select the Ports tab at the top.
b. Select Add Port. Select Standard TCP/IP Port. Select New Port.
c. Follow the Add Port Wizard. Under Printer Name or IP Address, Example: 192.168.1.15. The IP address will be copied under Port Name.
d. Select Next and Finish the Wizard.
Hope this helps! Keep me posted.
And, Welcome to the HP Support Community.
Please click “Accept as Solution” if you feel my post solved your issue, it will help o
08-24-2021 07:33 AM
Thanks for jumping in to help!
Unfortunately, none of this helps.
To clarify, there *is* an IP connection with the printer. The printer pings, its web interface opens, and if I add the printer on Windows via the HTTP option, it works.
But what doesn't work, for some reason, is discovery (no computers in the network can "find" the printer). Nor regular printing (only via HTTP). For that reason, HP Print and Scan Doctor also fails to find the printer.
Any additional help or tips would be appreciated.
09-01-2021 06:43 AM
Thank you for sharing the image.
Let's try and uninstall the printer software from the root level on your PC and install the full feature printer software.
First, unplug the USB cable from the printer if present.
- Go to Control panel – Programs and feature – Select all the HP printer entries and uninstall them.
- Now go to Control panel – Devices and printer – Select all the printer entries and remove the device.
- Restart your computer.
- Click the bottom-left Start button on desktop, type device manager in the search box and tap Device Manager on the menu.
- Once in device manager, click on the view tab in the top & choose “Show hidden devices”.
- Then from the device manager list, check the entries under “Printer” – If there are any entries, please right click and choose “uninstall” – In the confirm device un-install pop-up, make sure you select the box which says “Delete the driver software for this device".
- Also, check the entries under "printer queue" and "imaging devices" and repeat the same exercise. Delete any printer entry or any entry which says “Unknown device”.
- Once done, close device-manger. Then press the "windows key" + "r" to get the "Run" window open - Type "printui.exe /s" and press enter.
- Under print server properties, go to drivers - remove any entry there as well.
- Again, go running window, type – “c:/programdata” – Go to Hewlett Packard folder, remove any printer related folders & files.
- Once done you can try cleaning out your temporary files and cached files. You can try using automated applications like some cleaner software's that you can download from the internet.
- Now restart your computer again.
- Open the Run window again, type “services.msc” and press ok to get services window.
- Scroll down to “Remote Procedure Call (RPC)” – right-click and go to properties. Make sure the service is started and startup type is “Automatic”.
- Now scroll up and go to “Function Discovery Provider Host” – right-click and select properties – Change the startup type to “manual” and start the service.
- Repeat the same exercise on “Function Discovery Resource Publication” as well
- Windows image acquisition stop and restart the service
Reinstall the drivers from the Software and drivers page and follow the on-screen instructions.
Let me know how this goes!

