-
×InformationNeed Windows 11 help?Check documents on compatibility, FAQs, upgrade information and available fixes.
Windows 11 Support Center. -
-
×InformationNeed Windows 11 help?Check documents on compatibility, FAQs, upgrade information and available fixes.
Windows 11 Support Center. -
- HP Community
- Printers
- Printing Errors or Lights & Stuck Print Jobs
- 5520 Cartridge problem after Black Ink problem

Create an account on the HP Community to personalize your profile and ask a question
01-13-2019 11:03 AM - edited 01-13-2019 11:08 AM
I had the Black printing problem and read that I should clean the Printhead.
. I watched YouTubes & took printer to bits. I cleaned the printhead. Printer worked for about 3 days but not used much. Then black ink stopped working. Again cleaned Printhead and Automatic cleaner. Now message 'One or more Cartridges appear to be missing or damaged.' All 4 cartridges are just about new.
I am now an expert at taking the printer to bits, removing the Printhead, re-attaching the cables BUT not at fixing it. I have spent hours! Thinking of buying a HP Envy 5030. My printer over 5 years old so might just scrap it.
01-14-2019 03:37 PM
Welcome to HP forums, I see that you are getting cartridge error.
Make sure that the cartridges are inserted correctly.
-
If the printer is off, press the Power button to turn it on.
-
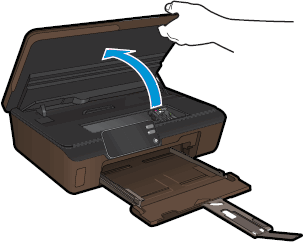
Open the cartridge access door. The carriage moves to the access area.
Figure : Open the cartridge access door
-
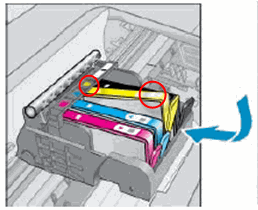
Make sure that the color icon on each cartridge label matches the color icon on the carriage slot.
Figure : Match the colored icons
-
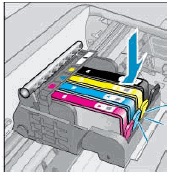
Run your finger along the top of the cartridges to check for any unseated cartridges in the carriage. Press down on any cartridge that is higher than the others to firmly snap the cartridge into its slot.
Figure : Snap the cartridge into its slot
-
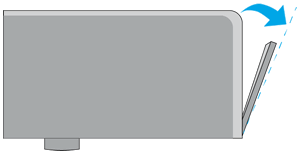
If the cartridge does not snap into place, or does not seat properly, remove the cartridge from the carriage. Gently bend the tab away from the cartridge, and then reinsert the cartridge into the carriage.
CAUTION:
Be careful not to bend the tab out more than 1.27 cm (0.5 in). Moving the tab too far might damage the cartridge or cause the tab to break off.
Figure : Example of bending the tab away from the cartridge
-
Bend the tab away from the cartridge
-
Do not bend the tab more than 1.27 cm (0.5 in)
-
-
-
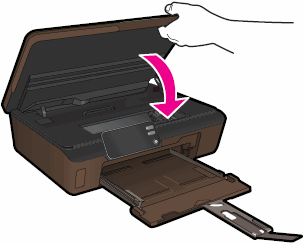
Close the cartridge access door.
Figure : Close the cartridge access door
Clean the cartridge contacts
-
Gather the following materials:
-
Clean, lint-free swabs that will not come apart or leave fibers
-
A sheet of paper to place the cartridges on
-
-
Press the Power button to turn on the printer.
-
Open the cartridge access door. The carriage moves to the access area.
Figure : Open the cartridge access door

-
Disconnect the power cord from the rear of the printer.
-
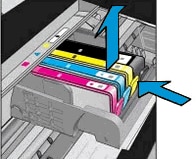
Press the tab on the front of the cartridge in to release it, and then pull up on the cartridge to remove it from the slot.
Figure : Remove the cartridge from the slot
-
Hold the cartridge by its sides, and then find the electrical contacts on the bottom of the cartridge. The electrical contacts are four small rectangles of copper-colored metal.
Figure : Cartridge contacts
-
-
Cartridge contacts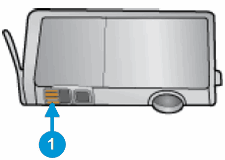
-
-
Inspect the contacts for ink and debris buildup.
-
Wipe the contacts with a swab until no debris remains on them.
CAUTION:
Be careful to wipe only the contacts. Do not smear any ink or debris elsewhere on the cartridge.
-
Turn the cartridge on its side, and then place it onto the sheet of paper.
-
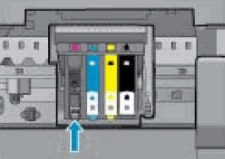
Locate the electrical contacts in the cartridge slot. The contacts are four copper-colored pins.
Figure : Location of the cartridge slot contacts
-
Wipe the contacts with a swab until no debris remains on them.
-
With the contacts facing down, slide the cartridge into its slot. Press down on the cartridge until it clicks into place.
Figure : Insert the cartridge

-
Repeat these steps to clean and reinsert any of the other cartridges.
-
Close the cartridge access door.
Figure : Close the cartridge access door

-
Reconnect the power cord to the rear of the printer.
-
Press the Power button to turn on the printer if it does not turn on automatically.
You can refer to this HP document for more assistance:- Click here
Let me know how it goes.
To thank me for my efforts to help you, please mark my post as an accepted solution so that it benefits several others.
Cheers.
Sandytechy20
I am an HP Employee
01-14-2019 04:36 PM
Thank you for your reply. I found the information that you shared elsewhere, and had tried it all. My cartridges were almost new. The contacts looked to be very clean but I still wiped them. It still did not work. I decided to scrap the printer as my time is valuable - I spent hours on it, after almost fixing the black ink problem. I have bought an HP Envy that should arrive tomorrow as I like the new HP ink solution. It would have been helpful if the message had said which cartridge. The fact that it didn’t might imply a different fault could cause this message. Thank you again for your time.
01-14-2019 07:52 PM
Thanks for writing back to us.
Good to know that you are receiving a new HP Printer.
Feel free to contact us in future if you need any assistance in the future.
Cheers.
Sandytechy20
I am an HP Employee
