• ×
    Information
    Need Windows 11 help?
    Check documents on compatibility, FAQs, upgrade information and available fixes.
    Windows 11 Support Center.
  • post a message
  • ×
    Information
    Need Windows 11 help?
    Check documents on compatibility, FAQs, upgrade information and available fixes.
    Windows 11 Support Center.
  • post a message
Guidelines
Experiencing 'Printer Blocked' or 'Printer Error' message? Click here for more information.
Check some of the most frequent questions about Instant Ink: HP INSTANT INK, HP+ PLANS: INK AND TONER.


Check out our Black or Color Ink Not Printing, Other Print Quality Issues info about: Print quality and Cartridge Issues.
HP Recommended
Officejet 7610
Microsoft Windows XP (64-bit)

I installed three new HP ink cartridges yesterday.  The first two installed normally, but upon installing the third (yellow) cartridge I noted that it did not seat normally.  Moreover I received the message that the subject cartridge had not been installed.  The main problem lies in the fact that I am unable to remove the defective cartridge and do not wish to risk damaging the printer head by exerting excessive force.  It seems only reasonable that there should be a simple remedy for extracting the cartridge short of having to take my printer to a service facility.

1 REPLY 1
HP Recommended

@ SpunkyC


Welcome to HP forums, I see that you are unable to remove the cartridge from the printhead.


Reset the printer.

  1. Turn the printer on, if it is not already on.

  2. Wait until the printer is idle and silent before you continue.

  3. With the printer turned on, disconnect the power cord from the rear of the printer.

  4. Unplug the power cord from the wall outlet.

  5. Wait at least 60 seconds.

  6. Plug the power cord back into the wall outlet.

    NOTE: 

    HP recommends connecting the printer power cord directly to the wall outlet.

  7. Reconnect the power cord to the rear of the printer.

  8. Turn on the printer, if it does not automatically turn on.

  9. Wait until the printer is idle and silent before you proceed.

Make sure that the carriage can move freely.

  1. Press the Power button to turn on the printer if it is not on already.

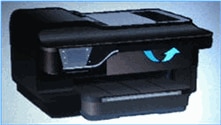
  2. On the front of the printer, open the carriage access door.

    NOTE: 

    The carriage might try to move into the access area. If it does, allow it to move to that position.

    Figure : Open the carriage access door

    Image: Open the carriage access door.
  3. With the printer turned on, disconnect the power cord from the rear of the printer.

  4. Unplug the power cord from the power source or electrical outlet.

       WARNING: 

    To avoid the risk of electrical shock, you must unplug the power cord before moving the carriage by hand and resetting the paper feed mechanism.

  5. Check for and remove any loose paper or objects that might be restricting the carriage.

  6. Use a flashlight to check for torn pieces of paper that might remain inside the printer. If any torn pieces of paper remain inside the printer, more jams are likely to occur.

    Use a flashlight

    Paper jammed in carriage path

    Image: Use a flashlight            Image: Paper jammed in carriage path

  7. Reach into the cartridge access area, and then manually move the carriage.

    • If the carriage is stuck on the right side of the printer, move the carriage to the left side of the printer.

    • If the carriage is stuck on the left side of the printer, move the carriage to the right side of the printer.

    • If the carriage is stuck in the middle of the printer, move the carriage to the right side of the printer.

  8. Remove any loose paper or objects found.

  9. Make sure that the carriage can move freely across the width of the printer by gently pushing the carriage to the left, and then to the right.

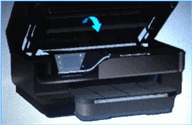
  10. Close the carriage access door.

    Figure : Close the carriage access door

    Image: Close the carriage access door.
  11. Reconnect the power cord to the rear of the printer.

  12. Plug the power cord back into the power source or electrical outlet.

  13. Press the Power button to turn on the printer.

You can refer to this HP document for more assistance:- Click here


Let me know how it goes.

To thank me for my efforts to help you, please mark my post as an accepted solution so that it benefits several others.

Cheers.

Sandytechy20
I am an HP Employee

† The opinions expressed above are the personal opinions of the authors, not of HP. By using this site, you accept the <a href="https://www8.hp.com/us/en/terms-of-use.html" class="udrlinesmall">Terms of Use</a> and <a href="/t5/custom/page/page-id/hp.rulespage" class="udrlinesmall"> Rules of Participation</a>.