-
×InformationNeed Windows 11 help?Check documents on compatibility, FAQs, upgrade information and available fixes.
Windows 11 Support Center. -
-
×InformationNeed Windows 11 help?Check documents on compatibility, FAQs, upgrade information and available fixes.
Windows 11 Support Center. -
- HP Community
- Printers
- Printing Errors or Lights & Stuck Print Jobs
- Brand new HP Envy makes grinding noise / plus color banding...

Create an account on the HP Community to personalize your profile and ask a question
05-07-2018 01:30 PM
Only have have this printer for two weeks and every time the printer comes out of standby to start printing there is a terrible grinding noise that the gears are making. Sounds like the printer is falling apart. If a second page is printed soon after the first prints then the noise goes away and the printed sounds normal. This grinding noise has happened from the first time I used the printer. And a new problem has shown up. Yesterday when I printed a color photo there were pale bands running running horizantly on the paper from top to bottom.
05-08-2018 12:02 PM
Welcome to the HP Forums!
This is a wonderful place to converse with the community, get assistance and find tips.
I reviewed your post and understand that the printer is making grinding noise when you print something and when the printer starts.
I'll be glad to help you 🙂
In order that I may provide you with an accurate solution, I will need a few more details.
- Does this happen when you make a copy?
- Have you made any software or hardware changes on the computer?
Meanwhile, I would like to inform you that you usually when you turn on the printer it performs maintenance and that is why you hear those noises and it is normal. However, as you have mentioned that it happens even when you print I recommend you follow the below steps to resolve this issue.
The cause of the problem may be that the printer’s clutch actuator is disengaged. Follow the instructions under “Re-engaging the clutch actuator” to re-engage the clutch actuator.
Instructions
If your printer has room for both ink cartridges to be installed at the same time, ensure that both ink cartridges are properly installed in the printer. The printer will not function without both cartridges. Please refer to the printer's User’s Guide for instructions on installing the ink cartridges.
The cause of the problem may be that the printer’s clutch actuator is disengaged. To fix a disengaged clutch actuator, try the following procedure.
Re-engaging the clutch actuator
- Open the printer lid.
- Unplug the power cord from the back of the printer.
- Remove the upper (OUT) paper tray.
- Slide the carriage assembly, which holds the ink cartridges, away from the left side of the printer. If the carriage assembly moves away from the left side, go to Step 6.
- OR
- If the carriage assembly is stuck on the left side, go to the next step.
- If the carriage assembly is stuck at the left side, push down on the large black bar directly above the three large rollers and release it so it springs back up. Gently lift the carriage assembly and try moving it to the right again.
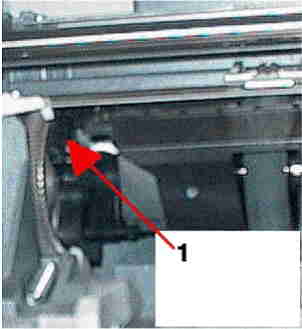
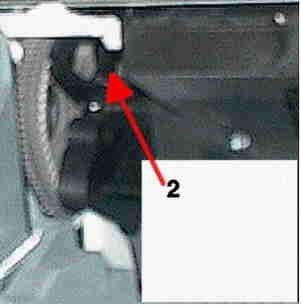
- Locate the metal gear assembly at the left side of the printer. Directly above the metal gear is the clutch actuator (also known as the slider arm), a small plastic arm approximately 50 mm (2 inches) in length. On the right edge of the clutch actuator is an "arrow" or "tooth" that points down. The arrow on the clutch actuator should be in the space to the right of the metal gear and plastic half-gear just below the clutch actuator.
- If the arrow on the clutch actuator is stuck between the metal gear and plastic half-gear, (see Figure 1) lift the clutch actuator and move the arrow to the right of the plastic half-gear. Once the arrow on the clutch actuator is to the right of the gears (see Figure 2), the clutch actuator should move freely right and left about 12.7 mm (0.5 inches).
Figure : Incorrectly placed actuator arm
-
- Actuator is out of position
Figure : Correctly placed actuator arm
-
- Actuator is in the correct position
- Replace the upper (OUT) paper tray.
- Close the printer lid.
- Plug in the power cord to the back of the printer.
- Turn the printer on.
- Print a self-test by pressing and holding the Resume button (upper button) for five seconds and releasing it.
- If the same problem still exists, verify that both ink cartridges are snapped into the carriage tightly and are not loose. See the printer User's Guide or the HP Toolbox in Windows for instructions on installing the ink cartridges.
- Try printing a self-test again.
Let me know how it goes. Awaiting your reply!
If the solution provided helps, please mark this as “Accepted Solution” as it will help several others with the same issue to get it resolved without hassles.
Good day! Take care 🙂
Cheers!
The_Fossette
I am an HP Employee
05-08-2018 04:58 PM
Hi - The color banding occurs either when I make a copy or send a photo from my desktop. I just send a another photo to the printer and it is still doing it.
I have not made any software or hardware changes on my computer. On the the instructions you sent for re- engaging the clutch actuator above. The instructions do not seem to be for my HP Envy 7800 series. I could not find any metal gear assembly at all in the printer. The instructions did not seem to apply to my product. But as odd as this may sound, in looking carefully around for the gear I may have fixed the problem because when I printed the test page and two other pages, the printer did not make the terribe gear grinding noise at all, only normal print sounds. The color banding problem still exists though . I made a scan of one of the printed images ( which clearly shows the bands across the image) and wanted to attach it to this email but cannot find any way to do this.
05-08-2018 05:24 PM
Thank you for the information.
I am glad to know that the grinding noise issue is resolved.
I recommend you follow the steps in the below artilce to resolve the color binding issue.
Let me know how it goes. Awaiting your reply!
If the solution provided helps, please mark this as “Accepted Solution” as it will help several others with the same issue to get it resolved without hassles.
Good day! Take care 🙂
Cheers!
The_Fossette
I am an HP Employee