-
×InformationNeed Windows 11 help?Check documents on compatibility, FAQs, upgrade information and available fixes.
Windows 11 Support Center. -
-
×InformationNeed Windows 11 help?Check documents on compatibility, FAQs, upgrade information and available fixes.
Windows 11 Support Center. -
- HP Community
- Printers
- Printing Errors or Lights & Stuck Print Jobs
- C3-6140 error Color Laser MFP 178nw unresolved after change ...

Create an account on the HP Community to personalize your profile and ask a question
Your account also allows you to connect with HP support faster, access a personal dashboard to manage all of your devices in one place, view warranty information, case status and more.
Check some of the most frequent questions about Instant Ink: HP INSTANT INK, HP+ PLANS: INK AND TONER.
Check out our Black or Color Ink Not Printing, Other Print Quality Issues info about: Print quality and Cartridge Issues.

It has been a while since anyone has replied. Simply ask a new question if you would like to start the discussion again.
06-26-2022 10:57 AM
 HP Recommended
Product: color laser MFP 178nw
Operating System: Microsoft Windows 7 (64-bit)
Hello I had a C3 6140 error on my printer. I bought a new HP image unit and changed it accordingly but it seems that the printer does not recognise that I have made the change.
I can't print and still have the C3 6140 error on the printer. I restarted my printer several times, clean it properly nothing help.
Is there any trick to reset the printer after having changed the image unit ?
Thank you for your help
4 REPLIES 4
06-29-2022 10:45 AM
HP Recommended
Hi @Lft1,
Welcome to the HP Support Community
I'd like to help!
I understand you are getting an error on your Color Laser MFP 178nw printer.
Kindly follow the below steps to resolve the issue:
Step 1: Perform a power reset on the printer.
- Turn the printer on, if it is not already on.
- Wait until the printer is idle and silent before you continue.
- With the printer turned on, disconnect the power cord from the rear of the printer.
- Unplug the power cord from the wall outlet.
- Wait at least 60 seconds.
- Plug the power cord back into the wall outlet.
NOTE: HP Recommends connecting the printer power cord directly to the wall outlet - Reconnect the power cord to the rear of the printer.
- Turn on the printer, if it does not automatically turn on.
- Wait until the printer is idle and silent before you proceed.
Step 2: Check for packing materials and paper
Check the toner cartridge and printer for any packing materials and paper that might be causing the error message.
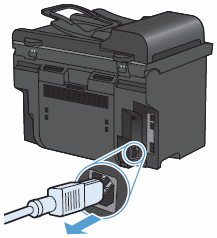
Turn off the printer.
Disconnect the power cord from the printer.
Figure: Disconnecting the power cord
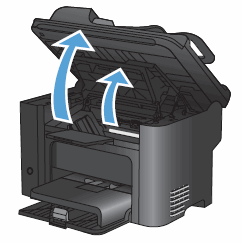
Open the toner cartridge door.
Figure: Opening the toner cartridge door
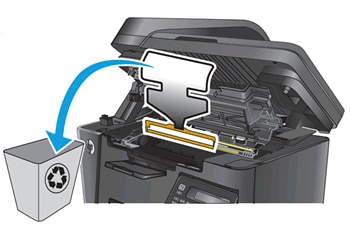
Look for and remove any packing material such as cardboard, tape, or paper debris.
Figure: Example of removing packing material
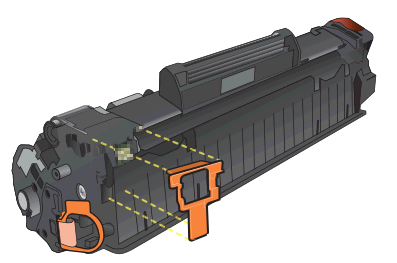
Remove the toner cartridge.
Figure: Removing toner cartridge
Look for and remove any additional packing material or paper debris inside the toner cartridge area.
Check for and remove the orange tab on the toner cartridge.
Figure: Removing the orange tab
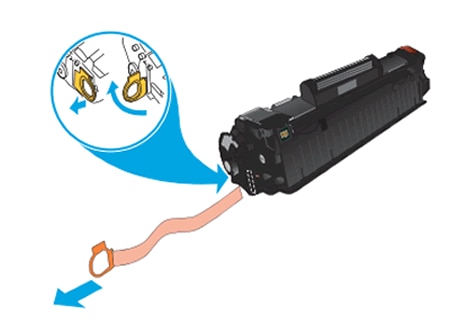
Check for and remove the protective sealing tape on the toner cartridge.
To remove the protective sealing tape, pull the tab away from the toner cartridge, and then discard.
Figure: Removing the protective sealing tape
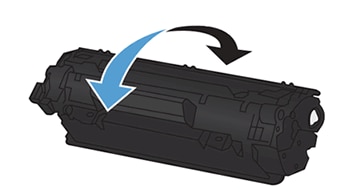
Gently rock the toner cartridge from front to back to make sure the toner is distributed evenly.
Figure: Rocking the toner cartridge
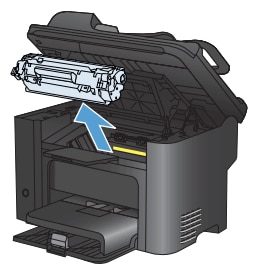
Insert the toner cartridge into the printer, and then close the toner cartridge door.
Figure: Inserting the toner cartridge
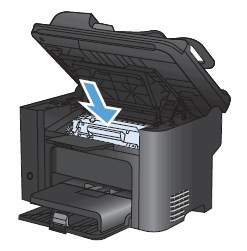
Reconnect the power cord, and then turn on the printer.
If checking for and removing packing materials and paper did not resolve the issue, continue to the next step.
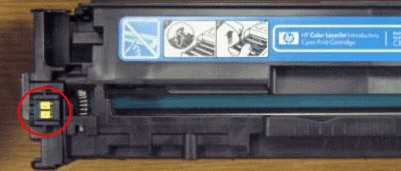
Step 2: Clean the electric contacts on the toner cartridge
The toner cartridge might have a faulty connection to the printer. Use a lint-free cloth to clean the toner cartridge contact (E-label).
Open the toner cartridge access door.
Remove the toner cartridge from its slot.
Use a lint-free cloth to wipe the toner cartridge contact (E-label) on the top left of the toner cartridge.
NOTE:
Coffee filters work well.
Figure : E-label on a toner cartridge
Insert the toner cartridge into its slot, and then close the toner cartridge access door.
If cleaning the E-label did not resolve the issue, continue to the next step.
You may also refer to this document link.
Hope this helps! Keep me posted.
Please click “Accepted Solution” if you feel my post solved your issue, it will help others find the solution. Click the “Kudos/Thumbs Up" on the bottom right to say “Thanks” for helping!
ANAND_ANDY
I am an HP Employee
06-29-2022 01:09 PM - edited 06-29-2022 01:09 PM
HP Recommended
Hi @Lft1,
Welcome to the HP Support Community
I'd like to help!
I understand you are getting an error on your Color Laser MFP 178nw printer.
Kindly follow the below steps to resolve the issue:
Step 1: Perform a power reset on the printer.
- Turn the printer on, if it is not already on.
- Wait until the printer is idle and silent before you continue.
- With the printer turned on, disconnect the power cord from the rear of the printer.
- Unplug the power cord from the wall outlet.
- Wait at least 60 seconds.
- Plug the power cord back into the wall outlet.
NOTE: HP Recommends connecting the printer power cord directly to the wall outlet - Reconnect the power cord to the rear of the printer.
- Turn on the printer, if it does not automatically turn on.
- Wait until the printer is idle and silent before you proceed.
Step 2: Check for packing materials and paper
Check the toner cartridge and printer for any packing materials and paper that might be causing the error message.
Turn off the printer.
Disconnect the power cord from the printer.
Figure: Disconnecting the power cord
Open the toner cartridge door.
Figure: Opening the toner cartridge door
Look for and remove any packing material such as cardboard, tape, or paper debris.
Figure: Example of removing packing material
Remove the toner cartridge.
Figure: Removing toner cartridge
Look for and remove any additional packing material or paper debris inside the toner cartridge area.
Check for and remove the orange tab on the toner cartridge.
Figure: Removing the orange tab
Check for and remove the protective sealing tape on the toner cartridge.
To remove the protective sealing tape, pull the tab away from the toner cartridge, and then discard.
Figure: Removing the protective sealing tape
Gently rock the toner cartridge from front to back to make sure the toner is distributed evenly.
Figure: Rocking the toner cartridge
Insert the toner cartridge into the printer, and then close the toner cartridge door.
Figure: Inserting the toner cartridge
Reconnect the power cord, and then turn on the printer.
If checking for and removing packing materials and paper did not resolve the issue, continue to the next step.
Step 3: Clean the electric contacts on the toner cartridge
The toner cartridge might have a faulty connection to the printer. Use a lint-free cloth to clean the toner cartridge contact (E-label).
Open the toner cartridge access door.
Remove the toner cartridge from its slot.
Use a lint-free cloth to wipe the toner cartridge contact (E-label) on the top left of the toner cartridge.
NOTE:
Coffee filters work well.
Figure : E-label on a toner cartridge
Insert the toner cartridge into its slot, and then close the toner cartridge access door.
If cleaning the E-label did not resolve the issue, continue to the next step.
You may also refer to this document link.
Hope this helps! Keep me posted.
Please click “Accepted Solution” if you feel my post solved your issue, it will help others find the solution. Click the “Kudos/Thumbs Up" on the bottom right to say “Thanks” for helping!
ANAND_ANDY
I am an HP Employee
07-06-2022 04:55 AM
HP Recommended
@Lft1,
Thank you for your efforts, I'm sending out a private message to assist you with the next course of action. Please check your Private message icon on the upper right corner of your HP Community profile Next, to your profile Name, you should see a little blue envelope, please click on it or simply click on this link.
Hope this helps! Keep me posted for further assistance.
Please click “Accept as Solution” if you feel my post solved your issue, it will help others find the solution. Click the “Kudos, Thumbs Up" on the bottom right to say “Thanks” for helping!
ANAND_ANDY
I am an HP Employee
Be alert for scammers posting fake support phone numbers and/or email addresses on the community.
If you think you have received a fake HP Support message, please report it to us by clicking on "Flag Post".
† The opinions expressed above are the personal opinions of the authors, not of HP. By using this site, you accept the Terms of Use and Rules of Participation.


Didn't find what you were looking for?
Ask the community
† The opinions expressed above are the personal opinions of the authors, not of HP. By using this site, you accept the <a href="https://www8.hp.com/us/en/terms-of-use.html" class="udrlinesmall">Terms of Use</a> and <a href="/t5/custom/page/page-id/hp.rulespage" class="udrlinesmall"> Rules of Participation</a>.