-
×InformationNeed Windows 11 help?Check documents on compatibility, FAQs, upgrade information and available fixes.
Windows 11 Support Center. -
-
×InformationNeed Windows 11 help?Check documents on compatibility, FAQs, upgrade information and available fixes.
Windows 11 Support Center. -
- HP Community
- Printers
- Printing Errors or Lights & Stuck Print Jobs
- ERROR CODE OX83C00009 NOS_LOADER_APP

Create an account on the HP Community to personalize your profile and ask a question
07-02-2017 01:08 PM
ERROR CODE OX83C00009 NOS_LOADER_APP message appears on my printer.
try to disconnect the power several times, but still not working.
How can I use this printer again?
07-03-2017 01:28 PM
Hello @jaek,
Welcome to the HP Forums.
I would be happy to help you with your HP Deskjet 3520 e-All-in-One Printer.
I understand your HP Deskjet 3520 e-All-in-One Printer have OX83C00009 NOS_LOADER_APP error code.
Follow the below the steps to solve the issue.
A paper jam can cause the carriage to stall. Follow these steps to clear any jammed paper.
Step one: Clear any jammed paper from the paper tray
If any jammed paper is accessible from the paper tray, follow these steps to remove the paper.
-
Remove any loose sheets of paper from the paper tray.
-
Gently remove any jammed paper and bits of torn paper from the tray. To avoid tearing any whole sheets of paper, pull the paper with both hands.
-
On the printer control panel, press OK.
-
If these steps resolved the issue, there is no need to continue troubleshooting.
-
If the issue persists, see the next step.
Step two: Clear any jammed paper from the cartridge access area
-
Press the Power button (
 ) to turn off the product.
 -
Disconnect the power cord from the rear of the product. injuries or electric shock.
-
Disconnect the USB cable from the rear of the product if you have a USB connection to the computer.
-
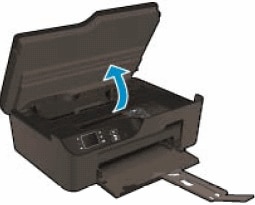
Open the cartridge access door.
Figure : Open the cartridge access door

-
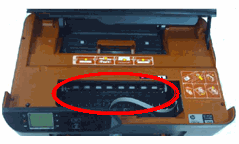
Locate the cartridge access area at the front of the product.
Figure : The cartridge access area

-
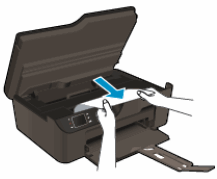
Gently remove any jammed paper and bits of torn paper from the cartridge access area. To avoid tearing any whole sheets of paper, pull the paper with both hands.
Figure : Remove any jammed paper from the cartridge access area

Step three: Clear any jammed paper from inside the cleanout area and duplexer
-
Press the Power button (
 ) to turn off the product, if it is not already off.
 -
Disconnect the power cord from the rear of the product, if it is not already disconnected.
-
With the cartridge access door open, locate the cleanout door. The door is behind the cartridge access area.
Figure : The cleanout door

-
Pull the cleanout door up and out to remove it from the product.
Figure : Remove the cleanout door
-
Lift the cleanout door up
-
Pull the cleanout door out
-
-
Gently remove any jammed paper and bits of torn paper. To avoid tearing any whole sheets of paper, pull the paper with both hands.
Figure : Remove paper from the cleanout area

-
Insert a finger into the duplexer cover hole, and then use your thumb to lift up the cover.
Figure : Lift the duplexer cover

-
Hold up the duplexer cover with one hand, and then gently remove any jammed paper and bits of torn paper with the other hand.
Figure : Remove any jammed paper from the duplexer
-
Hold up the duplexer cover
-
Pull any jammed paper out
-
-
Let the duplexer cover fall back into place.
-
Reinsert the cleanout door. Gently push the door in until both latches snap into place.
-
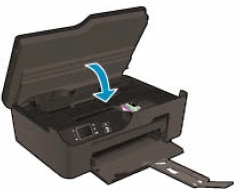
Close the cartridge access door.
Figure : Close the cartridge access door

Step four: Clear any jammed paper from underneath the printer
Follow these steps to clear any jammed paper from underneath the printer.
-
Press the Power button to turn off the printer if it is not off already.
-
Disconnect the power cord from the rear of the printer if it is not disconnected already.
-
Use your hands to secure the scanner lid, and then turn the printer onto its left side so that you can access its underside.
-
Slide out the paper tray until it stops.
-
Gently remove any jammed paper and bits of torn paper. To avoid tearing any whole sheets of paper, pull the paper with both hands.
Figure : Remove paper from underneath the printer

-
Slide the tray in until it stops.
-
Revert the printer to its normal position.
-
Open the cartridge access door, and then look inside the printer for any loose objects that might have shifted when the printer was turned over. Remove any loose objects found.
-
Close the cartridge access door.
Figure : Close the cartridge access door

-
Reconnect the power cord to the rear of the printer.
-
Press the Power button to turn on the printer.
For further trouble shooting steps click here.
Thanks for being a part of the HP community.
Please let me know if this helps resolve the issue by marking this post as "Accept as Solution".
If you require further assistance, let me know and I will gladly do all I can to help. If
you wish to say "thanks" for my efforts, click the "Thumbs Up" to give me a Kudos..
A4Apollo
I am an HP Employee
