-
×InformationNeed Windows 11 help?Check documents on compatibility, FAQs, upgrade information and available fixes.
Windows 11 Support Center. -
-
×InformationNeed Windows 11 help?Check documents on compatibility, FAQs, upgrade information and available fixes.
Windows 11 Support Center. -
- HP Community
- Printers
- Printing Errors or Lights & Stuck Print Jobs
- Envelopes not printing

Create an account on the HP Community to personalize your profile and ask a question
Your account also allows you to connect with HP support faster, access a personal dashboard to manage all of your devices in one place, view warranty information, case status and more.
Check some of the most frequent questions about Instant Ink: HP INSTANT INK, HP+ PLANS: INK AND TONER.
Check out our Black or Color Ink Not Printing, Other Print Quality Issues info about: Print quality and Cartridge Issues.

It has been a while since anyone has replied. Simply ask a new question if you would like to start the discussion again.
04-09-2019 11:42 AM
 HP Recommended
Product: HP4655
Operating System: macOS 10.14 Mojave
When trying to print an envelope using my Contact program in my I-Mac, nothing prints on the envelope. However, when I insert plain paper, instead of the envelope in the HP 4655 Ink Jet printer, it prints perfectly, in the proper orientation in the middle of the paper. But nothing prints on enveope when i try again? Frustrated!!
Solved! Go to Solution.
1 ACCEPTED SOLUTION
Accepted Solutions
04-11-2019 07:07 AM
HP Recommended
Let us update the software on iMac. Click here to know how.
Once updated, check the print settings and try to print.
-
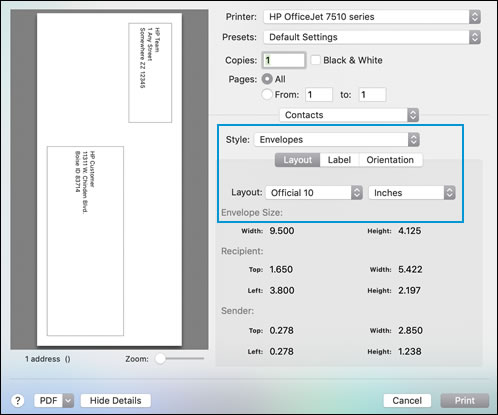
Search the Mac for contacts, and then click the Contacts app in the results.
-
Click the name of the contact you want to print on the envelope and make sure the address fields are filled out.

-
Click File, and then click Print. Click the Show Details button at the bottom of the dialog if it displays.
-
Click the Style menu, and then select Envelopes.
-
Click Layout, and then select your envelope size from Layout pop up menu.
-
To add, remove, or change the return address field, click Label, and then select or deselect the check box next to Print my address.
-
Click Orientation, and then select the landscape option.

-
Click Print.
Keep me posted.
KUMAR0307
I am an HP Employee
5 REPLIES 5
04-10-2019 09:35 AM
HP Recommended
@RayDDS
Welcome to the HP Support Community!
Checking the print settings on MAC and loading the envelopes in the right way may resolve this issue. Let us try these steps:
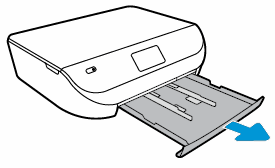
Step 1: Loading envelopes in the printer
-
Open the input tray door, then pull it toward you to extend the paper tray.
Figure : Opening the input tray
-
Slide the paper width guides to their outermost position.
Figure : Adjusting the paper width guides

-
Load the envelopes with the print side down in the center of the input tray.
If the envelope has a flap, make sure the flap is on the left.
Figure : Example of the position of different envelopes for loading into the input tray

-
Make sure the stack of envelopes align with the appropriate paper size lines on the bottom of the input tray.
Do not load more than 10 envelopes at a time.
-
Slide in the paper width guides until they rest against the stack of envelopes, then close the input tray.
Do not push the guides in so tightly that they bind against the envelopes.
Figure : Sliding in paper width guides

-
Close the input tray.
Figure : Close the input tray

Step 2: Check the print settings in MAC
Click here to check the settings for printing envelopes.
-
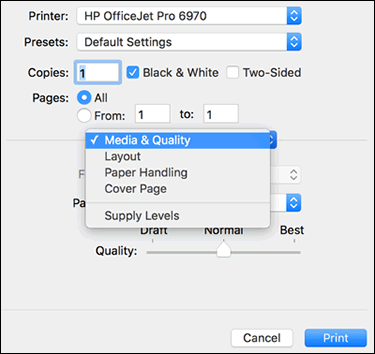
Open a document, photo, or webpage, click File, and then click Print to open the print dialog.
-
If a Show Details button displays at the bottom of the dialog, click it to reveal all available menu options. The button changes to Hide Details when clicked.

-
Select your printer in the Printer menu.
-
Select an option in the Presets menu that applies to your print job or paper type.
-
Click the unnamed print options menu at the separator bar to display more settings options.
-
Change any print job settings.
-
Print in color or black and white: Select or de-select Black & White on the main dialog. The Presets menu also includes color and black and white options.
-
Paper type (photo, plain, specialty): Selecting the paper type ensures the printer properly applies the ink to the paper you loaded in the printer. Click Media & Quality, and then click the Paper Type menu.
-
Paper size: Select the paper from the Paper Size menu on the main dialog, if present. Or, click Paper Handling, select Scale to fit paper size, and then select the paper in the Destination Paper Size menu.
-
Create a custom paper size: Click Manage Custom Sizes in the Paper Size menu, if available. The feature might also be available from the app File menu in Page Setup. Go to Creating Custom Paper Sizes for more information.
-
Adjust print quality: Click Media & Quality, and then move the Quality slider to the desired setting.
-
Two-sided printing (duplexing): Select Two-Sided on the main dialog, select Layout from the print options menu, and then select a binding option in the Two-Sided menu. Go to Printing on Both Sides of the Paper (Mac) for detailed steps on how to load and flip the paper for your printer type.
-
Add or remove a border: Click Layout, and then click the Border menu to select a border width or select None for borderless prints.
-
Mirror printing: Reverse an image or document for printing iron-on transfers. Click Layout, and then select the Flip horizontally option.
-
-
To save your settings for future print jobs, click the Presets menu, and then select Save Current Settings as Preset.
Let me know how this goes.
Please click “Accept as Solution” if you feel my post solved your issue, it will help others find the solution. Click the “Kudos/Thumbs Up" on the bottom right to say “Thanks” for helping!
KUMAR0307
I am an HP Employee
04-10-2019 07:47 PM
HP Recommended
Thanks for the in depth info. Unfortunately, I had tried all these things with no success. Surprisingly, I told my son about this problem today, and he suggested I try to print the envelopes using my older Macbook instead of the I-mac. The envelopes printed perfectly. So the problem could be related to the operating system of the I-mac, or som sort of incapatability. I downloaded the most current drivers for the printer, but that did not help. I'm not sure if there is anything else I can try to do?
04-11-2019 07:07 AM
HP Recommended
Let us update the software on iMac. Click here to know how.
Once updated, check the print settings and try to print.
-
Search the Mac for contacts, and then click the Contacts app in the results.
-
Click the name of the contact you want to print on the envelope and make sure the address fields are filled out.
-
Click File, and then click Print. Click the Show Details button at the bottom of the dialog if it displays.
-
Click the Style menu, and then select Envelopes.
-
Click Layout, and then select your envelope size from Layout pop up menu.
-
To add, remove, or change the return address field, click Label, and then select or deselect the check box next to Print my address.
-
Click Orientation, and then select the landscape option.
-
Click Print.
Keep me posted.
KUMAR0307
I am an HP Employee
04-12-2019 09:24 AM
HP Recommended
Software was up to date. However, after checking settings, I noticed that I had portrait instead of landscape selected ( I had tried both options prior to this with no success). I switched back to landscape, and now the envelopes will print from I-mac. Thank you very much for your time and input.
Be alert for scammers posting fake support phone numbers and/or email addresses on the community.
If you think you have received a fake HP Support message, please report it to us by clicking on "Flag Post".
† The opinions expressed above are the personal opinions of the authors, not of HP. By using this site, you accept the Terms of Use and Rules of Participation.


Didn't find what you were looking for?
Ask the community
† The opinions expressed above are the personal opinions of the authors, not of HP. By using this site, you accept the <a href="https://www8.hp.com/us/en/terms-of-use.html" class="udrlinesmall">Terms of Use</a> and <a href="/t5/custom/page/page-id/hp.rulespage" class="udrlinesmall"> Rules of Participation</a>.