-
×InformationNeed Windows 11 help?Check documents on compatibility, FAQs, upgrade information and available fixes.
Windows 11 Support Center. -
-
×InformationNeed Windows 11 help?Check documents on compatibility, FAQs, upgrade information and available fixes.
Windows 11 Support Center. -
- HP Community
- Printers
- Printing Errors or Lights & Stuck Print Jobs
- Envy 5540 printer does not pick photo paper

Create an account on the HP Community to personalize your profile and ask a question
02-11-2018 03:08 AM
I wanted to print a photo sent to me on Facebook. The printer said I needed paper. The tray was half full. I have added more paper, but it still does not recognize the fact. This device is just over the warranty period.
02-12-2018 10:13 AM
Welcome to the HP Forums, this is a great location to get assistance! I read your post and see that your HP Envy 5540 Printer does not pick up photo paper. I would like to help you resolve this issue.
However, I will need a few details to provide an accurate solution,
- When did this issue start?
- Did you do any hardware or software changes?
- How is the printer connected to computer, wired or wireless?
Meanwhile
Clean the paper feed and pick rollers
Clean the paper feed rollers
Follow these steps to clean the paper feed rollers.
-
Remove any paper in the printer before you clean the rollers.
-
Press the Power button to turn off the printer, if it is not off already.
-
Disconnect the power cord from the rear of the printer.
WARNING:
You must disconnect the power cord before reaching inside the printer to avoid risk of injuries or electric shock.
-
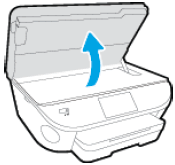
Open the cartridge access door.
Figure : Open the cartridge access door
-
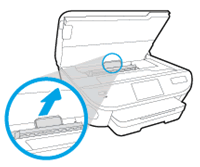
Locate the paper path cover, grasp the handle, and then lift up to remove it.
Figure : Remove the paper path cover
-
Lightly dampen a clean swab with the water, and then squeeze any excess liquid from the swab.
-
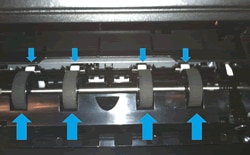
Press the swab against the rollers inside the printer, and then rotate the rollers upwards with your fingers. Apply a moderate amount of pressure to remove any dust or dirt buildup.
Figure : Clean the rollers in the paper path access area
-
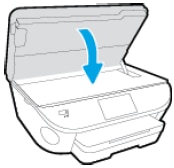
Replace the paper path cover, and then close the cartridge access door.
Figure : Close the cartridge access door
-
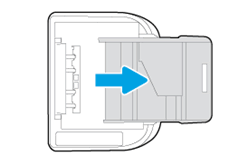
Gently turn the printer onto its right side, and then pull open the input tray so that you can access its underside.
Figure : Turn the printer onto its right side
-
Lightly dampen a clean swab with the water, and then squeeze any excess liquid from the swab.
-
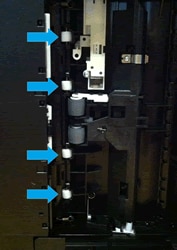
Clean the rollers in the gap behind the input tray. Make sure that none of the rollers are not missing, that they turn easily, and that they are springy when you press them.
Figure : Clean the rollers behind the input tray
-
Before you turn the printer over to its normal position, continue to the next step to clean the paper pick rollers.
Clean the paper pick rollers
Follow these steps to clean the paper pick rollers.
-
Make sure that the printer is turned off, the power cord is disconnected, and the printer is turned onto its right side with the input tray open.
-
Lightly dampen a clean swab with the water, and then squeeze any excess liquid from the swab.
-
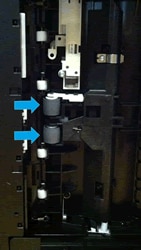
Press the swab against the rollers inside the printer, and then rotate the rollers upwards with your fingers. Apply a moderate amount of pressure to remove any dust or dirt buildup.
Figure : Clean the paper pick rollers
-
Make sure that the rollers turn easily when you press them.
-
Allow the rollers to dry for 10 to 15 minutes.
-
Turn the printer over to its normal position.
-
Reconnect the power cord to the rear of the printer, and then press the Power button to turn on the printer.
Reset the printer
-
Turn the printer on, if it is not already on.
-
Wait until the printer is idle and silent before you continue.
-
With the printer turned on, disconnect the power cord from the rear of the printer.
-
Unplug the power cord from the wall outlet.
-
Wait at least 60 seconds.
-
Plug the power cord back into the wall outlet.
NOTE:
HP recommends connecting the printer power cord directly to the wall outlet.
-
Reconnect the power cord to the rear of the printer.
-
Turn on the printer, if it does not automatically turn on.
The printer might go through a warm-up period. The printer lights might flash, and the carriage might move.
-
Wait until the warm-up period finishes and your printer is idle and silent before you proceed.
Adjust the paper settings in the print driver
-
Return to the document that you were trying to print when the issue occurred.
-
Click File, and then click Print.
-
Select your printer, and then click the Properties button.
NOTE:
Depending on your software application, this button might be a link, and it might be called Properties, Printer Properties, Options, Printer Setup, Printer, Preferences, or Page Setup.
-
Click the Paper/Quality or Paper tab.
-
From the Paper Size drop-down list, select the option that matches your paper size.
-
From the Media drop-down list, or for the paper source or type, select the paper type that matches the paper loaded in the printer.
-
Click OK to apply the settings.
-
Click OK or Print.
Click here and refer the HP document for more assistance.
Let me know ow it goes.
Cheers.
Sandytechy20
I am an HP Employee
