-
×InformationNeed Windows 11 help?Check documents on compatibility, FAQs, upgrade information and available fixes.
Windows 11 Support Center. -
-
×InformationNeed Windows 11 help?Check documents on compatibility, FAQs, upgrade information and available fixes.
Windows 11 Support Center. -
- HP Community
- Printers
- Printing Errors or Lights & Stuck Print Jobs
- Envy 5661 photo tray states out of paper

Create an account on the HP Community to personalize your profile and ask a question
07-21-2020 04:55 PM
I have an Envy 5661 printer. I've been trying to print photos using the HP Smart app and it act likes it is going to print but keeps saying the photo tray is out of paper. The photo tray has paper. I took some out and it wouldn't print, I added more paper it wouldn't print. I've also tried to print a photo directly from my pc and it still says I'm out the photo tray is empty. The printer shows it has plenty of ink, but I think that is probably the issue. I am running on Windows 7.
07-24-2020 11:26 AM
@CMJ2207, Welcome to HP Support Community!
Follow the steps below to isolate and resolve the issue-
Paper feed issues might result from using ripped, dusty, curled, wrinkled, or bent paper. The quality of the paper can also make a difference. Use these guidelines to help avoid the issue. Use only good quality paper that meets printer specifications.
Check the condition of the paper
Make sure that the paper you use to print is in good condition, that it is neatly stacked in the tray, and that the paper path and tray are free from obstructions.
-
Press the Power button to turn off the printer.
WARNING:
You must disconnect the power cord before reaching inside the printer to avoid risk of injuries or electric shock.
-
Disconnect the USB or Ethernet cable from the rear of the printer.
-
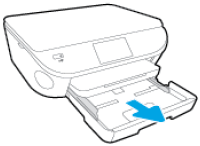
Pull the output tray toward you to remove it, and then pull the input tray toward you to open it.
Figure : Pull to open the paper tray
-
Remove any paper from the photo tray.
-
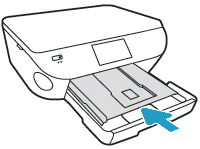
With the paper tray pulled out, push in the photo tray as far as possible.
Figure : Push in the photo tray
-
Remove any paper from the input tray, and then examine the condition of the paper or photo paper:
-
Replace any ripped, curled, wrinkled, or bent paper.
-
Avoid printing on paper that is dusty. Reload paper that has been in the photo tray for a time.
-
Make sure that all the paper in the stack is the same size and type. The printer can only process one type of paper at a time.
-
-
Make sure that the stack of paper contains the following number of sheets of paper:
-
For the input tray: No fewer than 10 sheets and no more than 25 sheets of paper
-
For the photo tray: No fewer than 5 sheets of photo paper
NOTE:
You need to use a certain number of sheets of paper only for troubleshooting. When the issue is resolved, you can load paper according to the specifications for your printer.
-
-
Check for obstructions inside the input tray and photo tray. Make sure that nothing blocks the paper from engaging with the rollers. Even small pieces of paper can cause paper feed issues.
Load photo paper into the photo tray
Load no fewer than 5 sheets of photo paper in the photo tray, but make sure that the stack of photo paper is not higher than the top edges of the paper width guides.
-
Grasp the handle on the input tray, and then pull the tray toward you to open it.
Figure : Pull to open the input tray

-
Put one or two fingers in the slot on the photo tray, and then pull the tray toward you to open it as far as possible.
NOTE:
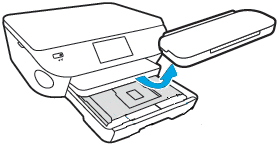
If you do not see the photo tray inside the input tray, remove the output tray, and then pull open the photo tray.
Figure : Remove the output tray, and then pull open the photo tray
-
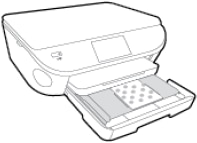
Insert the photo paper with the print side or shiny side of the paper down into the photo tray.
-
Figure : Load the photo paper
-
Push the photo tray into the printer as far as possible.
Figure : Push in the photo tray

-
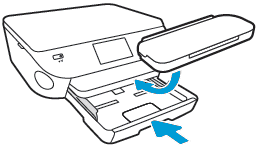
Replace the output tray on the input tray, if you removed it, and then push the input tray into the printer until it locks into place.
Figure : Replace the output tray and push on the input tray
-
On the Have You Changed the Paper? screen that displays, check to make sure that the photo paper is correctly loaded into the photo tray.
-
If 4x6 in., Photo Paper displays in the Photo Tray field, the photo paper is loaded correctly in the photo tray. Touch OK to return to the Home screen.
-
If the Photo Tray field displays as Empty, open the photo tray and make sure that the photo paper is pushed all the way to the rear of the tray, and then push the photo tray into the printer as far as possible. Check the printer control panel to make sure that 4x6 in., Photo Paper displays in the Photo Tray field.
-
Try printing.
If you have issues, follow additional steps from the document 'Out of Paper' Displays and Printer Does Not Pick Paper.
Hope this helps! Keep me posted.
Please click “Accepted Solution” if you feel my post solved your issue, it will help others find the solution. Click the “Kudos/Thumbs Up" on the bottom right to say “Thanks” for helping!
TEJ1602
I am an HP Employee
