• ×
    Information
    Need Windows 11 help?
    Check documents on compatibility, FAQs, upgrade information and available fixes.
    Windows 11 Support Center.
  • post a message
  • ×
    Information
    Need Windows 11 help?
    Check documents on compatibility, FAQs, upgrade information and available fixes.
    Windows 11 Support Center.
  • post a message
Guidelines
Join the HP Community Solve‑a‑thon | Help Others & Share Your Solutions | Live on Zoom | 2:30 PM to 2:30 AM IST | Every Wednesday Click here to know more
Check some of the most frequent questions about Instant Ink: HP INSTANT INK, HP+ PLANS: INK AND TONER.


Check out our Black or Color Ink Not Printing, Other Print Quality Issues info about: Print quality and Cartridge Issues.
HP Recommended
HP 4650 All In One
macOS 10.14 Mojave

I was getting errors asking to replace the cartridge because it wasn't working.  I did that and it didn't work.  I also cleaned the spot where they are housed.


Now I'm getting this error:

ERROR CODE

OXOOO5FBB5

LIB_MATH C


What does that mean?

1 REPLY 1
HP Recommended

@Sami15

Thank you for joining HP Forums.

It's a pleasure assisting you in finding answers to your technical queries.


To provide you with an accurate solution, I'll need a few more details:

Are you using a genuine HP Ink cartridge?

What is the error message if you remove the ink cartridge??

Did you try with a different ink cartridge?

Make sure the cartridge is properly vented.


I suggest you do a Hard Reset


(1) Turn the printer on, if it is not already on.

(2) Wait until the printer is idle and silent before you continue.

(3) With the printer turned on, disconnect the power cord from the rear of the printer.

(4) Unplug the power cord from the wall outlet.

(5) Wait at least 60 seconds.

(6) Plug the power cord back into the wall outlet.

NOTE: HP recommends connecting the printer power cord directly to the wall outlet.

(7) Reconnect the power cord to the rear of the printer.

(8) Turn on the printer, if it does not automatically turn on.


The printer might go through a warm-up period. The printer lights might flash, and the carriage might move.

Wait until the warm-up period finishes and your printer is idle and silent before you proceed.


Manually clean the area around the ink nozzles

  1. Gather the following materials:

    • Dry foam rubber swabs, lint-free cloth, or any soft material that does not come apart or leave fibers (coffee filters work well)

    • Distilled, filtered, or bottled water (tap water might contain contaminants that can damage the ink cartridges)

         CAUTION: 

      Do not use platen cleaners or alcohol to clean the ink cartridge contacts. These can damage the ink cartridge or the printer.

  2. Turn on the printer, if it is not already on.

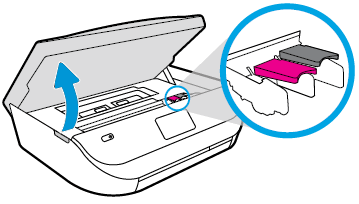
  3. Gently grasp the handles on either side of the printer, then raise the ink cartridge access door until it locks into place.

    The carriage moves to the center of the printer.

    Image: Opening the ink cartridge access door.

  4. Wait until the carriage is idle and silent before you continue.

  5. Disconnect the power cord from the rear of the printer.

  6. Disconnect the USB cable, if it is connected.

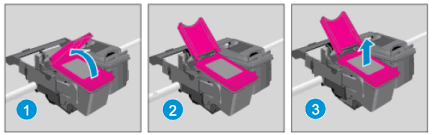
  7. To release the ink cartridge, lift the lid on the ink cartridge slot, then gently push the lid back until it stops.

  8. Pull up on the ink cartridge to remove it from the slot.

       CAUTION: 

    Do not remove both ink cartridges at the same time. Remove and then clean each ink cartridge one at a time. Do not leave an ink cartridge outside the printer for more than 30 minutes.
    Image: Removing the ink cartridge.

    1. Lift the lid

    2. Gently push the lid back

    3. Pull up on the ink cartridge

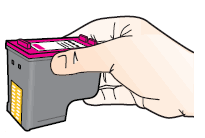
  9. Hold the ink cartridge by its sides.

    Image: Hold the ink cartridge by its sides.

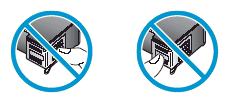
       CAUTION: 

    Do not touch the copper-colored contacts or the ink nozzles. Touching these parts can result in clogs, ink failure, and bad electrical connections.

    Image: Do not touch the contacts or nozzles.

  10. Lightly moisten a foam-rubber swab or lint-free cloth with distilled water, and then squeeze any excess water from it.

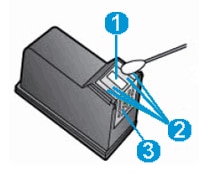
  11. Clean the face and edges around the ink nozzle with the swab.

       CAUTION: 

    Do not clean the ink nozzle plate.
    Image: The ink nozzle and ink cartridge contacts.

    1. Nozzle plate - Do not clean

    2. Area surrounding ink nozzle - Do clean

    3. Ink cartridge contacts - Do not clean

  12. Either let the ink cartridge sit for 10 minutes to allow the cleaned area to dry, or use a new swab to dry it.

  13. Hold the ink cartridge by its sides with the nozzles toward the printer, then slide the ink cartridge forward into the slot.

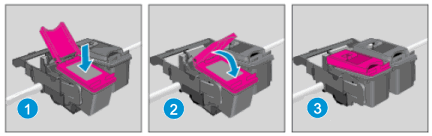
  14. Close the lid on the ink cartridge slot to secure the ink cartridge into place.
    Image: Inserting the ink cartridges

    1. Insert the ink cartridge

    2. Close the lid

    3. The color ink cartridge is on the left, and the black ink cartridge is on the right

  15. Repeat these steps to clean, then reinsert the other ink cartridge.

  16. Close the ink cartridge access door.

  17. Reconnect the power cord to the rear of the printer.

  18. Turn on the printer, if it does not turn on automatically.

Keep me posted, how it goes!

If the information I've provided was helpful, give us some reinforcement by clicking the Accepted Solution and Kudos buttons, that'll help us and others see that we've got the answers!

Have a great day!

Cheers:)

Raj1788
I am an HP Employee 

† The opinions expressed above are the personal opinions of the authors, not of HP. By using this site, you accept the <a href="https://www8.hp.com/us/en/terms-of-use.html" class="udrlinesmall">Terms of Use</a> and <a href="/t5/custom/page/page-id/hp.rulespage" class="udrlinesmall"> Rules of Participation</a>.