-
×InformationNeed Windows 11 help?Check documents on compatibility, FAQs, upgrade information and available fixes.
Windows 11 Support Center. -
-
×InformationNeed Windows 11 help?Check documents on compatibility, FAQs, upgrade information and available fixes.
Windows 11 Support Center. -
- HP Community
- Printers
- Printing Errors or Lights & Stuck Print Jobs
- Error - Printing

Create an account on the HP Community to personalize your profile and ask a question
Your account also allows you to connect with HP support faster, access a personal dashboard to manage all of your devices in one place, view warranty information, case status and more.
Check some of the most frequent questions about Instant Ink: HP INSTANT INK, HP+ PLANS: INK AND TONER.
Check out our Black or Color Ink Not Printing, Other Print Quality Issues info about: Print quality and Cartridge Issues.

It has been a while since anyone has replied. Simply ask a new question if you would like to start the discussion again.
04-05-2020
12:32 AM
- last edited on
01-13-2026
12:52 PM
by
![]() Animatryx
Animatryx
 HP Recommended
Product: OfficeJet 5742
Morning,
I'm having issues printing on my Officejet 5742. When I try and print from a regular application, 'Error - Printing' appears next to the document in the printer queue. The Windows 10 printer trouble shooter finds nothing wrong, and, strangely, if I go into the HP app and select the printer, the status is 'Ready', I see the correct IP address and mac address, the installation status is 'Installed', and if I click on 'Printer Reports' under 'Tools' and click 'Printer Status Report', the printer prints the report. So while the printer is connected to my laptop over wifi, there doesn't appear to be any connectivity issues, but nothing except the pages from the reports section in the HP app will print.
Things I've tried:
Turning the printer off and on again
Turning the laptop off and on again
Turning the router off and on again
Restarting the printer spooler from services.
Uninstalling the printer from device manager, including entries under printer queue and imaging devices
Uninstalling all HP software from add/remove software
Removing everything HP related from the drivers section under printui.exe
Deleting all HP related data I could find from within c:\programdata, followed by several laptop restarts and a reinstall of the full driver package from the HP driver and software download page (downloaded today to ensure I have the latest version).
Another laptop restart, just to be sure
Current state:
Printer will print documents from the Printer Reports section of the HP app
Printer will *not* print documents from the HP app when I click Print Docuements from the HP app home page
Printer will *not* print documents from and other application, including the Windows 10 printer test page.
Windows 10 is reporting that it is up to date in the windows 10 update section of settings
Printer firmware version is NPM5CN1830AR
I know 'Error - Printing' from the print queue dialog isn't much to go on, but I'm not sure where abouts in Windows error logging information related to printing is kept.
Thanks.
Solved! Go to Solution.
1 ACCEPTED SOLUTION
Accepted Solutions
04-09-2020 09:53 AM
HP Recommended
Hi @AKAAKUK,
Welcome to the HP Support Community. I'd be happy to assist you with the "Can't print from Laptop" issue.
What happens when you try and print?
Try the steps below to resolve the issue-
Use HP Print and Scan Doctor to check connectivity
Download a special version of HP Print and Scan Doctor specifically created to help with printer offline conditions.
-
Download HP Print and Scan Doctor.
-
Run HPPSdr.exe from the download location on your computer.
-
Once HP Print and Scan Doctor opens, click Start, and then select your printer.
-
If your printer in not in the list, turn it off and on, and then click Retry.
-
If there is a connection problem, follow the instructions in HP Print and Scan Doctor.
-
-
If a screen prompts you to turn on printer updates, click Yes.
-
If a screen prompts you to make your printer the default printer, click Yes.
-
Try to print. If the printer remains offline, continue to the next step.
Manually set the default printer
Make sure the default printer driver matches the printer your trying to print to.
Windows 10
Set your default printer in Windows 10.
-
Search Windows for devices, and then click Printers & scanners from the list of results.
-
If it is checked, uncheck the box beside Let Windows manage my default printer.
-
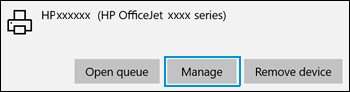
From the list of printers, click the printer name that matches the name of your printer, and then click Manage. If there are multiple names listed, select the printer that has a status of idle or online.
-
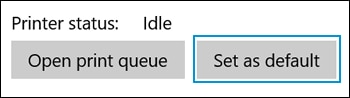
Under Manage your device, click Set as default.
-
Try to print. If the printer remains offline, continue to the next step.
Check the printer port and Windows services status
If your printer uses a WSD port, check the status of Windows Function Discovery services, and then add a TCP/IP port if necessary.
-
Search Windows for 'control panel' to open Control Panel, and then click View devices and printers to open the Devices and Printers window.
-
Right-click your printer, select Printer Properties, and then click the Ports tab.
-
Check if your printer uses a WSD port.

-
If your printer does not use a WSD port, skip to the next step in this document.
-
If your printer uses a WSD port, continue with these steps.
-
-
Search Windows for 'services' to open the Services list.
-
Scroll down the list to locate Function Discovery Provider Host and Function Discovery Resource Publication, and then check the Status and Startup Type columns.
NOTE:
Some antivirus or firewall software turns these services off due to IT policy. Check with your IT support or antivirus software vendor for help.
-
If the status of both services is 'Running' and the Startup Type is 'Automatic', continue to the next step.
-
If the status of the services is blank and the Startup Type is 'Manual', right click the name, select Properties, set the Startup Type to Automatic, and then click Start under Service status. Click OK, and then continue to the next step.
-
-
Return to the Devices and Printers window, press the F5 key, and then click your printer name to view the status.
-
If your printer is no longer offline, the issue is resolved.
-
If your printer is still offline, continue with these steps.
-
-
Print a Network Configuration Report from the printer Settings or Wireless menu.
-
Right-click your printer, select Printer Properties, click the Ports tab, and then click Add Port.
-
Select Standard TCP/IP Port, and then click New Port.
-
Follow the instructions to add a new port using the information listed on the Network Configuration Report.
NOTE:
A Host Name is preferred when creating the port because the printer IP address may change in a DHCP network.
-
Return to the Devices and Printers window, press the F5 key, and then click your printer name to view the printer status.
-
If your printer is no longer offline, the issue is resolved.
-
If your printer is still offline, continue to the next step.
-
Create a manual IP connection (network connections only)
Use the printer IP address to manually connect to your printer.
NOTE:These steps require that your printer is connected to your router.
-
Print a Network Configuration Page.
-
If your printer has a control panel with a menu display, print a Network Configuration Page from the network settings or network setup menu.
-
If your printer does not have a menu display, print the Network Configuration Page using printer control panel buttons. For many printers, press and hold the Cancel button for 3 to 5 seconds, or until a report prints. If pressing the Cancel button does not work for your printer model, go to HP Customer Support, search for your printer model, and then search for Printing Self-Test Pages document.
-
-
On the Network Configuration Page, find the network status for your network connection type (wired or wireless).
-
If the status is connected, continue with these steps
-
If the status is not connected, the printer is disconnected from your network. Go to Connecting to a Wireless HP Printer, and then follow the steps to connect the printer to your network.

-
-
Find the IP Address, Subnet mask, and Default Gateway for your network connection type (wired or wireless). If you find different numbers for IPv4 and IPv6, you only need the IPv4 number.
-
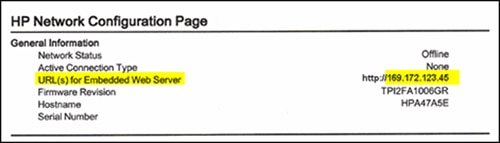
Find the URL(s) for the Embedded Web Server (EWS).
NOTE:
Your printer might have more than one URL.
-
From a computer connected to your network, open an internet browser, type one of the URLs into the address field, and then press Enter to open the printer’s EWS. If the EWS does not display, try a different browser.
-
In the EWS, click the Network or Networking tab, open the Wired or Wireless menu option, depending on your network, and then click IPv4 Configuration.
-
Select Manual IP, click Suggest a Manual IP Address, and then make sure the IP Address, Subnet Mask, and Default Gateway numbers match the Network Configuration Page.
If you do not see Suggest a Manual IP Address, manually type the IP address, Subnet mask, and Default gateway.

-
Write the IP address on a piece of paper. You might need to use it later.
-
Click Apply, and then wait until the changes are confirmed.
-
Return to the Devices and Printers window, press the F5 key, and then click your printer name to view the printer status.
-
If your printer is no longer offline, the issue is resolved.
-
If your printer is still offline, continue to the next step.
-
Step 5: Connect the PC to a TCP/IP Port (Windows only, network only)
After setting a manual IP address for the printer, add a printer port to Windows that matches this new IP address.
-
In Windows, search for and open Printers & scanners.
-
Click the name of your printer, and then select Manage.
-
Click Printer Properties.
-
Click the Ports tab, and then click Add Port.
-
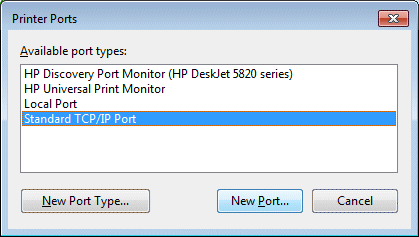
Select Standard TCP/IP Port, and then click New Port.
Figure : Creating a new TCP/IP Port
-
Type the printer’s IP address that you wrote down earlier, and then click Next.
-
Select the new Standard TCP/IP Port from the list, and then click OK.
NOTE:
You might see a second printer device display in the list of devices. Do not uninstall either printer device. Leave both printer devices.
-
Try printing
Hope this helps! Keep me posted.
Please click “Accept as Solution” if you feel my post solved your issue, it will help others find the solution.
Click the “Kudos, Thumbs Up" on the bottom right to say “Thanks” for helping!
Have a great day!
3 REPLIES 3
04-09-2020 09:53 AM
HP Recommended
Hi @AKAAKUK,
Welcome to the HP Support Community. I'd be happy to assist you with the "Can't print from Laptop" issue.
What happens when you try and print?
Try the steps below to resolve the issue-
Use HP Print and Scan Doctor to check connectivity
Download a special version of HP Print and Scan Doctor specifically created to help with printer offline conditions.
-
Download HP Print and Scan Doctor.
-
Run HPPSdr.exe from the download location on your computer.
-
Once HP Print and Scan Doctor opens, click Start, and then select your printer.
-
If your printer in not in the list, turn it off and on, and then click Retry.
-
If there is a connection problem, follow the instructions in HP Print and Scan Doctor.
-
-
If a screen prompts you to turn on printer updates, click Yes.
-
If a screen prompts you to make your printer the default printer, click Yes.
-
Try to print. If the printer remains offline, continue to the next step.
Manually set the default printer
Make sure the default printer driver matches the printer your trying to print to.
Windows 10
Set your default printer in Windows 10.
-
Search Windows for devices, and then click Printers & scanners from the list of results.
-
If it is checked, uncheck the box beside Let Windows manage my default printer.
-
From the list of printers, click the printer name that matches the name of your printer, and then click Manage. If there are multiple names listed, select the printer that has a status of idle or online.
-
Under Manage your device, click Set as default.
-
Try to print. If the printer remains offline, continue to the next step.
Check the printer port and Windows services status
If your printer uses a WSD port, check the status of Windows Function Discovery services, and then add a TCP/IP port if necessary.
-
Search Windows for 'control panel' to open Control Panel, and then click View devices and printers to open the Devices and Printers window.
-
Right-click your printer, select Printer Properties, and then click the Ports tab.
-
Check if your printer uses a WSD port.
-
If your printer does not use a WSD port, skip to the next step in this document.
-
If your printer uses a WSD port, continue with these steps.
-
-
Search Windows for 'services' to open the Services list.
-
Scroll down the list to locate Function Discovery Provider Host and Function Discovery Resource Publication, and then check the Status and Startup Type columns.
NOTE:
Some antivirus or firewall software turns these services off due to IT policy. Check with your IT support or antivirus software vendor for help.
-
If the status of both services is 'Running' and the Startup Type is 'Automatic', continue to the next step.
-
If the status of the services is blank and the Startup Type is 'Manual', right click the name, select Properties, set the Startup Type to Automatic, and then click Start under Service status. Click OK, and then continue to the next step.
-
-
Return to the Devices and Printers window, press the F5 key, and then click your printer name to view the status.
-
If your printer is no longer offline, the issue is resolved.
-
If your printer is still offline, continue with these steps.
-
-
Print a Network Configuration Report from the printer Settings or Wireless menu.
-
Right-click your printer, select Printer Properties, click the Ports tab, and then click Add Port.
-
Select Standard TCP/IP Port, and then click New Port.
-
Follow the instructions to add a new port using the information listed on the Network Configuration Report.
NOTE:
A Host Name is preferred when creating the port because the printer IP address may change in a DHCP network.
-
Return to the Devices and Printers window, press the F5 key, and then click your printer name to view the printer status.
-
If your printer is no longer offline, the issue is resolved.
-
If your printer is still offline, continue to the next step.
-
Create a manual IP connection (network connections only)
Use the printer IP address to manually connect to your printer.
NOTE:These steps require that your printer is connected to your router.
-
Print a Network Configuration Page.
-
If your printer has a control panel with a menu display, print a Network Configuration Page from the network settings or network setup menu.
-
If your printer does not have a menu display, print the Network Configuration Page using printer control panel buttons. For many printers, press and hold the Cancel button for 3 to 5 seconds, or until a report prints. If pressing the Cancel button does not work for your printer model, go to HP Customer Support, search for your printer model, and then search for Printing Self-Test Pages document.
-
-
On the Network Configuration Page, find the network status for your network connection type (wired or wireless).
-
If the status is connected, continue with these steps
-
If the status is not connected, the printer is disconnected from your network. Go to Connecting to a Wireless HP Printer, and then follow the steps to connect the printer to your network.
-
-
Find the IP Address, Subnet mask, and Default Gateway for your network connection type (wired or wireless). If you find different numbers for IPv4 and IPv6, you only need the IPv4 number.
-
Find the URL(s) for the Embedded Web Server (EWS).
NOTE:
Your printer might have more than one URL.
-
From a computer connected to your network, open an internet browser, type one of the URLs into the address field, and then press Enter to open the printer’s EWS. If the EWS does not display, try a different browser.
-
In the EWS, click the Network or Networking tab, open the Wired or Wireless menu option, depending on your network, and then click IPv4 Configuration.
-
Select Manual IP, click Suggest a Manual IP Address, and then make sure the IP Address, Subnet Mask, and Default Gateway numbers match the Network Configuration Page.
If you do not see Suggest a Manual IP Address, manually type the IP address, Subnet mask, and Default gateway.
-
Write the IP address on a piece of paper. You might need to use it later.
-
Click Apply, and then wait until the changes are confirmed.
-
Return to the Devices and Printers window, press the F5 key, and then click your printer name to view the printer status.
-
If your printer is no longer offline, the issue is resolved.
-
If your printer is still offline, continue to the next step.
-
Step 5: Connect the PC to a TCP/IP Port (Windows only, network only)
After setting a manual IP address for the printer, add a printer port to Windows that matches this new IP address.
-
In Windows, search for and open Printers & scanners.
-
Click the name of your printer, and then select Manage.
-
Click Printer Properties.
-
Click the Ports tab, and then click Add Port.
-
Select Standard TCP/IP Port, and then click New Port.
Figure : Creating a new TCP/IP Port
-
Type the printer’s IP address that you wrote down earlier, and then click Next.
-
Select the new Standard TCP/IP Port from the list, and then click OK.
NOTE:
You might see a second printer device display in the list of devices. Do not uninstall either printer device. Leave both printer devices.
-
Try printing
Hope this helps! Keep me posted.
Please click “Accept as Solution” if you feel my post solved your issue, it will help others find the solution.
Click the “Kudos, Thumbs Up" on the bottom right to say “Thanks” for helping!
Have a great day!
04-09-2020 10:29 AM
HP Recommended
Hi, thanks for your reply.
I downloaded the HP Print and Scan Doctor and it found the issue and fixed it. It reported that it had found a port match issue, it installed something, I then restarted the system, printed a test page and it worked. I also tried scanning the test page as well, just for good measure and that worked too.
Thanks again for your help.
Be alert for scammers posting fake support phone numbers and/or email addresses on the community.
If you think you have received a fake HP Support message, please report it to us by clicking on "Flag Post".
† The opinions expressed above are the personal opinions of the authors, not of HP. By using this site, you accept the Terms of Use and Rules of Participation.


Didn't find what you were looking for?
Ask the community
† The opinions expressed above are the personal opinions of the authors, not of HP. By using this site, you accept the <a href="https://www8.hp.com/us/en/terms-of-use.html" class="udrlinesmall">Terms of Use</a> and <a href="/t5/custom/page/page-id/hp.rulespage" class="udrlinesmall"> Rules of Participation</a>.