-
×InformationNeed Windows 11 help?Check documents on compatibility, FAQs, upgrade information and available fixes.
Windows 11 Support Center. -
-
×InformationNeed Windows 11 help?Check documents on compatibility, FAQs, upgrade information and available fixes.
Windows 11 Support Center. -
- HP Community
- Printers
- Printing Errors or Lights & Stuck Print Jobs
- Error code 71.02.4A on HP OfficeJet 8022

Create an account on the HP Community to personalize your profile and ask a question
Your account also allows you to connect with HP support faster, access a personal dashboard to manage all of your devices in one place, view warranty information, case status and more.
Check some of the most frequent questions about Instant Ink: HP INSTANT INK, HP+ PLANS: INK AND TONER.
Check out our Black or Color Ink Not Printing, Other Print Quality Issues info about: Print quality and Cartridge Issues.

It has been a while since anyone has replied. Simply ask a new question if you would like to start the discussion again.
01-04-2025 05:07 PM
 HP Recommended
Hi there,
My HP OfficeJet 8022 home printer suddenly stopped working this morning. It successfully printed one paper and then got the below error message when printing a second paper.
"There is a problem with the printer or print system. Turn the printer Off, then On. If you continue to get this message, contact support.
Event Code: 71.02.4A"
Google shows the error message might be related to jamming. I've tried the below things but not luck so far:
- Unplug the printer, wait for minutes, then plug it in.
- Open the printer, take out the cartridges, unplug the printer, wait for minutes, then plug it in, install the cartridges, close the printer.
Any idea on how to further investigate/fix the issue?
Solved! Go to Solution.
1 ACCEPTED SOLUTION
Accepted Solutions
01-06-2025 03:50 AM
HP Recommended
Hi @zzhen,
Welcome to the HP Support Community.
I'd be glad to help you!
I understand that you are getting a carriage jam issue on the printer and it shows Event code: 71.02.4A, I am glad to assist you in fixing this issue.
Check for obstructions in the carriage path to make sure the carriage path is not blocked.
- With the printer on, disconnect the power cord from the rear of the printer.
- If your printer has a battery, remove the battery.
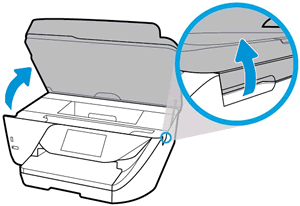
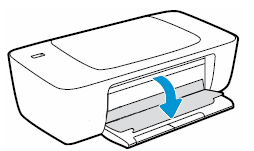
- Open the door to access the carriage inside of the printer.
Examples of carriage access doors
- Look in the carriage path for debris such as crumpled paper or dislodged labels, and then remove any that you find.
Example of a printer with debris in the carriage path

- If the carriage on your printer has a latch, make sure it is closed.
- Use your hand to move the carriage to each side, making sure it moves freely. If the carriage is stalled or docked to one side of the printer and you cannot move it, continue with these steps.
- Close the carriage access door.
- Reconnect the power cord to the rear of the printer, and then turn the printer on.
Reset the printer
- An error might continue to display after the jam is cleared. To clear the error state, reset the printer, connecting the power cord directly to a wall outlet to make sure the power source is stable and prevent more carriage jams.
- With the printer turned on, disconnect the power cord from the printer.
- Unplug the power cord from the power source.
- Wait 60 seconds.
- Reconnect the power cord to a wall outlet and to the printer.
Update the printer firmware to install the latest updates
Click here for the steps.
Hope this helps! Keep me posted for further assistance
Please mark this post as “Accepted Solution” if the issue is resolved and if you feel this reply was helpful click “Yes”.
Nal_NR-
HP Community Moderator
4 REPLIES 4
01-06-2025 03:50 AM
HP Recommended
Hi @zzhen,
Welcome to the HP Support Community.
I'd be glad to help you!
I understand that you are getting a carriage jam issue on the printer and it shows Event code: 71.02.4A, I am glad to assist you in fixing this issue.
Check for obstructions in the carriage path to make sure the carriage path is not blocked.
- With the printer on, disconnect the power cord from the rear of the printer.
- If your printer has a battery, remove the battery.
- Open the door to access the carriage inside of the printer.
Examples of carriage access doors
- Look in the carriage path for debris such as crumpled paper or dislodged labels, and then remove any that you find.
Example of a printer with debris in the carriage path
- If the carriage on your printer has a latch, make sure it is closed.
- Use your hand to move the carriage to each side, making sure it moves freely. If the carriage is stalled or docked to one side of the printer and you cannot move it, continue with these steps.
- Close the carriage access door.
- Reconnect the power cord to the rear of the printer, and then turn the printer on.
Reset the printer
- An error might continue to display after the jam is cleared. To clear the error state, reset the printer, connecting the power cord directly to a wall outlet to make sure the power source is stable and prevent more carriage jams.
- With the printer turned on, disconnect the power cord from the printer.
- Unplug the power cord from the power source.
- Wait 60 seconds.
- Reconnect the power cord to a wall outlet and to the printer.
Update the printer firmware to install the latest updates
Click here for the steps.
Hope this helps! Keep me posted for further assistance
Please mark this post as “Accepted Solution” if the issue is resolved and if you feel this reply was helpful click “Yes”.
Nal_NR-
HP Community Moderator
01-06-2025 08:26 PM - edited 01-06-2025 08:37 PM
HP Recommended
Hi Elohi_NR,
Thanks for looking into the issue!
After "cleaning" the carriage path, the printer started working (although there's no debris and I cleaned nothing). But the printed pictures are missing lines, like gaps. There's no error code but a pattern of the missing parts:
- The missing lines are short lines (horizontal rows in Portrait mode, or vertical columns in Landscape mode).
- It's about 5mm missing content, then 18mm correctly printed content, then 5mm missing content again, etc..
- After printing 10 A4 papers, the gaps become smaller (2mm+21mm instead of 5mm+18mm).
Any idea what could've gone wrong and how to investigate/fix it?
01-07-2025 05:12 AM
HP Recommended
Hi @zzhen ,
We apologize for the inconvenience. The issue seems to persist even after attempting the troubleshooting steps mentioned above.
This might require one-on-one interaction via remote assistance to fix the issue over the phone.
I've sent you a private message with further instructions. In order to access your private messages, click the private message icon on the upper right corner of your HP Support Community profile, next to your profile Name or simply click on this link.
If the information I've provided was helpful, give us some reinforcement by clicking the Accepted Solution button, that'll help us and others see that we've got the answers!
Nal_NR-
HP Community Moderator
Be alert for scammers posting fake support phone numbers and/or email addresses on the community.
If you think you have received a fake HP Support message, please report it to us by clicking on "Flag Post".
† The opinions expressed above are the personal opinions of the authors, not of HP. By using this site, you accept the Terms of Use and Rules of Participation.


Didn't find what you were looking for?
Ask the community
† The opinions expressed above are the personal opinions of the authors, not of HP. By using this site, you accept the <a href="https://www8.hp.com/us/en/terms-of-use.html" class="udrlinesmall">Terms of Use</a> and <a href="/t5/custom/page/page-id/hp.rulespage" class="udrlinesmall"> Rules of Participation</a>.