-
×InformationNeed Windows 11 help?Check documents on compatibility, FAQs, upgrade information and available fixes.
Windows 11 Support Center. -
-
×InformationNeed Windows 11 help?Check documents on compatibility, FAQs, upgrade information and available fixes.
Windows 11 Support Center. -
- HP Community
- Printers
- Printing Errors or Lights & Stuck Print Jobs
- HOW TO INSTALL INK CARTRIDES ON hp6958

Create an account on the HP Community to personalize your profile and ask a question
10-08-2019 03:58 PM
@PRINTER451, Welcome to the HP Support Community!
Let us follow these steps to install the ink cartridges into the printer:
-
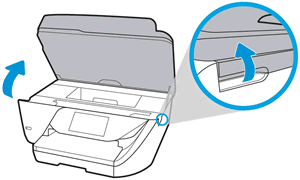
Raise the ink cartridge access door until it locks into place.

-
Wait until the carriage is idle and silent before you proceed.
-
Remove the packing material from the carriage.

-
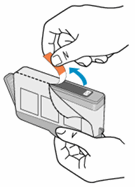
Remove an ink cartridge from its package, and then pull the orange pull-tab straight back.
CAUTION:
Make sure that you remove the orange pull-tab and plastic wrap completely before you remove the orange cap in the next step. Otherwise, ink might leak from the ink cartridge. When you remove the plastic wrap, the paper label on the top of the ink cartridge tears slightly, which is necessary to properly vent the ink cartridge.

-
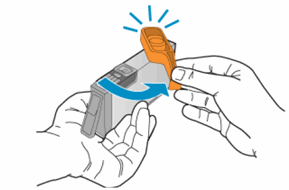
Hold the ink cartridge by its sides, and then twist the protective orange cap counter-clockwise to snap it off the ink cartridge.

CAUTION:
Do not touch the copper-colored contacts or the ink nozzles. Touching these parts can result in clogs, ink failure, and bad electrical connections.
-
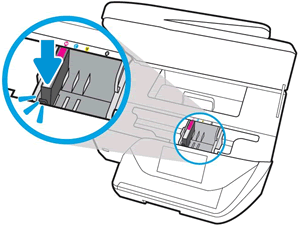
Turn the ink cartridge so that the ink cartridge contacts face downward, and then match the label color with the color dot on the carriage.
-
Slide the ink cartridge into its slot, and then gently press the ink cartridge down until it snaps into place.

-
Repeat these steps to install all the new ink cartridges.
-
Close the ink cartridge access door.
For more info on setting up the printer for the first time, refer to this document.
Let me know how this goes.
If you feel my post solved your issue, please click “Accept as Solution”, it will help others find the solution. Click the “Kudos/Thumbs Up" on the bottom right to say “Thanks” for helping!
KUMAR0307
I am an HP Employee
