-
×InformationNeed Windows 11 help?Check documents on compatibility, FAQs, upgrade information and available fixes.
Windows 11 Support Center. -
-
×InformationNeed Windows 11 help?Check documents on compatibility, FAQs, upgrade information and available fixes.
Windows 11 Support Center. -
- HP Community
- Printers
- Printing Errors or Lights & Stuck Print Jobs
- HP 5524 wont print black after installing new cartridge

Create an account on the HP Community to personalize your profile and ask a question
01-25-2018
02:42 AM
- last edited on
01-25-2018
08:54 AM
by
![]() kevin-t
kevin-t
Re: HP 5524 wont print black after installing new cartridge
I have tried a hard reset and still no black ink printing
I have tried two new cartridges and I've done lots of cleaning pages and no luck, i'ts costing me a fortune.
Solved! Go to Solution.
Accepted Solutions
01-29-2018 08:15 AM
Let me take a moment to thank you for posting on the HP Support Forums. MKazi is at your service.
I understand that you have an HP Photosmart 5524 e-All-in-One Printer and it no longer prints the black color. I read that you have tried two new HP ink cartridges and the issue persists. You've done a remarkable job performing the steps.
Did the printer go through the alignment process aferinstalling the new black ink cartrudge?
Is the printer sucessfully able to make a photocopy in black color? If yes then it indicates that the printer and the ink cartridges are all good.
While you respond to that, I recommend you to perform the following steps to isolate the issue and arrive at a fix:
NOTE: You may skip any steps that you have already attempted before.
- Disconnect the power cable from the printer while the printer is still ON.
- Disconnect any other cables if connected the printer.
- Press and hold the printer’s power button for 15 seconds.
- The printer should be directly connected to the wall outlet and not to a surge protector.
- Reconnect the power cable to print and the printer should power ON by itself. If the printer doesn’t power ON then please manually power it ON.
Please perform the below steps from this HP document:
- Step 4: Clean the ink cartridge vents and contacts.
- Step 5: Clean the printhead with an automated tool.
- Step 6: Manually clean the printhead.
Also, align the printer by following the below steps:
-
From the home screen, touch the Setup icon (
 ), and then touch Tools.
 -
Touch the Down Arrow (
 ), and then touch Align Printer. The alignment page prints.
 -
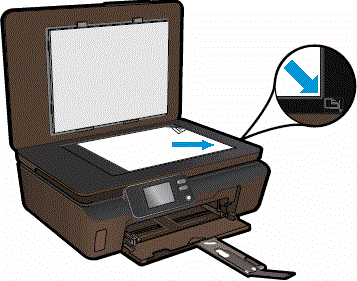
Lift the lid on the printer, and then place the alignment page print side down in the right front corner of the scanner glass.
Figure : Place the alignment page on the scanner glass

- Close the lid, and then press OK on the control panel. The printer will align automatically. Press OK to continue.
If the issue persists after perfrming the above steps then the evidence points towards a defective printhead. In such a case you may contact our HP phone support team to check the avalable service options for your HP printer.
I genuinely hope the issue gets resolved without hassles and the unit works great. Let me know the results. Good luck! 🙂
01-29-2018 08:15 AM
Let me take a moment to thank you for posting on the HP Support Forums. MKazi is at your service.
I understand that you have an HP Photosmart 5524 e-All-in-One Printer and it no longer prints the black color. I read that you have tried two new HP ink cartridges and the issue persists. You've done a remarkable job performing the steps.
Did the printer go through the alignment process aferinstalling the new black ink cartrudge?
Is the printer sucessfully able to make a photocopy in black color? If yes then it indicates that the printer and the ink cartridges are all good.
While you respond to that, I recommend you to perform the following steps to isolate the issue and arrive at a fix:
NOTE: You may skip any steps that you have already attempted before.
- Disconnect the power cable from the printer while the printer is still ON.
- Disconnect any other cables if connected the printer.
- Press and hold the printer’s power button for 15 seconds.
- The printer should be directly connected to the wall outlet and not to a surge protector.
- Reconnect the power cable to print and the printer should power ON by itself. If the printer doesn’t power ON then please manually power it ON.
Please perform the below steps from this HP document:
- Step 4: Clean the ink cartridge vents and contacts.
- Step 5: Clean the printhead with an automated tool.
- Step 6: Manually clean the printhead.
Also, align the printer by following the below steps:
-
From the home screen, touch the Setup icon (
 ), and then touch Tools.
 -
Touch the Down Arrow (
 ), and then touch Align Printer. The alignment page prints.
 -
Lift the lid on the printer, and then place the alignment page print side down in the right front corner of the scanner glass.
Figure : Place the alignment page on the scanner glass

- Close the lid, and then press OK on the control panel. The printer will align automatically. Press OK to continue.
If the issue persists after perfrming the above steps then the evidence points towards a defective printhead. In such a case you may contact our HP phone support team to check the avalable service options for your HP printer.
I genuinely hope the issue gets resolved without hassles and the unit works great. Let me know the results. Good luck! 🙂
