-
×InformationNeed Windows 11 help?Check documents on compatibility, FAQs, upgrade information and available fixes.
Windows 11 Support Center. -
-
×InformationNeed Windows 11 help?Check documents on compatibility, FAQs, upgrade information and available fixes.
Windows 11 Support Center. -
- HP Community
- Printers
- Printing Errors or Lights & Stuck Print Jobs
- HP 6230 will not recognize black ink cartridge

Create an account on the HP Community to personalize your profile and ask a question
03-25-2019
02:22 PM
- last edited on
03-25-2019
02:29 PM
by
![]() Cheron-Z
Cheron-Z
I'm experiencing the same issue. I've just replaced the black cartridge and now it fails to print in black (all the other colours are fine).
Is there an alternative way to print the network configuration page, or a way to print it in another colour as I just get a blank page 'printed' when I attempt this step in the process?
03-26-2019 05:49 PM
Welcome to HP support community.
Make sure the ink cartridges are correctly installed.
-
Turn on the printer.
-
Open the ink cartridge access door.
-
Wait until the carriage is idle and silent before you continue.
-
Make sure the ink cartridges are marked ‘SETUP'.
-
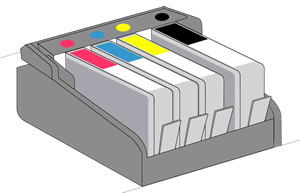
Make sure the color-coded icon on each ink cartridge label matches the color-coded icon on the carriage slot. If the icons do not match, remove the ink cartridge and insert it in the correct slot.
Figure : Checking the color-coded icons on the ink cartridges and carriage slot
-
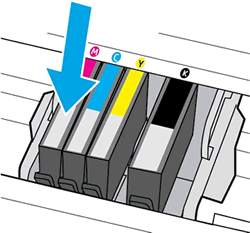
Move your finger along the top of the ink cartridges to check for any unseated ink cartridges in the carriage. Press down on any ink cartridge that is higher than the others to firmly snap the ink cartridge into its slot.
Figure : Pressing down on the unseated ink cartridge
-
If the ink cartridge does not snap into place, remove the ink cartridge from the carriage.
-
Gently bend the tab away from the ink cartridge.
CAUTION:
Be careful not to bend the tab out more than 1.27 cm (0.5 in). Moving the tab too far might damage the ink cartridge or cause the tab to break off.
Figure : Gently bending the tab away from the ink cartridge
-
-
Bend the tab away from the ink cartridge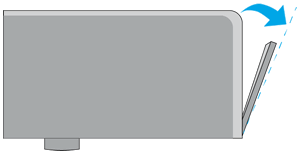
-
Do not bend the tab more than 1.27 cm (0.5 in)
-
-
Reinsert the ink cartridge into the carriage until it snaps into place.
-
-
Close the ink cartridge access door.
Clean the ink cartridge and printhead contacts
-
Gather the following materials:
-
A clean, lint-free cloth
-
A clean, dry cotton swab
-
Distilled or bottled water
CAUTION:
Do not use tap water, platen cleaners, or alcohol because they might contain contaminants that can damage the contacts.
-
-
Open the ink cartridge access door.
-
Wait until the printer is idle and silent before you proceed.
-
Disconnect the power cord from the rear of the printer.
-
Press the tab inward on the front of the ink cartridge to release it, and then pull up on the ink cartridge to remove it from the slot.
Figure : Removing the ink cartridge

-
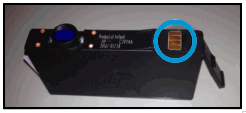
Lightly dampen a clean, lint-free cloth with bottled or distilled water, and then clean ink cartridge contact.
Figure : Example of the copper-colored ink cartridge contact
-
Place the ink cartridge to the side with the contacts facing upwards.
-
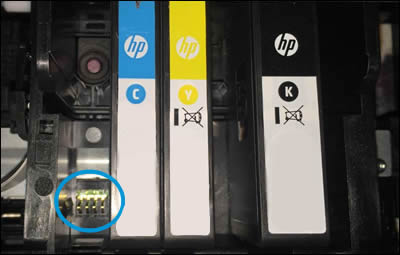
Moisten a cotton swab, and then wipe the contacts inside the printhead.
Figure : Cleaning the printhead contacts
-
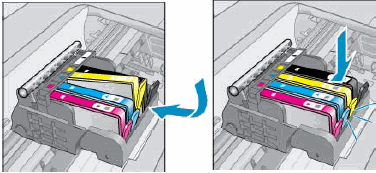
Carefully reinsert the ink cartridge into the correct colored slot, and then press down on the ink cartridge until it clicks into place.
Figure : Insert the ink cartridge
-
Repeat these steps for other ink cartridges.
-
Close the ink cartridge access door.
You can refer this HP document for more assistance:- Click here
Let me know how it goes.
To thank me for my efforts to help you, please mark my post as an accepted solution so that it benefits several others.
Cheers.
Sandytechy20
I am an HP Employee
03-28-2019 01:24 AM
Hi Sandy,
Thanks for your message. I've followed all of the steps you've outlined but am still experiencing the same issue.
I'm not sure I mentioned previously but I bought the printer about 6 months ago and everything worked correctly (including the black cartridge). The black cartridge ran out of ink so I bought a replacement (XL version). It's this that's failing.
I'ev tried purchasing a another cratridge in case the cartridge was fault ybut am still experiencing the same issue.
Is there anything else I can try?
Thanks
Matt
03-28-2019 07:48 PM
This seems to be a hardware issue.
I request you to talk to HP support.
They might have multiple options to help you with this.
1) Click on this link - www.hp.com/contacthp/
2) Click on "Continue as guest".
3) Enter the serial of your device.
4) Select the country from the drop-down.
5) Click on "Show Options".
Fill the web-form. A case number and phone number will now populate for you.
To thank me for my efforts to help you, please mark my post as an accepted solution so that it benefits several others.
Cheers.
Sandytechy20
I am an HP Employee
