-
×InformationNeed Windows 11 help?Check documents on compatibility, FAQs, upgrade information and available fixes.
Windows 11 Support Center. -
-
×InformationNeed Windows 11 help?Check documents on compatibility, FAQs, upgrade information and available fixes.
Windows 11 Support Center. -
- HP Community
- Printers
- Printing Errors or Lights & Stuck Print Jobs
- HP 7610 printer failure or ink system failure

Create an account on the HP Community to personalize your profile and ask a question
Your account also allows you to connect with HP support faster, access a personal dashboard to manage all of your devices in one place, view warranty information, case status and more.
Check some of the most frequent questions about Instant Ink: HP INSTANT INK, HP+ PLANS: INK AND TONER.
Check out our Black or Color Ink Not Printing, Other Print Quality Issues info about: Print quality and Cartridge Issues.

It has been a while since anyone has replied. Simply ask a new question if you would like to start the discussion again.
05-08-2019 08:12 PM - edited 05-08-2019 08:14 PM
 HP Recommended
Product: HP 7610 Wideformat
Operating System: Microsoft Windows 10 (64-bit)
Hello. I have a HP 7610 Wideformat printer. Yesterday it worked fine. But today I had a paper jam and is coming up with "Printer failure or ink system error" I have tried everything that I have found and nothing seems to work. Please help, thanks.
4 REPLIES 4
05-09-2019 12:40 PM
HP Recommended
@JamesCrozier, Welcome to HP Support Community!
Reset the printer
In some cases, a printer reset can clear the error message.
-
Turn the printer on, if it is not already on.
-
Wait until the printer is idle and silent before you continue.
-
With the printer turned on, disconnect the power cord from the rear of the printer.
-
Unplug the power cord from the wall outlet.
-
Wait at least 60 seconds.
-
Plug the power cord back into the wall outlet.
-
Reconnect the power cord to the rear of the printer.
-
Turn on the printer, if it does not automatically turn on.
-
Wait until the printer is idle and silent before you proceed.
If the issue persists, continue to the next step.
Remove the ink cartridges
Removing the ink cartridges and checking for an error message can help diagnose the printer issue. Take the ink cartridges out of the printhead, and then check the printer control panel or computer for an error message.
-
Open the ink cartridge access door.
The carriage moves to the left side of the access area.
-
Wait until the carriage is idle and silent before proceeding.
-
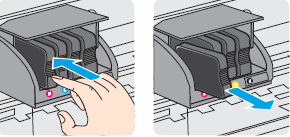
Push in on the front of one of the ink cartridges to release it, and then pull the ink cartridge toward you to remove it.
Figure: Removing the ink cartridge
-
Repeat these steps for the other ink cartridges.
-
Close the ink cartridge access door.
-
Check the control panel to see if an error message displays.
-
If the printer displays an Ink System Failure message on the control panel, skip to the step to Update the printer firmware.
-
If the message has changed to Replace the

 or
or  Ink Cartridge, continue to the next step.
-
Clean the ink cartridges, and then check the error message
Cleaning the ink cartridge contacts, and then reinstalling the ink cartridges one at a time can help determine if a specific ink cartridge is causing the error message.
-
Gather the following materials:
-
A clean, lint-free cloth
-
A clean, dry cotton swab
-
Distilled or bottled water
-
-
Lightly dampen a clean, lint-free cloth with bottled or distilled water.
-
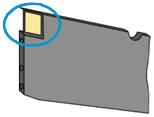
Gently wipe the copper-colored contact on one of the ink cartridges.
Figure: Wiping the copper-colored contact
-
Wipe the contact with a dry, lint-free cloth before proceeding to the next step.
-
Repeat these steps for the three remaining ink cartridges.
-
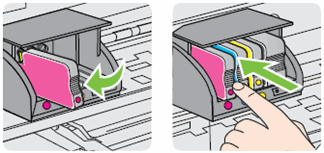
Carefully reinsert one of the ink cartridges into its slot, and then push the ink cartridge forward until it clicks into place.
Figure: Reinserting the ink cartridge
-
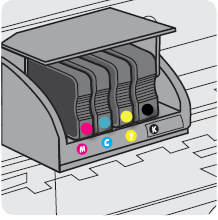
Make sure each colored dot on the ink cartridge label matches the colored dot on the print carriage.
Figure: Matching the colored dot on the print carriage
-
Close the ink cartridge access door.
-
Check the printer control panel to see if the error message persists.
-
If the message is to Replace the
or Ink Cartridge, remove the specified ink cartridge(s) and clean the copper-colored contact again, and then reinsert the ink cartridge(s). -
If the issue persists, continue to the next step.
-
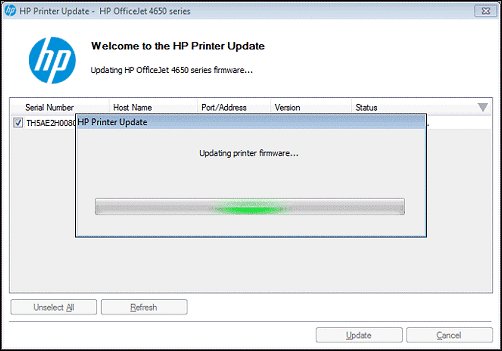
Update the printer firmware
-
Make sure the printer is on and connected to the computer through your local network or USB cable.
-
If a Let's identify your product to get started page displays, click Printer.
-
Type your printer model number, and then click Submit.
The software results page for your printer displays with the default operating system selected.
-
If you need to change the version of Windows, click Change, select your version, and then click Change.
-
Click Firmware, and then click Download.
If a Firmware section is not listed, an update is not currently available for your printer.
-
Save the file to your computer.
-
Locate and then open the file to start the installation process.
-
When the HP Printer Update window opens, see if the printer serial number displays.
-
If the serial number displays, select the checkbox next to it and then click Update.
-
If the serial number displays but the status is 'not applicable' (grayed out), you do not need the firmware update. Click Cancel.
-
If the serial number does not display and your printer uses a network connection, connect a USB cable to the printer and computer. Wait 20 seconds, and then click Refresh. When the serial number displays, select the checkbox next to it and then click Update.
-
-
When the update completes, click OK.
-
If you connected a USB cable to update your network printer, remove the USB driver installed by Windows.
-
Search Windows for control panel, and then click Control Panel in the results.
-
Click View Devices and printers.
-
Right-click the USB printer device that matches your printer model, and then select Remove Device.
-
Disconnect the USB cable from the printer and the computer, and then restart the computer.
-
Let me know if this helps.
Cheers 🙂
Please click “Accept as Solution” if you feel my post solved your issue, it will help others find the solution. Click the “Kudos/Thumbs Up" on the bottom right to say “Thanks” for helping!
TEJ1602
I am an HP Employee
05-09-2019 04:11 PM
HP Recommended
@ChristineHaver, Welcome to HP Support Community!
If you have tried all the troubleshooting steps from this document, I am afraid it could be a hardware issue.
You can try our other support options. Follow the steps below to reach out to our HP Support team:
1) Click on this link - https://support.hp.com/us-en/contact-hp
2) Select your product type below.
3) Enter the serial of your device.
4) Select the country from the drop-down.
5) Select the appropriate option based on your preference.
6) Fill the web-form and proceed further.
Thank you.
Please click “Accept as Solution” if you feel my post solved your issue, it will help others find the solution. Click the “Kudos/Thumbs Up" on the bottom right to say “Thanks” for helping!
TEJ1602
I am an HP Employee
Be alert for scammers posting fake support phone numbers and/or email addresses on the community.
If you think you have received a fake HP Support message, please report it to us by clicking on "Flag Post".
† The opinions expressed above are the personal opinions of the authors, not of HP. By using this site, you accept the Terms of Use and Rules of Participation.


Didn't find what you were looking for?
Ask the community
† The opinions expressed above are the personal opinions of the authors, not of HP. By using this site, you accept the <a href="https://www8.hp.com/us/en/terms-of-use.html" class="udrlinesmall">Terms of Use</a> and <a href="/t5/custom/page/page-id/hp.rulespage" class="udrlinesmall"> Rules of Participation</a>.