-
×InformationNeed Windows 11 help?Check documents on compatibility, FAQs, upgrade information and available fixes.
Windows 11 Support Center. -
-
×InformationNeed Windows 11 help?Check documents on compatibility, FAQs, upgrade information and available fixes.
Windows 11 Support Center. -
- HP Community
- Printers
- Printing Errors or Lights & Stuck Print Jobs
- HP C4180 Half print on Win10x64

Create an account on the HP Community to personalize your profile and ask a question
Your account also allows you to connect with HP support faster, access a personal dashboard to manage all of your devices in one place, view warranty information, case status and more.
Check some of the most frequent questions about Instant Ink: HP INSTANT INK, HP+ PLANS: INK AND TONER.
Check out our Black or Color Ink Not Printing, Other Print Quality Issues info about: Print quality and Cartridge Issues.

It has been a while since anyone has replied. Simply ask a new question if you would like to start the discussion again.
03-09-2017 09:20 AM
 HP Recommended
Product: HP Photosmart C4180 All-in-One
Operating System: Microsoft Windows 10 (64-bit)
Ever since I have Windows10x64, I have this problem when printing on my HP Photosmart C4180: I have 1 page in Word -> print - printer prints only part of page (less of half of page) then eject the paper and request another sheet of paper (despite the fact that my document has only 1 page). I feed another page and the printer prints only a row of characters, again eject. After several tries, the job is printed correctly.
I have installed 14.8.0 driver version (Dec 14th, 2015).
Another thing, when I print from my laptop with Windows 7x64, I have no problem.
Thank you!
Solved! Go to Solution.
1 ACCEPTED SOLUTION
Accepted Solutions
03-13-2017 08:50 AM
HP Recommended
You're welcome/ 🙂
I did some further research and suggest you to try them as mentioned below:
- Open Devices and Printers.
- Select your printer, Then click on "Print Server Properties" button on top of that window.
- This will open the Print Server properties window.
- Click on the Drivers tab. This will give the list of drivers installed.
- Select each driver and remove it.
- Later, download and install the full featured drivers for the printer.
If the printer still does not print then please assign a static IP as shown below:
- Print a Network Configuration Report or Wireless Test Report from your printer.
-
-
If status is connected, continue with these steps.
-
If status is anything other than connected, such as Off or Disabled, then the printer is disconnected from your network. This is the reason your printer is offline. You must connect the printer to your network before you continue. For more help on how to set up a connection to your network, see the User Guide, search the HP website for your printer model and wireless or wired network install, or use the wireless setup wizard from the control panel of your printer if available.
-
-
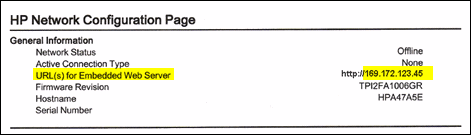
On the report, find the IP Address, subnet mask, and Default Gateway for your active (connected) network connection type. If your report has separate numbers for IPv4 and IPv6, then use the numbers listed in the IPv4 section.
-
From a computer connected to your network, find the URL(s) for Embedded Web Server (EWS) on the report and enter the URL into your Internet browser. If the webpage appears blank, use a different Internet browser.
Figure : Example of the URL for the EWS
-
Click the Network or Networking tab, and then open the section or page for your network type: wired or wireless.
-
Click Manual IP.
-
If you see a Suggest a Manual IP Address button, click Manual IP address, and the Manual IP addresses are automatically filled out for you.
-
If your page does not have a button to suggest a manual IP address, type the IP address, subnet mask, and default gateway using the numbers shown in the report you printed.
-
Figure : Example of setting up a Manual IP configuration

-
Write these new numbers on a piece of paper. You might need to use them later when adding a second printer device.
-
Click Apply, and then wait until the changes are confirmed.
Make sure that the correct port is selected:
-
Search Windows for devices, and then select Devices and Printers in the list of results.
The Devices and Printers window opens.
-
Right-click the name of your printer, and then select Printer Properties.
The Properties window opens.
-
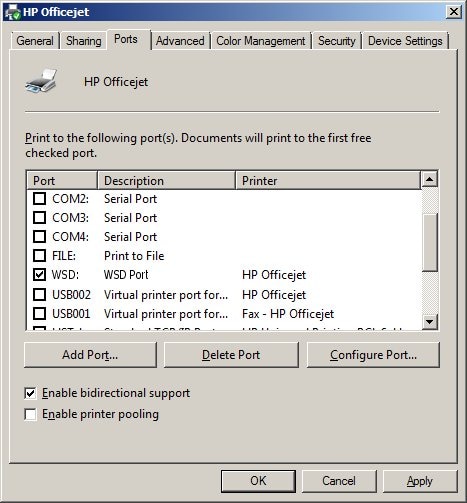
Click the Ports tab, and then find the name of your printer in the Printers column.
-
If the printer uses a USB connection, make sure the port name or description includes USB or DOT4
-
If the printer uses a network connection, make sure the port name or description includes WSD, network, Standard TCP/IP Port, or HP Standard TCP/IP Port.
Figure : Example of the WSD port selected for a wireless printer
-
-
Select the correct port type if the selection does not match the current connection used by the printer.
Hope this helps. Cheers! 🙂
5 REPLIES 5
03-10-2017 10:46 AM
HP Recommended
Let me take a moment to thank you for posting on the HP Support Forums.
I understand that you have an HP Photosmart C4180 All-in-One Printer and it has printing issue ever since you upgraded to Win10. The printer prints only part of the page (less of half of page) then ejects the paper and request another sheet of paper (despite the fact that is it one paged document). If you feed another page and the printer prints only a row of characters, again ejects. Only after several attempts, it prints fine. Printing is absolutely fine with Win7. I must say that you have done in-depth analysis and I appreciate the steps you have performed and have certainly done a good job.
I'll do my best to assist you with this case. I recommend you to perform the following steps to isolate the issue and arrive at a fix:
- This seems to be an issue with the drivers for Win10. Please download and run the HP Print and Scan Doctor software. HP Print and Scan Doctor is a free tool for Windows to help resolve printer driver related issues.
- If the printer continues to have printing issues from Win10. then let us uninstall the printer drivers from root level and then reinstall them back using the below steps:
- In Windows, search for and open Programs and Features.
- Select your HP printer.
- Select Uninstall.
- In Windows, search for and open Devices and Printers.
- In the Devices and Printers window look for your HP Printer. If you see it listed, right-click on it and choose "Delete" or "Remove Device.”
- Open up the run command with the "Windows Key + R" key combo.
- Type printui.exe /s and click OK.
- Click on Drivers tab.
- Look for HP Printer driver. If you see it click on it and click Remove at the bottom.
- Select OK.
- Select Apply and OK on the Print Server Properties windows.
- Close Devices and Printers.
Once you have performed the above steps, please download and install the drivers from this link: http://hp.care/2nn83XF
After you have tried all the above steps if you continue to have the same issue then please try to install the basic inbuilt printer drivers in Windows10: http://hp.care/2bYE4kP
I hope this information helps. Feel free to keep me posted. Good luck! 🙂
03-12-2017 12:54 PM
HP Recommended
Hello, Kazi,
Thank you for your reply and appreciation 🙂 Today, in the afternoon I have tried the steps you indicated.
HP Print and Scan Doctor worked ok, the test page was printed alright (to be honest, to my surprise). The steps involving drivers uninstalling and reinstalling… not so much. All my attempts to reinstall the drivers ended in error: “Fatal error during installation”. So, I have decided to reinstall my Windows 10… it was long overdue, anyway.
So, I reinstalled it and the first thing afterwards, I install my printer… no luck L same behavior, print only a part of page, reinsert the page, print ok. And same as before, printing works very well from my laptop with Windows7x64… I do not think there is a solution at this point 🙂
Thanks!
03-13-2017 08:50 AM
HP Recommended
You're welcome/ 🙂
I did some further research and suggest you to try them as mentioned below:
- Open Devices and Printers.
- Select your printer, Then click on "Print Server Properties" button on top of that window.
- This will open the Print Server properties window.
- Click on the Drivers tab. This will give the list of drivers installed.
- Select each driver and remove it.
- Later, download and install the full featured drivers for the printer.
If the printer still does not print then please assign a static IP as shown below:
- Print a Network Configuration Report or Wireless Test Report from your printer.
-
-
If status is connected, continue with these steps.
-
If status is anything other than connected, such as Off or Disabled, then the printer is disconnected from your network. This is the reason your printer is offline. You must connect the printer to your network before you continue. For more help on how to set up a connection to your network, see the User Guide, search the HP website for your printer model and wireless or wired network install, or use the wireless setup wizard from the control panel of your printer if available.
-
-
On the report, find the IP Address, subnet mask, and Default Gateway for your active (connected) network connection type. If your report has separate numbers for IPv4 and IPv6, then use the numbers listed in the IPv4 section.
-
From a computer connected to your network, find the URL(s) for Embedded Web Server (EWS) on the report and enter the URL into your Internet browser. If the webpage appears blank, use a different Internet browser.
Figure : Example of the URL for the EWS
-
Click the Network or Networking tab, and then open the section or page for your network type: wired or wireless.
-
Click Manual IP.
-
If you see a Suggest a Manual IP Address button, click Manual IP address, and the Manual IP addresses are automatically filled out for you.
-
If your page does not have a button to suggest a manual IP address, type the IP address, subnet mask, and default gateway using the numbers shown in the report you printed.
-
Figure : Example of setting up a Manual IP configuration
-
Write these new numbers on a piece of paper. You might need to use them later when adding a second printer device.
-
Click Apply, and then wait until the changes are confirmed.
Make sure that the correct port is selected:
-
Search Windows for devices, and then select Devices and Printers in the list of results.
The Devices and Printers window opens.
-
Right-click the name of your printer, and then select Printer Properties.
The Properties window opens.
-
Click the Ports tab, and then find the name of your printer in the Printers column.
-
If the printer uses a USB connection, make sure the port name or description includes USB or DOT4
-
If the printer uses a network connection, make sure the port name or description includes WSD, network, Standard TCP/IP Port, or HP Standard TCP/IP Port.
Figure : Example of the WSD port selected for a wireless printer
-
-
Select the correct port type if the selection does not match the current connection used by the printer.
Hope this helps. Cheers! 🙂
03-13-2017 03:35 PM
HP Recommended
Hello,
After I read your suggestions, I’ve had a question: why “Network Configuration” on my C4180 printer, USB only?
Still, the last pictures caught my eye, that “Enable printer pooling” check. My port settings is USB001 – Virtual Printer Port for USB and below there is port DOT4_001 – HP Print Device. So, I selected both ports and I enabled printer pooling. When I tried to print, no luck, the printer did not receive any command from the computer. I have returned to previous setting (only USB001 port selected and “Enable printer pooling” unchecked) and, surprise! All the print jobs I have made, all success from the first time!
I will make more tests tomorrow but for now, seems that the printer works alright. I do not know why changing those settings resolve the problem or if this situation will last. I will return here with the results of more print tests.
Thank you!
03-13-2017 03:46 PM
HP Recommended
You're welcome. 🙂
I'm glad to know that the printer is working fine. I must say that technical solutions can only be provided. But it was you who performed them to perfection.
Do reach out to us for nay further assistance in future. Take care! 🙂
Be alert for scammers posting fake support phone numbers and/or email addresses on the community.
If you think you have received a fake HP Support message, please report it to us by clicking on "Flag Post".
† The opinions expressed above are the personal opinions of the authors, not of HP. By using this site, you accept the Terms of Use and Rules of Participation.


Didn't find what you were looking for?
Ask the community
† The opinions expressed above are the personal opinions of the authors, not of HP. By using this site, you accept the <a href="https://www8.hp.com/us/en/terms-of-use.html" class="udrlinesmall">Terms of Use</a> and <a href="/t5/custom/page/page-id/hp.rulespage" class="udrlinesmall"> Rules of Participation</a>.