-
×InformationNeed Windows 11 help?Check documents on compatibility, FAQs, upgrade information and available fixes.
Windows 11 Support Center. -
-
×InformationNeed Windows 11 help?Check documents on compatibility, FAQs, upgrade information and available fixes.
Windows 11 Support Center. -
- HP Community
- Printers
- Printing Errors or Lights & Stuck Print Jobs
- HP Desk Jet 2132-- stop printing test page at start

Create an account on the HP Community to personalize your profile and ask a question
04-16-2019 01:32 PM
No error messages, printer prints a test page every time it is turned on--waste of expensive ink. How do I stop this?
Solved! Go to Solution.
Accepted Solutions
04-17-2019 10:56 AM
@scate, Welcome to HP Support Community!
It sounds like the alignment didn't finish when you set up the printer initially. The alignment sheet needs to be scanned or the process repeats itself. This is normal and it will continue to realign itself until it is completed successfully.
This guide shows the alignment process:
Load paper into the input tray (ensure you're loading fresh, unused paper into the input tray).
Load plain, U.S. letter or A4 paper in the input tray after you install the ink cartridges.
-
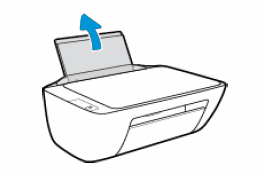
Raise the input tray.
Figure: Raise the input tray
-
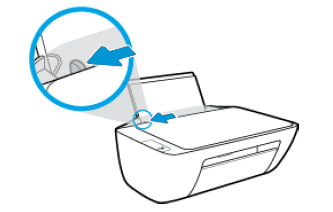
Remove any paper from the input tray that is different than the type of paper you want to load, and then slide the paper width guide as far as possible to the left.
Figure: Slide the paper width guide to the left
-
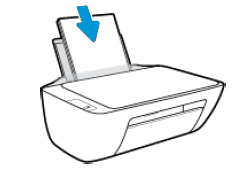
Load a stack of U.S. letter, A4, or legal size paper into the input tray with the short edge forward and the print side facing closest to you. Push the stack into the tray until it stops.
Figure: Load the paper into the input tray
-
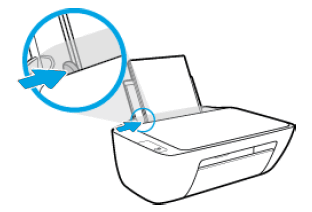
Slide the paper-width guide to the right until it rests at the edge of the paper.
Figure: Slide the paper width guide to the right
-
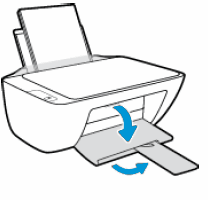
Lower the output tray and pull out the output tray extender.
Figure: Lower the output tray and pull out the output tray extender
Step 5: Align the ink cartridges
Aligning the ink cartridges is necessary to achieve the best print quality.
-
After loading the paper, the printer automatically prints an alignment page.
NOTE: The printer only prints an alignment page automatically when new ink cartridges are installed.
-
Lift the scanner lid.
-
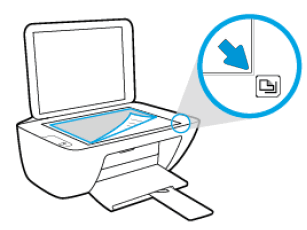
Place the alignment page with the print side down on the scanner glass, and then position it according to the engraved guides around the glass.
Figure: Place the alignment page on the scanner glass
-
Close the scanner lid.
-
Press the Start Copy Black button (
 ) or the Start Copy Color button (
 ) on the control panel of the printer.
The printer aligns the ink cartridges.
Once the alignment is completed, you should be able to print without issues.
Keep me posted.
Cheers 🙂
Please click “Accept as Solution” if you feel my post solved your issue, it will help others find the solution. Click the “Kudos/Thumbs Up" on the bottom right to say “Thanks” for helping!
TEJ1602
I am an HP Employee
04-17-2019 10:56 AM
@scate, Welcome to HP Support Community!
It sounds like the alignment didn't finish when you set up the printer initially. The alignment sheet needs to be scanned or the process repeats itself. This is normal and it will continue to realign itself until it is completed successfully.
This guide shows the alignment process:
Load paper into the input tray (ensure you're loading fresh, unused paper into the input tray).
Load plain, U.S. letter or A4 paper in the input tray after you install the ink cartridges.
-
Raise the input tray.
Figure: Raise the input tray

-
Remove any paper from the input tray that is different than the type of paper you want to load, and then slide the paper width guide as far as possible to the left.
Figure: Slide the paper width guide to the left

-
Load a stack of U.S. letter, A4, or legal size paper into the input tray with the short edge forward and the print side facing closest to you. Push the stack into the tray until it stops.
Figure: Load the paper into the input tray

-
Slide the paper-width guide to the right until it rests at the edge of the paper.
Figure: Slide the paper width guide to the right

-
Lower the output tray and pull out the output tray extender.
Figure: Lower the output tray and pull out the output tray extender

Step 5: Align the ink cartridges
Aligning the ink cartridges is necessary to achieve the best print quality.
-
After loading the paper, the printer automatically prints an alignment page.
NOTE: The printer only prints an alignment page automatically when new ink cartridges are installed.
-
Lift the scanner lid.
-
Place the alignment page with the print side down on the scanner glass, and then position it according to the engraved guides around the glass.
Figure: Place the alignment page on the scanner glass

-
Close the scanner lid.
-
Press the Start Copy Black button (
 ) or the Start Copy Color button (
 ) on the control panel of the printer.
The printer aligns the ink cartridges.
Once the alignment is completed, you should be able to print without issues.
Keep me posted.
Cheers 🙂
Please click “Accept as Solution” if you feel my post solved your issue, it will help others find the solution. Click the “Kudos/Thumbs Up" on the bottom right to say “Thanks” for helping!
TEJ1602
I am an HP Employee
