-
×InformationNeed Windows 11 help?Check documents on compatibility, FAQs, upgrade information and available fixes.
Windows 11 Support Center. -
-
×InformationNeed Windows 11 help?Check documents on compatibility, FAQs, upgrade information and available fixes.
Windows 11 Support Center. -

Create an account on the HP Community to personalize your profile and ask a question
03-07-2019 04:36 PM
Thanks for reaching out to the HP Support community!
Incompatible ink cartridge means either the cartridge installed on the printer may not be the correct cartridge or the cartridge may not be getting registered with the printer correctly even though its the right cartridge for the printer
Let's try the following steps:
Step 1: Use Genuine HP ink cartridges
Step 2: Make sure that the cartridges are compatible. Refer the below image to check for the compatible cartridge.
Step 3: Remove, inspect, and reseat the cartridges.
The cartridge might not have full electrical contact with the printer. Removing and reinstalling the cartridge might help.
- Press the Power button to turn on the printer, if it is not already on.
- Open the scanner lid.
- Open the cartridge access door. The carriage moves to the cartridge access area of the printer. Wait until the carriage is idle and silent before continuing.
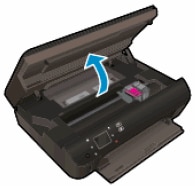
- To release the cartridge, lift the lid on the cartridge slot, and then gently push the lid back until it stops.
- Pull up on the cartridge to remove it from the slot.

1.Lift the lid
2. Gently push the lid back
3. Pull up on the cartridge
- Remove any protective tape that might still be on the nozzles.
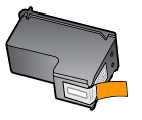
-
Hold the cartridge at a slight upward angle with the cartridge contacts facing the rear of the printer, and then slide the cartridge into the empty slot.
-
Close the lid on the cartridge slot to secure the cartridge into place.
-
Install the other ink cartridge.
-
Close the scanner lid.
-
If the issue persists, continue to the next solution.
Step 4: Clean the electrical contacts
- Gather the following materials:
- Dry foam rubber swabs, lint-free cloth, or any soft material that does not come apart or leave fibers (coffee filters work well)
- Distilled, filtered, or bottled water (tap water might contain contaminants that can damage the cartridges)
- Press the Power button to turn on the printer, if it is not already on.
- Open the scanner lid.
- Open the cartridge access door. The carriage moves to the cartridge access area.
- Disconnect the power cord from the rear of the printer.
- Remove the ink cartridge.
- Hold the cartridge by its sides.
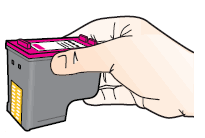
- Inspect the ink cartridge contacts for ink and debris buildup. (Note: Do not touch the contacts or nozzles)
-
Lightly moisten a foam-rubber swab or lint-free cloth with distilled water, and then squeeze any excess water from it.
-
Clean only the copper-colored contacts on the cartridge, and then allow the cartridge to dry for about 10 minutes.
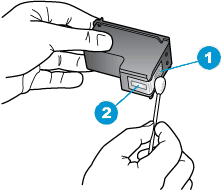
1. Copper-colored contacts 2. Ink nozzles (do not clean)
-
Lightly moisten another foam-rubber swab or lint-free cloth with distilled water, and then squeeze any excess water from it.
-
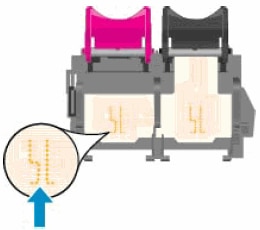
Use the swab or cloth to clean the electrical contacts in the carriage, located inside the printer in the cartridge slots.
-
Allow the carriage contacts to dry for about 10 minutes.
-
Re-insert the ink cartridges.
-
Close the ink cartridge door.
-
Close the scanner lid.
-
Reconnect the power cord to the rear of the printer.
-
Reconnect the USB cable, if the printer is connected to your computer with a USB connection.
-
Press the Power button to turn on the printer.
-
If the issue persists, clean the cartridges again.
-
Proceed to the next step if the issue remains.
Step 5: Power Reset.
- Make sure this printer is plugged into a direct wall, not a surge protector.
- Turn the printer on.
- Wait until the printer is idle and silent before you continue.
- With the printer turned on, disconnect the power cord from the rear of the printer.
- Unplug the power cord from the wall outlet. Wait at least 60 seconds
- Plug the power cord back into the wall outlet.
- Reconnect the power cord to the rear of the printer.
- Turn on the printer, if it does not automatically turn on.
Step 6: Identify the problem ink cartridge
- Remove 1 of the ink cartridge, close the cartridge door and check if the error message disappears. If it does then the removed cartridge is a faulty one. Replace the cartridge. If the issue exists, switch cartridges and check error, replace if needed.
Follow these steps & let me know what happens.
Please click “Accept as Solution” if you feel my post solved your issue, it will help others find the solution.
Click the “Kudos, Thumbs Up" on the bottom right to say “Thanks” for helping.
ATHARVA_GP
I am an HP Employee

