-
×InformationNeed Windows 11 help?Check documents on compatibility, FAQs, upgrade information and available fixes.
Windows 11 Support Center. -
-
×InformationNeed Windows 11 help?Check documents on compatibility, FAQs, upgrade information and available fixes.
Windows 11 Support Center. -
- HP Community
- Printers
- Printing Errors or Lights & Stuck Print Jobs
- HP Envy 4520 Legal Size Printing

Create an account on the HP Community to personalize your profile and ask a question
Your account also allows you to connect with HP support faster, access a personal dashboard to manage all of your devices in one place, view warranty information, case status and more.
Check some of the most frequent questions about Instant Ink: HP INSTANT INK, HP+ PLANS: INK AND TONER.
Check out our Black or Color Ink Not Printing, Other Print Quality Issues info about: Print quality and Cartridge Issues.

It has been a while since anyone has replied. Simply ask a new question if you would like to start the discussion again.
03-29-2019
07:19 AM
- last edited on
03-31-2019
11:18 AM
by
![]() Cheron-Z
Cheron-Z
 HP Recommended
I tried this solution, but the printer tells me to close the paper tray door and won't print. It is really frustrating when an incomplete "solution" is on the official website.
Solved! Go to Solution.
1 ACCEPTED SOLUTION
Accepted Solutions
04-01-2019 04:08 AM - edited 04-01-2019 04:10 AM
HP Recommended
Hey there! @Steve4158,
What is the legal paper size you are printing?
By default, the printer does not support printing legal paper size. You need to change the settings to custom paper size and then try printing.
Refer the printer specifications page for more information. Click Here
Try the steps recommended below to create a custom paper size. (Windows Only)
Create a custom paper size from Windows Devices and Printers.
Step 1: Create the new custom paper size
To set up the new custom paper size, create the new size option in the printer properties.
Search Windows for control panel, select Control Panel from the list of results, and then click View devices and printers.
Click the icon for your printer, and then click Print server properties.
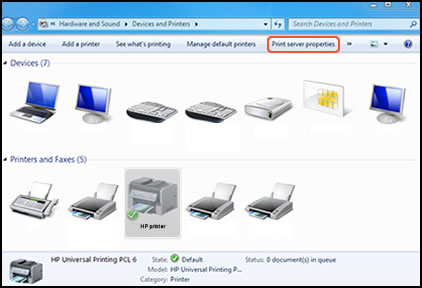
NOTE:
If Print server properties does not display, right-click an empty area in the Printers window, select Run as administrator from the drop-down menu, and then select Server Properties.
If the User Account Control window displays, click Continue.
On the Forms tab, select the Create a new form check box, and then type a name for the new paper size in the Form nametext box.
NOTE:
You must choose a different, unique name for the new custom paper size. Do not use an existing paper size name.
Create a new form
Form name
Select Metric or English, and then type the dimensions of your custom paper in the Width and Height text boxes.
NOTE:
Leave the Printer area margins set at 0.00.
Metric or English
Width and Height
Click Save Form, and then click OK or Close.
NOTE:
Supported paper sizes vary by printer. If you input custom dimensions that your printer does not support, the new custom paper size does not display when you attempt to print. Check the printer specifications for your printer for more information on supported paper sizes..
Refer this article to know more information about creating a custom size paper. Click Here
Also, Try the steps recommended below.
Step 1: Open your spreadsheet in Excel.
Step 2: Click the Page Layout tab at the top of the window.

Step 3: Click the Size button in the Page Setup section of the ribbon at the top of the window, then click the Legal option.

Refer the printer user guide to know more information about loading media paper on the printer. Click Here
Note: Refer page 8 for more information.
Hope this answers your query!
Have a pleasant weekend ahead! 🙂
Please click “Accept as Solution” if you feel my post solved your issue, it will help others find the solution.
Click the “Kudos, Thumbs Up" on the bottom right to say “Thanks” for helping!
A4Apollo
I am an HP Employee
3 REPLIES 3
04-01-2019 04:08 AM - edited 04-01-2019 04:10 AM
HP Recommended
Hey there! @Steve4158,
What is the legal paper size you are printing?
By default, the printer does not support printing legal paper size. You need to change the settings to custom paper size and then try printing.
Refer the printer specifications page for more information. Click Here
Try the steps recommended below to create a custom paper size. (Windows Only)
Create a custom paper size from Windows Devices and Printers.
Step 1: Create the new custom paper size
To set up the new custom paper size, create the new size option in the printer properties.
Search Windows for control panel, select Control Panel from the list of results, and then click View devices and printers.
Click the icon for your printer, and then click Print server properties.
NOTE:
If Print server properties does not display, right-click an empty area in the Printers window, select Run as administrator from the drop-down menu, and then select Server Properties.
If the User Account Control window displays, click Continue.
On the Forms tab, select the Create a new form check box, and then type a name for the new paper size in the Form nametext box.
NOTE:
You must choose a different, unique name for the new custom paper size. Do not use an existing paper size name.
Create a new form
Form name
Select Metric or English, and then type the dimensions of your custom paper in the Width and Height text boxes.
NOTE:
Leave the Printer area margins set at 0.00.
Metric or English
Width and Height
Click Save Form, and then click OK or Close.
NOTE:
Supported paper sizes vary by printer. If you input custom dimensions that your printer does not support, the new custom paper size does not display when you attempt to print. Check the printer specifications for your printer for more information on supported paper sizes..
Refer this article to know more information about creating a custom size paper. Click Here
Also, Try the steps recommended below.
Step 1: Open your spreadsheet in Excel.
Step 2: Click the Page Layout tab at the top of the window.
Step 3: Click the Size button in the Page Setup section of the ribbon at the top of the window, then click the Legal option.
Refer the printer user guide to know more information about loading media paper on the printer. Click Here
Note: Refer page 8 for more information.
Hope this answers your query!
Have a pleasant weekend ahead! 🙂
Please click “Accept as Solution” if you feel my post solved your issue, it will help others find the solution.
Click the “Kudos, Thumbs Up" on the bottom right to say “Thanks” for helping!
A4Apollo
I am an HP Employee
04-02-2019 12:06 PM
HP Recommended
@Steve4158 I'm writing on behalf of my colleague @A4Apollo as the tech is out of office for the day,
I'm glad that worked and if you need anything else, feel free to get back to us, anytime.
Have a good day, ahead.
Riddle_Decipher
I am an HP Employee
Learning is a journey, not a destination.
Let's keep asking questions and growing together.
Be alert for scammers posting fake support phone numbers and/or email addresses on the community.
If you think you have received a fake HP Support message, please report it to us by clicking on "Flag Post".
† The opinions expressed above are the personal opinions of the authors, not of HP. By using this site, you accept the Terms of Use and Rules of Participation.


Didn't find what you were looking for?
Ask the community
† The opinions expressed above are the personal opinions of the authors, not of HP. By using this site, you accept the <a href="https://www8.hp.com/us/en/terms-of-use.html" class="udrlinesmall">Terms of Use</a> and <a href="/t5/custom/page/page-id/hp.rulespage" class="udrlinesmall"> Rules of Participation</a>.