Hi @Jill_S
Welcome to the HP Support Community. I'd be happy to assist you
Try the below steps to resolve the issue-
Clean the paper feed rollers
Dust, paper fiber, and other debris might accumulate on the paper feed rollers and cause paper jams and paper feed issues.
-
Turn off the printer, and then disconnect the power cord.
WARNING:
To avoid risk of injuries or electric shock, disconnect the power cord before reaching inside the printer.
-
Push in the output tray, if necessary.
-
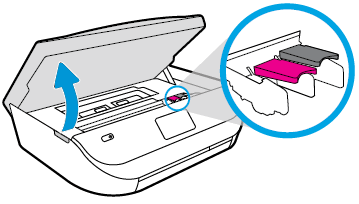
Gently grasp the handles on either side of the printer, and then raise the ink cartridge access door until it locks into place.
Figure : Opening the ink cartridge access door
-
Lightly dampen a lint-free cloth with distilled water, and then squeeze any excess liquid from the cloth.
-
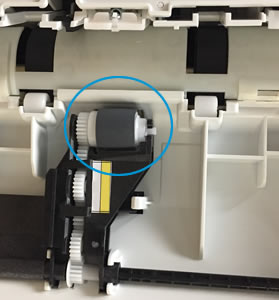
Press the cloth against the rollers inside the printer, and then rotate the rollers upwards with your fingers. Apply a moderate amount of pressure to remove any dust or dirt buildup.
Figure : Rollers in the ink cartridge access area

-
Allow the rollers to dry (approximately 10 or 15 minutes).
-
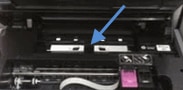
Locate the paper path cover in the area behind the ink cartridge access area.
Figure : Example of the paper path cover
-
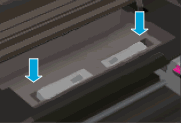
To remove the paper path cover, pinch the tabs together, and then lift up.
Figure : Removing the paper path cover
-
Pinch the tabs together
-
Lift up
-
Lightly dampen a lint-free cloth with distilled water, and then squeeze any excess liquid from the cloth.
-
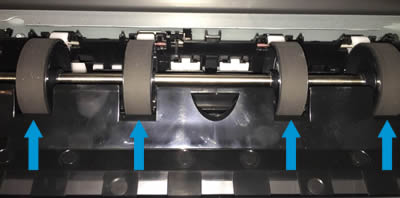
Press the cloth against the rollers, and then rotate them upward with your fingers. Apply a moderate amount of pressure to remove any dust or dirt buildup.
Figure : Rollers behind the ink cartridges
-
Allow the rollers to dry (approximately 10 or 15 minutes).
-
Replace the paper path cover.
Figure : Replacing the paper path cover
-
Close the ink cartridge access door.
-
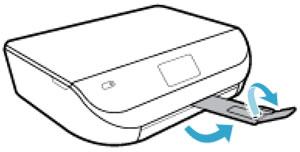
Pull out the output tray, and then lift the output tray extender.
Figure : Pulling out the output tray and lifting the output tray extender
-
Reconnect the power cord and any other cables to the rear of the printer, and then turn on the printer.
Try to print. If the error persists, clean the rollers in another area of the printer.
Clean the rollers underneath the printer
-
Turn off the printer, and then disconnect any cords connected to the printer, such as the power cord and USB cable.
-
Turn the printer on its side to access its underside (base).
CAUTION:
Before turning the printer, use your hands to secure the scanner lid.
-
While supporting the printer with one hand, pull the paper tray open to expose the paper rollers underneath the printer.
Figure : Rollers underneath the printer
-
Lightly dampen a lint-free cloth with distilled water, and then squeeze any excess liquid from the cloth.
-
Press the cloth against the rollers inside the printer, and then rotate the rollers upwards with your fingers. Apply a moderate amount of pressure to remove any dust or dirt buildup.
-
Allow the rollers to dry completely (approximately 10 minutes).
-
Close the paper tray, and then set the printer upright.
-
Reconnect the power cord and any other cables to the rear of the printer, and then turn on the printer.
Try to print. If the error persists, continue to the next step.
Reset the printer
Sometimes a paper jam error persists even though there is no jammed paper (false paper jam). Reset the printer, which might clear a false paper jam error, and then try to print again.
-
With the printer turned on, disconnect the power cord from the printer.
-
Unplug the power cord from the power source.
-
Wait 60 seconds.
-
Reconnect the power cord to a wall outlet and to the printer.
NOTE:
HP recommends plugging the printer directly into a wall outlet.
Try to print.
Hope this helps! Keep me posted.
Please click “Accept as Solution” if you feel my post solved your issue, it will help others find the solution.
Click the “Kudos, Thumbs Up" on the bottom right to say “Thanks” for helping!
Have a great day!


