-
×InformationNeed Windows 11 help?Check documents on compatibility, FAQs, upgrade information and available fixes.
Windows 11 Support Center. -
-
×InformationNeed Windows 11 help?Check documents on compatibility, FAQs, upgrade information and available fixes.
Windows 11 Support Center. -
- HP Community
- Printers
- Printing Errors or Lights & Stuck Print Jobs
- HP Ink Tank 319 E4 error

Create an account on the HP Community to personalize your profile and ask a question
12-27-2020 08:46 AM
Hi @Amber999,
I'd like to help!
Try the below suggestions -
Step 1: Look for jammed paper
Paper jams can occur in multiple areas of the printer. If you cannot find the paper jam in one area, continue to the next area until the jam is located.
- Clear jammed paper from the input tray
- Clear jammed paper from the output tray
- Clear jammed paper from the printhead access area
- Clear jammed paper from underneath the printer
If you have checked and removed any jammed paper from each printer area and the error persists, continue to the next step.
Step 2: Make sure the carriage moves freely
To make sure there are no foreign objects or paper in the printer, move the carriage across the width of the printer.
-
Turn on the printer, if it is not already on.
-
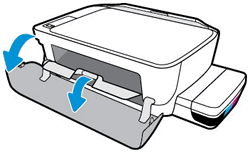
Open the exterior door, and then open the printhead access door.

-
With the printer turned on, disconnect the power cord from the rear of the printer.
-
Unplug the power cord from the power source or electrical outlet.
WARNING:
You must disconnect the power cord before reaching inside the printer to avoid risk of injuries or electric shock.
-
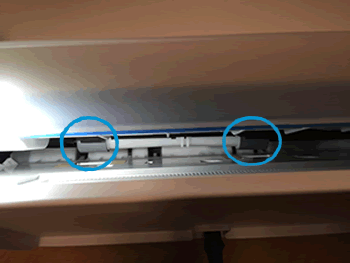
Check for any paper or foreign objects that might be restricting the carriage, and then remove any paper or foreign objects that you find.
CAUTION:
If the paper tears when you remove it from the rollers, check the rollers and wheels for torn pieces of paper that might remain inside the printer. If pieces of paper remain in the printer, more jams are likely to occur.
-
Without engaging the printhead latch, reach inside the printer through the printhead access door, and then manually move the carriage.
-
If the carriage is stuck on the right side of the printer, move the carriage to the left side of the printer.
-
If the carriage is stuck on the left side of the printer, move the carriage to the right side of the printer.
-
If the carriage is stuck in the middle of the printer, move the carriage to the right side of the printer.
-
-
Remove any loose paper or obstructions you find.
-
Make sure the carriage can move freely across the width of the printer. Firmly push the carriage to the left side of the printer, and then to the right side.
-
Close the printhead access door, and then close the exterior door.
-
Reconnect the power cord to the rear of the printer, and then plug it into the power source or electrical outlet.
-
Reconnect the USB cable, if necessary.
-
Turn on the printer.
Try to print. If the error persists, continue to the next step.
Step 3: Clean ink smears
Cleaning ink smears can help clear paper jams and optimize print quality.
-
Press and hold the Power button, press the Cancel button
 three times, press the Start Copy Color button
  eight times, and then release the Power button.
The printer feeds one page slowly and makes mechanical noises.
-
Wait until the printer is idle and silent before you proceed.
Try to print. If the error persists, continue to the next step.
Step 4: Manually clean the paper rollers inside the input tray area
Dust, paper fiber, and other debris might accumulate on the paper feed rollers and cause paper jams and paper feed issues.
-
Turn off the printer.
-
Disconnect the USB cable from the printer, if it is connected.
-
Disconnect the power cord from the rear of the printer.
WARNING:
You must disconnect the power cord before reaching inside the printer to avoid risk of injuries or electric shock.
-
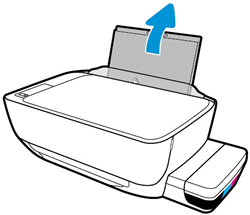
Raise the input tray.

-
Lift and hold the input tray shield.
CAUTION:
Do not remove the input tray shield. The input tray shield prevents foreign debris from falling into the paper path and causing paper jams.
-
Look through the open input tray, and then find the gray paper pick rollers.

-
Dampen a long cotton swab with distilled water, and then squeeze out any excess water.
-
Press the swab against the rollers, and then rotate them upward with your fingers. Apply a moderate amount of pressure to remove dust or dirt buildup.
-
Lower the input tray shield.
-
Allow the rollers to dry for 10 minutes.
-
Reconnect the power cord to the rear of the printer.
-
Reconnect the USB cable to the printer, if necessary.
-
Turn on the printer.
Try to print. If the error persists, continue to the next step.
Step 5: Reset the printer
Sometimes a paper jam error persists even though there is no jammed paper (false paper jam). Reset the printer, which might clear a false paper jam error.
-
With the printer turned on, disconnect the power cord from the printer.
-
Unplug the power cord from the power source.
-
Wait 60 seconds.
-
Reconnect the power cord to a wall outlet and to the printer.
NOTE:
HP recommends plugging the printer directly into a wall outlet.
Try the below steps-'E4' Error (Paper Jam)
Hope this helps! Keep me posted.
And, Welcome to the HP Support Community.
Please click “Accept as Solution” if you feel my post solved your issue, it will help others find the solution.
Click the “Kudos, Thumbs Up" on the bottom right to say “Thanks” for helping
