• ×
    Information
    Need Windows 11 help?
    Check documents on compatibility, FAQs, upgrade information and available fixes.
    Windows 11 Support Center.
  • post a message
  • ×
    Information
    Need Windows 11 help?
    Check documents on compatibility, FAQs, upgrade information and available fixes.
    Windows 11 Support Center.
  • post a message
Guidelines
Experiencing 'Printer Blocked' or 'Printer Error' message? Click here for more information.
Check some of the most frequent questions about Instant Ink: HP INSTANT INK, HP+ PLANS: INK AND TONER.


Check out our Black or Color Ink Not Printing, Other Print Quality Issues info about: Print quality and Cartridge Issues.
HP Recommended
HP OfficeJet 4652

I have been using Instant Ink for about a year and have had zero issues. They normally send me an XL color and an XL black cartridge. This month I recieved my XL color cartridge and 2 regular sized black cartridges (I assume they are equal to 1 XL). The first black cartridge worked perfectly until it ran out. I installed the second and alligned the printer, but the black ink will not show up on paper. It's as if the ink has run out. The levels on my printer and online say they are both full (color and black), but they are not printing like they are full. Maybe a faulty cartridge? I have cleaned the cartriges via settings on the printer multiple times, but it is not helping. I'd love a replacement cartridge if I can't resolve this. Thanks. 

1 REPLY 1
HP Recommended

Hey there! @ashmontpenn, Thank you for visiting the HP Forums! A great place where you can find solutions for your issues, with help from the community!


I understand the black ink cartridge is full however you have issues printing in black from your printer.


Don't worry I'll try to help you out.


Did you make any changes to your printer?


Does the issue persist when you make a copy from your printer?


Have you tried printing using a different ink cartridge?


Excellent description and a great diagnosis done. It is greatly appreciated.


Replace any low or empty ink cartridges

Replace any low or empty ink cartridges, and then try to print again.

  1. Turn on the printer.

  2. Make sure to load the printer with plain, white paper.

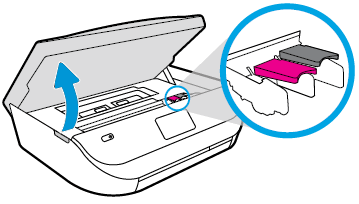
  3. Gently grasp the handles on either side of the printer, then raise the ink cartridge access door until it locks into place.

    The carriage moves to the center of the printer.

    Image: Opening the ink cartridge access door.

  4. Wait until the carriage is idle and silent before you proceed.

  5. To release the ink cartridge, lift the lid on the ink cartridge slot, then gently push the lid back until it stops.

  6. Pull up on the ink cartridge to remove it from the slot.

    1. Lift the lid

    2. Gently push the lid back

    3. Pull up on the ink cartridge

  7. Remove one of the new ink cartridges from its package. Be careful to only touch the black plastic on the ink cartridge.

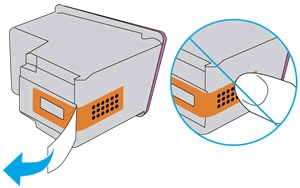
  8. Remove the plastic tape from the ink cartridge.

       CAUTION:

    Do not touch the copper-colored contacts or the ink nozzles. Do not replace the protective tape on the contacts. Handling these parts can result in clogs, ink failure, and bad electrical connections.

    Image: Removing the plastic tape

  9. Hold the ink cartridge by its sides with the nozzles toward the printer, then slide the ink cartridge forward into the slot.

  10. Close the lid on the ink cartridge slot to secure the ink cartridge into place.

    1. Insert the ink cartridge

    2. Close the lid

    3. The color ink cartridge is on the left, and the black ink cartridge is on the right

  11. Repeat the previous steps to install the other ink cartridge, if needed.

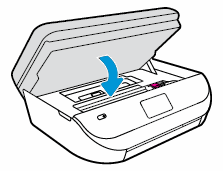
  12. Close the ink cartridge access door.

    After you install new ink cartridges, the printer automatically prints an alignment page.

    Image: Closing the ink cartridge access door.

  13. Wait for the alignment page to fully eject from the printer.

       NOTE:

    Before a print job, the printer automatically extends the output tray extender. Do not push in the output tray extender until the print job is complete.

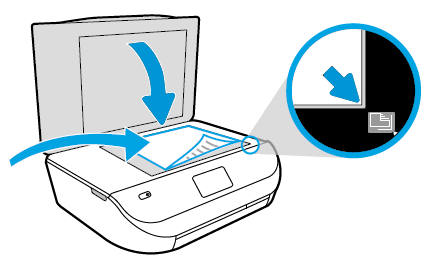
  14. Lift the scanner lid.

  15. Place the alignment page with the print side down on the scanner glass. Position it according to the engraved guides around the glass.

    Image: Placing the alignment page on the scanner glass

  16. Close the scanner lid, then touch OK.

    The printer aligns the ink cartridges.


Refer this article to further troubleshoot print quality issues. Click Here


If the issue still persists after trying out the steps. Please share few details through a private message. So I can check the account details and ship you the replacement ink cartridges.


Instant ink account number-

Instant ink email address-

Printer serial number-


Let me know if this helps!

Have a pleasant day ahead! 🙂


Please click “Accept as Solution” if you feel my post solved your issue, it will help others find the solution.

Click the “Kudos, Thumbs Up" on the bottom right to say “Thanks” for helping!

A4Apollo
I am an HP Employee

† The opinions expressed above are the personal opinions of the authors, not of HP. By using this site, you accept the <a href="https://www8.hp.com/us/en/terms-of-use.html" class="udrlinesmall">Terms of Use</a> and <a href="/t5/custom/page/page-id/hp.rulespage" class="udrlinesmall"> Rules of Participation</a>.