-
×InformationNeed Windows 11 help?Check documents on compatibility, FAQs, upgrade information and available fixes.
Windows 11 Support Center. -
-
×InformationNeed Windows 11 help?Check documents on compatibility, FAQs, upgrade information and available fixes.
Windows 11 Support Center. -
- HP Community
- Printers
- Printing Errors or Lights & Stuck Print Jobs
- HP Photosmart 7510 New cartridges showing as nearly empty

Create an account on the HP Community to personalize your profile and ask a question
Your account also allows you to connect with HP support faster, access a personal dashboard to manage all of your devices in one place, view warranty information, case status and more.
Check some of the most frequent questions about Instant Ink: HP INSTANT INK, HP+ PLANS: INK AND TONER.
Check out our Black or Color Ink Not Printing, Other Print Quality Issues info about: Print quality and Cartridge Issues.

It has been a while since anyone has replied. Simply ask a new question if you would like to start the discussion again.
12-12-2018 05:16 AM
 HP Recommended
Product: HP Photosmart 7510
Operating System: Microsoft Windows 10 (64-bit)
My cartridges seem to be running out even though I have not been printing very much. When I replace cartridges, which I did today, the whole set - it's showing in the Report that 2 of them are very low. The printer is 6 years old.
5 REPLIES 5
12-13-2018 12:29 PM
HP Recommended
Welcome to HP Forums,
This is a great place to get support, find answers and tips to your technical queries.
To provide you with an accurate solution, I'll need a few more details:
Are you using genuine HP ink cartridge?
I suggest you do a Hard Reset
(1) Turn the printer on, if it is not already on.
(2) Wait until the printer is idle and silent before you continue.
(3) With the printer turned on, disconnect the power cord from the rear of the printer.
(4) Unplug the power cord from the wall outlet.
(5) Wait at least 60 seconds.
(6) Plug the power cord back into the wall outlet.
NOTE: HP recommends connecting the printer power cord directly to the wall outlet.
(7) Reconnect the power cord to the rear of the printer.
(8) Turn on the printer, if it does not automatically turn on.
The printer might go through a warm-up period. The printer lights might flash, and the carriage might move.
Wait until the warm-up period finishes and your printer is idle and silent before you proceed.
Update the firmware for the printer using this link: https://support.hp.com/us-en/product/hp-photosmart-7510-e-all-in-one-printer-series-c311/5070118/doc...
Restart the printer.
Manually clean the printhead
If the printhead cleaning tool did not resolve the problem, the printhead might be installed incorrectly, or there might be ink or debris on the printhead electrical contacts.
CAUTION:Clean the printhead contacts only after running the printhead cleaning utility from your computer. Printhead contacts contain sensitive electronic components that can be damaged easily.
-
Gather the following materials:
-
A clean, lint-free cloth
-
A clean, dry cotton swab
-
Distilled or bottled water
CAUTION:
Do not use tap water because it might contain contaminants that can damage the printhead.
-
-
Open the ink cartridge access door.
-
To remove the ink cartridge, press the tab on the front of the ink cartridge to release it, and then remove it.
Figure : Example of removing an ink cartridge from the printhead

-
Place the ink cartridges on a clean piece of paper with the ink opening pointing up.
CAUTION:
Do not leave the ink cartridges outside the printer longer than 30 minutes. Doing so can result in damage to both the printer and the ink cartridges.
-
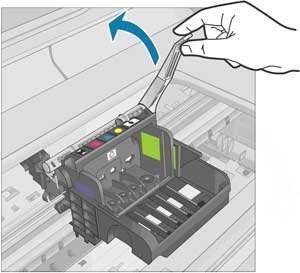
Lift the latch handle on the ink carriage until it stops.
Figure : Lifting the ink carriage latch handle
-
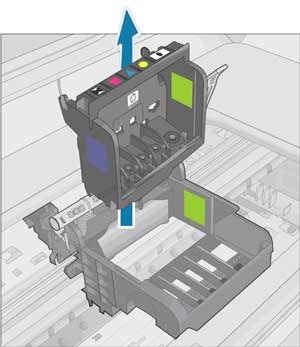
Lift up to remove the printhead from the ink carriage.
Figure : Removing the printhead
-
Review the three areas of the printhead that need to be cleaned.
Figure : Example of the three areas to clean on the printhead
-
Plastic ramp on the side of the ink nozzles
-
Edge between nozzles and contacts
-
Electrical contacts
CAUTION:
Do not touch the nozzles or the electrical contacts with your fingers. Touch the electrical contact areas only with the cleaning materials.
-
-
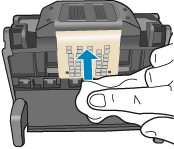
Use a fresh, lightly dampened, lint-free cloth to wipe the electrical contact area from the bottom to the top until no new ink shows on the cloth.
Use as many fresh, lightly dampened, lint-free cloths as necessary.
Figure : Cleaning the electrical contacts
-
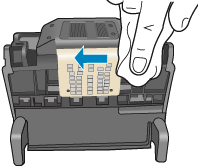
Use a fresh, lightly dampened, lint-free cloth to wipe any accumulated ink and debris from the edge between the nozzles and the contacts.
Figure : Cleaning the edge of the printhead
-
Use a fresh, lightly dampened, lint-free cloth to wipe the plastic ramps on both sides, away from the nozzles.
Figure : Cleaning the printhead ramps

-
Wipe the previously cleaned areas dry with a dry, lint-free cloth.
-
Use a fresh, lightly dampened, lint-free cloth to wipe the electrical contact area inside the printer from bottom to the top until no new ink shows on the cloth.
Use as many fresh, lightly dampened, lint-free cloths as necessary.
Figure : Cleaning the electrical contacts inside the printer
-
Wipe the electrical contact area dry with a dry, lint-free cloth.
-
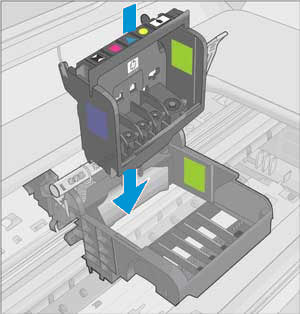
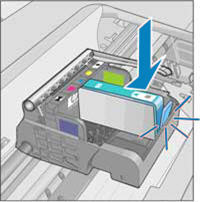
Make sure the ink carriage latch handle is up, then reinstall the printhead.
Figure : Reinstalling the printhead
-
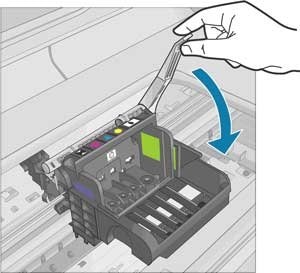
Carefully lower the ink carriage latch handle.
Figure : Lowering the ink carriage latch handle
-
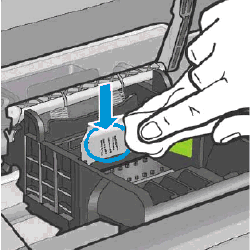
Reinsert the ink cartridge into the matching letter and colored dot slot, then push the ink cartridge down and forward until it snaps into place.
Figure : Example of sliding the ink cartridge into the correct slot
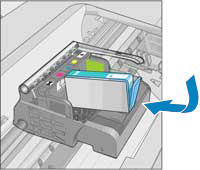
Figure : Example of snapping the ink cartridge into place
-
Run your finger along the top of the ink cartridges to make sure none of them protrude.
If any ink cartridges protrude, then press down firmly until each ink cartridge snaps into place.
-
Close the ink cartridge access door.
Keep me posted, how it goes!
If the information I've provided was helpful, give us some reinforcement by clicking the Accepted Solution and Kudos buttons, that'll help us and others see that we've got the answers!
Have a great day!
Cheers:)
Raj1788
I am an HP Employee
12-14-2018 01:05 PM
HP Recommended
Hi Raj1788.
I have just followed all instructions, firstly trying to disconnect completely, wait, turn on again - the ink levels are still showing as low.
I have been to the software and downloads page, located my printer and tried to run an update on the drivers, but there didn't seem to be any available - just a clean installation.
I then did the cleaning of the print heads as per instructions - no improvement.
I did a Printer Status Report and although all inks were replaced as new at the same time, the Black/Photo is showing 2/3 full, Magenta nearly empty, Cyan slightly used, Yellow 2/3 used and black is showing as full. I have printed just 4 pages since installing.
I have run a Cleaning process of the print heads, the colours are all vibrant.
I ran the second process of cleaning and again the colours are vibrant.
This is just a waste of ink if I keep running diagnostics.
I really don't want to dispose of a piece of HP equipment - it's wasteful if the only thing wrong is a problem with the printhead.
I am using Windows 10. My computer is 64 Bit Acer, 4 years old. Is there anything else you may need to know?
12-15-2018 09:40 AM
HP Recommended
Appreciate all your time and efforts,
I have sent you a private message, for more details that cannot be shared in a public post.
Can you please check your inbox on the forums page for the private message.
Have a great day!
Raj1788
I am an HP Employee
12-15-2018 12:41 PM
HP Recommended
Thanks for your help. I'm so frustrated. I will let you know how I get along. I've wasted 2 whole days now trying to resolve and probably also money on inks.
I am doubting there will be a solution and a perfectly good piece of equipment may have to be disposed of just because the cartrdges are not working. I will keep you posted.
Laura
12-15-2018 03:51 PM
HP Recommended
Appreciate all your time and efforts,
I have sent you a private message, for more details that cannot be shared in a public post.
Can you please check your inbox on the forums page for the private message.
Have a great day!
Raj1788
I am an HP Employee
Be alert for scammers posting fake support phone numbers and/or email addresses on the community.
If you think you have received a fake HP Support message, please report it to us by clicking on "Flag Post".
† The opinions expressed above are the personal opinions of the authors, not of HP. By using this site, you accept the Terms of Use and Rules of Participation.


Didn't find what you were looking for?
Ask the community
† The opinions expressed above are the personal opinions of the authors, not of HP. By using this site, you accept the <a href="https://www8.hp.com/us/en/terms-of-use.html" class="udrlinesmall">Terms of Use</a> and <a href="/t5/custom/page/page-id/hp.rulespage" class="udrlinesmall"> Rules of Participation</a>.