-
×InformationNeed Windows 11 help?Check documents on compatibility, FAQs, upgrade information and available fixes.
Windows 11 Support Center. -
-
×InformationNeed Windows 11 help?Check documents on compatibility, FAQs, upgrade information and available fixes.
Windows 11 Support Center. -
- HP Community
- Printers
- Printing Errors or Lights & Stuck Print Jobs
- HP Photosmart cartridge alignment failed

Create an account on the HP Community to personalize your profile and ask a question
03-08-2018 02:43 PM
Welcome to the HP Forums 🙂
I would like to take a moment and thank you for using this forum, it is a great place to find answers.
As I understand the HP Photosmart cartridge alignment failed,
No worries, as I'll be glad to help you, that said, I'll need a few more details to dissect your concern & provide an accurate solution:
Did you remove, inspect and reseat the cartridge?
Have you cleaned the cartridge contacts?
While you respond to that, here's what you need to do:
Step one: Remove, inspect, and reseat the cartridge
The cartridge might not have full electrical contact with the contacts inside the product. Follow these steps to remove and reseat the cartridge to restore contact.
-
Press the Power button (
 ) to turn on the product.
 -
Open the output tray, and then open the cartridge door.
Figure : Open the output tray and the cartridge door

-
Push down on the cartridge, and then pull it out to remove it.
CAUTION:
Do not touch the copper electrical contacts or the nozzles on the cartridge. Touching these parts can result in clogs, ink failure, and bad electrical connections.
Figure : Do not touch the electrical contacts or nozzles on the cartridge

-
Check the electrical contacts for debris.
-
If you see debris, skip to Step two: Clean the cartridge contacts.
-
If you do not see debris, continue to the next step in this procedure.
-
-
Remove any clear protective tape from the cartridge nozzles.
CAUTION:
Do not try to remove the copper electrical strip from the cartridge.
-
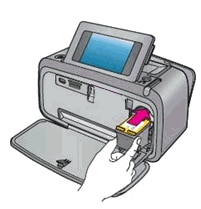
Insert the cartridge back into the product with the label facing up and the copper contacts facing the inside of the product.
Figure : Insert the cartridge

-
Push the cartridge into the product until it snaps into place.
-
Close the cartridge door.
-
If these steps resolved the issue, there is no need to continue troubleshooting.
-
If the issue persists, see the next step.
Step two: Clean the cartridge contacts
CAUTION:
Clean the contacts quickly so that the cartridge does not remain outside the product for more than 30 minutes. If the cartridge stays outside the product for too long, the nozzles can become dry and clogged.
-
Gather the following materials:
-
Distilled water
CAUTION:
Tap water can contain contaminants that can damage the cartridge.
-
Soft, lint-free materials, such as foam-tipped swabs or coffee filters, that do not stick to the electrical contacts
-
A clean sheet of paper
-
-
Open the cartridge door.
-
Remove the cartridge, and then place it on the clean sheet of paper with the nozzle plate facing up.
-
Unplug the power cord from the product.
-
Dip the lint-free material in the water, and then squeeze it to remove most of the moisture.
-
Clean the cartridge contacts, but do not clean the nozzles.
Figure : Clean the contacts
-
Copper-colored contacts
-
Ink nozzles (do not clean)
-
-
Either let the cartridge sit for 10 minutes to allow the cleaned area to dry, or use a new swab to dry the contacts.
-
Insert the cartridge back into the product with the label facing up and the copper contacts facing the inside of the product.
Figure : Insert the cartridge

-
Push the cartridge into the product until it snaps into place.
-
Close the cartridge door.
-
Reconnect the power cord to the product.
-
Press the Power button (
 ) to turn on the product.
 -
Try to print the job again.
-
If these steps resolved the issue, there is no need to continue troubleshooting.
-
If the issue persists, see the next step.
CLICK HERE FOR MORE STEPS AND INSTRUCTIONS - Step 3 Onward
(By the end of this article all the issues should be resolved)
If you would like to thank me for my efforts to help you,
feel free to give me a virtual high-five by clicking the 'Thumbs Up' icon below,
Followed by clicking on the "Accept as solution" button.
Have a great day!
Riddle_Decipher
I am an HP Employee
Learning is a journey, not a destination.
Let's keep asking questions and growing together.
