-
×InformationNeed Windows 11 help?Check documents on compatibility, FAQs, upgrade information and available fixes.
Windows 11 Support Center. -
-
×InformationNeed Windows 11 help?Check documents on compatibility, FAQs, upgrade information and available fixes.
Windows 11 Support Center. -
- HP Community
- Printers
- Printing Errors or Lights & Stuck Print Jobs
- Hp 4510 Envy wont print in color, no color and black option...

Create an account on the HP Community to personalize your profile and ask a question
Your account also allows you to connect with HP support faster, access a personal dashboard to manage all of your devices in one place, view warranty information, case status and more.
Check some of the most frequent questions about Instant Ink: HP INSTANT INK, HP+ PLANS: INK AND TONER.
Check out our Black or Color Ink Not Printing, Other Print Quality Issues info about: Print quality and Cartridge Issues.

It has been a while since anyone has replied. Simply ask a new question if you would like to start the discussion again.
07-26-2019 08:16 PM
 HP Recommended
Product: Hp Envy 4510 inkjet all in one printer/scanner
Operating System: Microsoft Windows 10 (64-bit)
Did all the removal of the HP software and the instructions I was given last time. This problem keeps occurring is getting annoying. I've had nothing but trouble with the printer software since I bought this printer. I ready to trash it and never again get an HP Printer. I reinstalled the software and I still have no color option and it wont print in color. it will copy and print in color. Need some more advice why this problem keeps reoccurring?
Solved! Go to Solution.
1 ACCEPTED SOLUTION
Accepted Solutions
07-29-2019 01:04 PM
HP Recommended
Hi! @Gage3780,
Have you tried printing from a different application? Does the issue persist?
Please try steps below in the Word application.
Click Print,
Select Printer properties,
Select Paper/Quality tab,
Click Advanced,
Select Print Grayscale Off
Click Apply then OK
Disable UAC on the PC.
-
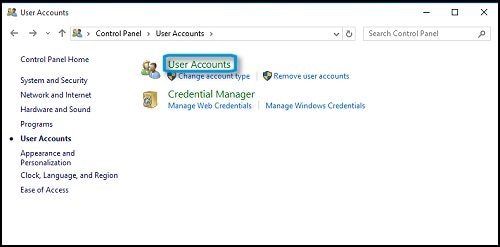
In Windows, search for and open Control Panel.
-
Click User Accounts.
Figure : User Accounts

-
In the User Accounts window, click User Accounts.
The User Accounts window opens.
Figure : User Accounts
-
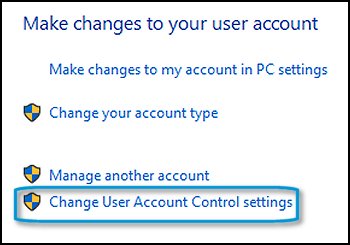
Click Change User Account Control settings.
Figure : Make changes to your user account
-
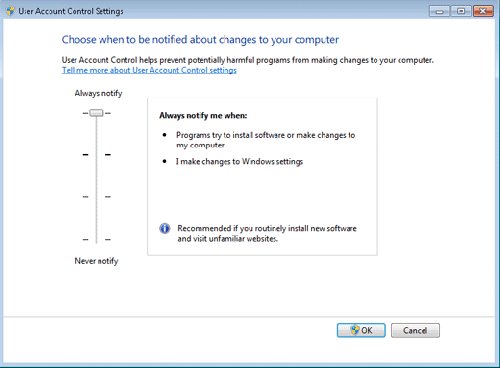
Move the slider up or down to set the User Account Control settings.
To turn off User Account Control, move the slider to the bottom (Never notify).
Figure : Choose when to be notified about changes to your computer
-
Click OK.
Lastly, Uninstall the printer software from the root level and install the full feature printer software.
Try uninstalling the full feature printer software from root level on your PC and install the full feature printer software.
In Windows, search for and open Programs and Features.
Select your HP printer.
Select Uninstall.
In Windows, search for and open Devices and Printers.
In the Devices and Printers window look for your HP Printer. If you see it listed, right-click on it and choose "Delete" or "Remove Device.”
Open up the run command with the "Windows Key + R" key combo.
Type printui.exe /s and click OK.
Click on Drivers tab.
Look for HP Printer driver. If you see it click on it and click remove at the bottom.
Select OK.
Select Apply and OK on the Print Server Properties window.
Close Devices and Printers.
Update the full feature printer drivers using this link. Click Here
Refer this article to know more information about print quality issues with the printer. Click Here
Let me know if this works!
Have a great day ahead! 🙂
Please click “Accept as Solution” if you feel my post solved your issue, it will help others find the solution.
Click the “Kudos, Thumbs Up" on the bottom right to say “Thanks” for helping!
A4Apollo
I am an HP Employee
3 REPLIES 3
07-29-2019 01:04 PM
HP Recommended
Hi! @Gage3780,
Have you tried printing from a different application? Does the issue persist?
Please try steps below in the Word application.
Click Print,
Select Printer properties,
Select Paper/Quality tab,
Click Advanced,
Select Print Grayscale Off
Click Apply then OK
Disable UAC on the PC.
-
In Windows, search for and open Control Panel.
-
Click User Accounts.
Figure : User Accounts
-
In the User Accounts window, click User Accounts.
The User Accounts window opens.
Figure : User Accounts
-
Click Change User Account Control settings.
Figure : Make changes to your user account
-
Move the slider up or down to set the User Account Control settings.
To turn off User Account Control, move the slider to the bottom (Never notify).
Figure : Choose when to be notified about changes to your computer
-
Click OK.
Lastly, Uninstall the printer software from the root level and install the full feature printer software.
Try uninstalling the full feature printer software from root level on your PC and install the full feature printer software.
In Windows, search for and open Programs and Features.
Select your HP printer.
Select Uninstall.
In Windows, search for and open Devices and Printers.
In the Devices and Printers window look for your HP Printer. If you see it listed, right-click on it and choose "Delete" or "Remove Device.”
Open up the run command with the "Windows Key + R" key combo.
Type printui.exe /s and click OK.
Click on Drivers tab.
Look for HP Printer driver. If you see it click on it and click remove at the bottom.
Select OK.
Select Apply and OK on the Print Server Properties window.
Close Devices and Printers.
Update the full feature printer drivers using this link. Click Here
Refer this article to know more information about print quality issues with the printer. Click Here
Let me know if this works!
Have a great day ahead! 🙂
Please click “Accept as Solution” if you feel my post solved your issue, it will help others find the solution.
Click the “Kudos, Thumbs Up" on the bottom right to say “Thanks” for helping!
A4Apollo
I am an HP Employee
07-29-2019 04:27 PM
HP Recommended
I uninstalled and reinstalled all the software and followed these instructions and I got the printer printing and I found the options , color or black. I still have one very annoying problem. When I turn my printer on it always shows its offline or not turned on in the printer and devices in the control panel even though its turned on, and the Blue wifi button shows it connected. I have to run Service.msc and try restarting or stopping and starting the print spooler. Sometimes it works or I have to restart my Laptop to get it online. It's a real pain. I dont know why it doesnt hook up to my laptop after I turn the printer on. I appreciate your advise, thank you.
07-30-2019 08:05 AM
HP Recommended
Hi! @Gage3780,
Thanks for the update and I'm happy to know the colour printing options is available now.
Is the printer connected by a wired or a wireless connection?
To solve the printer offline issues, try the steps recommended below.
Download and run HP print and scan doctor on the PC and check if the issue persists.
Refer this article to know more information about using HP print and scan doctor. Click Here
Manually set the default printer
Set your default printer in Windows 10.
Search Windows for devices, and then click Printers & scanners from the list of results.
If it is checked, uncheck the box beside Let Windows manage my default printer.
From the list of printers, click the printer name that matches the name of your printer, and then click Manage. If there are multiple names listed, select the printer that has a status of idle or online.
Under Manage your device, click Set as default.
Try to print.
Lastly, try assigning a manual IP address and also disable the IPv6 on the printer. Here are the steps:
• Obtain the IP address of the printer – You can touch the “wireless” icon on the printer control panel to get the IP address.
• Type the IP address on your web browser to obtain the printer EWS page on your computer.
• Go to "Network" tab - General - Select "Network protocols" - Select "Enable IPv4 only" (or similar) - Apply the settings.
• Go to the “Network” tab – Click on “Wireless (802.11) – Then click on “Network address (IPv4)
• Click on the radio button which says “Manual IP” and then click “Suggest a manual IP address” to give a manual IP address to your printer.
• Click on radio button which says “Manual DNS Server” and under manual preferred type 8.8.8.8 and under manual alternate type 8.8.4.4 (This is Google DNS server address)
Let me know if this helps!
Take Care! 🙂
A4Apollo
I am an HP Employee
Be alert for scammers posting fake support phone numbers and/or email addresses on the community.
If you think you have received a fake HP Support message, please report it to us by clicking on "Flag Post".
† The opinions expressed above are the personal opinions of the authors, not of HP. By using this site, you accept the Terms of Use and Rules of Participation.


Didn't find what you were looking for?
Ask the community
† The opinions expressed above are the personal opinions of the authors, not of HP. By using this site, you accept the <a href="https://www8.hp.com/us/en/terms-of-use.html" class="udrlinesmall">Terms of Use</a> and <a href="/t5/custom/page/page-id/hp.rulespage" class="udrlinesmall"> Rules of Participation</a>.