-
×InformationNeed Windows 11 help?Check documents on compatibility, FAQs, upgrade information and available fixes.
Windows 11 Support Center. -
-
×InformationNeed Windows 11 help?Check documents on compatibility, FAQs, upgrade information and available fixes.
Windows 11 Support Center. -
- HP Community
- Printers
- Printing Errors or Lights & Stuck Print Jobs
- Ink blots on upper right corner of paper

Create an account on the HP Community to personalize your profile and ask a question
Your account also allows you to connect with HP support faster, access a personal dashboard to manage all of your devices in one place, view warranty information, case status and more.
Check some of the most frequent questions about Instant Ink: HP INSTANT INK, HP+ PLANS: INK AND TONER.
Check out our Black or Color Ink Not Printing, Other Print Quality Issues info about: Print quality and Cartridge Issues.

It has been a while since anyone has replied. Simply ask a new question if you would like to start the discussion again.
02-28-2018 07:28 PM
 HP Recommended
Product: HP Photosmart 7520
Operating System: Microsoft Windows 10 (64-bit)
I keep getting blobs of black ink on the upper right corner of paper, even after changing ink cartridges. It seeps thru a stack of at least a dozen sheets and is the most prominent (and wettest) on the bottom of the stack.
What's up and can it be fixed for a reasonable cost? Or is it time for a new printer? This one is 5 years old.
5 REPLIES 5
03-01-2018 03:35 PM
HP Recommended
Thanks for taking an interest in the HP Support Forums After reading your post I see that you are getting issues with the ink cartridge. I will be a delight to assist you here.
Superb analysis and brilliant diagnosis of the issue before posting. 🙂 Kudos to you on that score.:)
For better clarity and to assist you better I would require more information regarding this:
- When did this issue start?
- Did you do any changes in the printer?
Meanwhile
Remove the cartridge and check if there is any physical damage to the cartridge.
If there no damage, follow the below post.
Make sure the ink cartridges are properly vented and correctly seated
-
Make sure the printer is on.
-
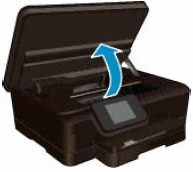
Open the ink cartridge access door.
Figure : Open the ink cartridge access door
-
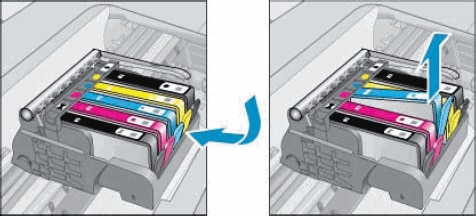
Press the tab on the front of the ink cartridge inward to release it, and then pull up on the ink cartridge to remove it from the slot.
-
If the error message mentions a specific ink cartridge, locate that ink cartridge, remove it from the carriage, and then continue with the next step.
-
If the error message does not mention a specific ink cartridge, remove all the ink cartridges one at a time, and then continue with the next step.
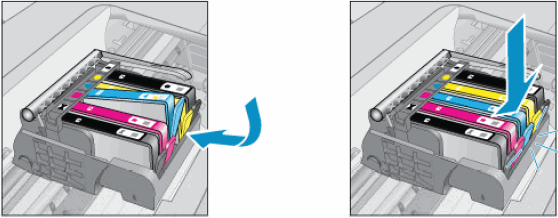
Figure : Remove the ink cartridge
-
-
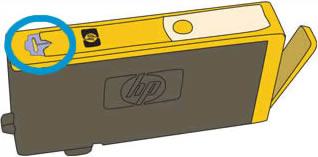
Examine the vent area on each ink cartridge located above the HP logo on the top of the ink cartridge.
Figure : Vent area on the top of the ink cartridge
-
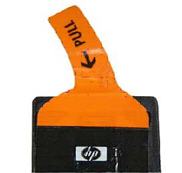
If the ink cartridge still has the orange pull-tab attached, pull to remove it.
Figure : Orange pull tab
-
If the vent is clogged, use a straight pin to gently remove excess adhesive from the vent.
-
With the nozzle and the contacts facing down, push the ink cartridge into its slot. Press down on the ink cartridge until it snaps into place. Make sure that the color icon on the ink cartridge label matches the color icon on the slot.
Figure : Insert the ink cartridge
-
Repeat these steps to inspect the vents on each of the ink cartridges.
-
Make sure each ink cartridge is firmly in place in its slot. Run your finger along the top of the ink cartridges to feel for any that are protruding, and if any are, press down firmly until each ink cartridge snaps into place.
-
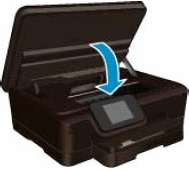
Close the ink cartridge access door.
Figure : Close the ink cartridge access door
-
Wait until the printer is idle and silent before proceeding.
-
Print another Print Quality Diagnostic report.
Clean the printhead
-
Load plain white U.S. letter or A4 size paper in the input tray, if it is not already loaded.
-
On the printer control panel, touch the Settings icon
 .
. -
Touch Tools, and then touch Clean Cartridges.
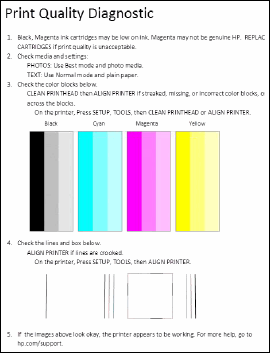
The printer cleans the printhead and then prints a test page.
Figure : Example of test page
-
Check the test page for defects.
Let me know if that helps.
Cheers.
Sandytechy20
I am an HP Employee
03-02-2018 12:01 PM
HP Recommended
Thanks for the suggestions. Having done them all, I am still getting blots of black ink on the upper right corner of the paper. It looks like the cartridge is leaking, but this is the second new one I have put into the printer. This has been going on for almost a month now.
Any other ideas?
03-02-2018 12:51 PM
HP Recommended
Thanks for the reply.
I appreciate your time and effort.
This seems to be a hardware issue, I would personally suggest you contact our HP phone support for further assistance. If your product is Out of warranty then remember to choose the paid options to get the tech support number.
They might have multiple options to help you on this.
Please use the following link to create yourself a case number, then call and it may help speed up the call process:
Step 1. Open link: www.hp.com/contacthp/
Step 2. Enter Product number or select to auto detect
Step 3. Scroll down to "Still need help? Complete the form to select your contact options"
Step 4. Scroll down and click: HP contact options - click on Get phone number and phone number appear.
They will be happy to assist you immediately.
Keep me posted for any other assistance,
Cheers
Sandytechy20
I am an HP Employee
03-05-2018 05:07 PM
HP Recommended
Your first solution may be working, as I have not had ink blots for a couple of days now. So, maybe there was some residue on the cartridges. We'll see. Hopefully, this works and I don't have to purchase a new printer.
Thanks for your help!
03-06-2018 07:18 AM
HP Recommended
It looks like you were interacting with sandytechy20, but he is out for the day & I'll be glad to help you out.
I'm Raj1788 & I'm at your service.
I am so glad that the printer is working fine.
If you like to appreciate @sandytechy20's efforts clicking on 'Accepted as Solution'
Feel free to get back to us with any technical queries.
Have a great day!
Cheers;)
Raj1788
I am an HP Employee
Be alert for scammers posting fake support phone numbers and/or email addresses on the community.
If you think you have received a fake HP Support message, please report it to us by clicking on "Flag Post".
† The opinions expressed above are the personal opinions of the authors, not of HP. By using this site, you accept the Terms of Use and Rules of Participation.


Didn't find what you were looking for?
Ask the community
† The opinions expressed above are the personal opinions of the authors, not of HP. By using this site, you accept the <a href="https://www8.hp.com/us/en/terms-of-use.html" class="udrlinesmall">Terms of Use</a> and <a href="/t5/custom/page/page-id/hp.rulespage" class="udrlinesmall"> Rules of Participation</a>.