• ×
    Information
    Need Windows 11 help?
    Check documents on compatibility, FAQs, upgrade information and available fixes.
    Windows 11 Support Center.
  • post a message
  • ×
    Information
    Need Windows 11 help?
    Check documents on compatibility, FAQs, upgrade information and available fixes.
    Windows 11 Support Center.
  • post a message
Guidelines
Here is the solution for Blue screen error 83C0000B on HP OfficeJet Pro 8010e, 9020e Printer Series: Click here to view.
Check some of the most frequent questions about Instant Ink: HP INSTANT INK, HP+ PLANS: INK AND TONER.


Check out our Black or Color Ink Not Printing, Other Print Quality Issues info about: Print quality and Cartridge Issues.
HP Recommended
HP Envy 7640
Microsoft Windows 10 (64-bit)

I inherited this HP Envy 7640 printer from my brother-in-law it has not been used in 2 years. It would not print so I check the cartridges and the color cartridge was leaking all over the place. I went to Staples to purchase some new cartridge and the salesman there told me that if the color cartridge is leaking it could not be fixed. Is this true do I have any options or do I just junk The

old printer

1 REPLY 1
HP Recommended

@Coyotebowler Welcome to HP Community!

I personally suggest you to clean the printer and the cartridges using the below steps:


Clean the ink cartridges

Follow these steps to clean the ink cartridges from the printer control panel.

NOTE: 

To avoid issues that require cleaning, always turn the printer off with the Power button.

  1. Load U.S. letter or A4 size, unused, plain white paper into the input tray.

  2. On the printer control panel, swipe the display to the left, and then touch Setup.

    The Setup menu displays.

  3. Swipe the display up, and then touch Printer Maintenance.

  4. Touch Clean Cartridges.

Clean the area around the ink nozzles

Do not perform these steps unless the test page or printout specifically shows smeared text or track marks. If you see track marks or smears on the printouts, follow these steps to clean the area around the ink nozzles.

Example of smeared text

Example of text with track marks

  1. Gather the following materials:

    • Dry foam-rubber swabs, lint-free cloth, or any soft material that does not come apart or leave fibers (coffee filters work well)

    • Distilled, filtered, or bottled water (tap water might contain contaminants that can damage the ink cartridges)

         CAUTION: 

      Do not use platen cleaners or alcohol to clean the ink cartridge contacts. These can damage the ink cartridge or the printer.

  2. Turn on the printer.

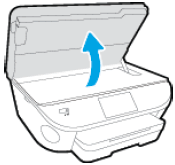
  3. Open the ink cartridge access door by placing two fingers under one or both of the small handles on the sides of the ink cartridge access door and then lifting it up. Wait until the carriage is idle and silent before you continue.

    Open the ink cartridge access door

    The Door Open screen displays on the printer control panel with the message, 'The cover or door must be closed to print. Check that it is completely closed.' A Change Ink option also displays on the bottom right corner of the touchscreen. You do not need to select this option at this time.

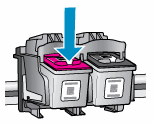
  4. Lightly press down on one of the ink cartridges to release it, and then pull the ink cartridge toward you out of its slot.

    Press down to remove the ink cartridge

       CAUTION: 

    Do not remove both ink cartridges at the same time. Remove and clean each ink cartridge one at a time. Do not leave an ink cartridge outside the printer for more than 30 minutes.

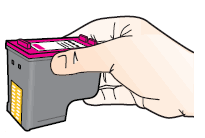
  5. Hold the ink cartridge by its sides.

    Hold the ink cartridge by its sides.

  6. Inspect the ink cartridge contacts for ink and debris buildup.

       CAUTION: 

    Do not touch the copper-colored contacts or the ink nozzles. Touching these parts can result in clogs, ink failure, and bad electrical connections.

    Do not touch the contacts or nozzles.

  7. Lightly moisten a foam-rubber swab or lint-free cloth with distilled water, and then squeeze any excess water from it.

  8. Clean the face and edges around the ink nozzle with the swab.

       CAUTION: 

    Do not clean the ink nozzle plate.

    1. Nozzle plate - Do not clean

    2. Area surrounding ink nozzle - Do clean

    3. Cartridge contacts - Do not clean

  9. Either let the ink cartridge sit for 10 minutes to allow the cleaned area to dry, or use a new swab to dry it.

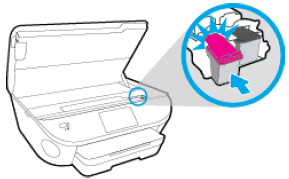
  10. Reinsert the ink cartridge by sliding it at a slight upward angle into the empty slot, and then gently pushing up on the ink cartridge until it snaps into place.

    • Reinsert the tri-color ink cartridge into the left slot.

    • Reinsert the black ink cartridge into the right slot.

    Reinsert the ink cartridge

  11. Repeat these steps to clean around the nozzles on the other ink cartridge.

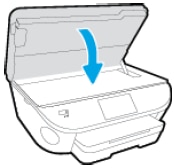
  12. Close the ink cartridge access door.

    Close the ink cartridge access door

  13. Turn on the printer.

Then, add the new cartridges and check if it works before you give up on it.


Keep us posted,

If you would like to thank us for our efforts to help you, 

Give us a virtual high-five by clicking the 'Thumbs Up' icon below, followed by clicking on the "Accept as solution" on this post, 

Have a great day!

Riddle_Decipher
I am an HP Employee


Learning is a journey, not a destination.
Let's keep asking questions and growing together.
† The opinions expressed above are the personal opinions of the authors, not of HP. By using this site, you accept the <a href="https://www8.hp.com/us/en/terms-of-use.html" class="udrlinesmall">Terms of Use</a> and <a href="/t5/custom/page/page-id/hp.rulespage" class="udrlinesmall"> Rules of Participation</a>.