-
×InformationNeed Windows 11 help?Check documents on compatibility, FAQs, upgrade information and available fixes.
Windows 11 Support Center. -
-
×InformationNeed Windows 11 help?Check documents on compatibility, FAQs, upgrade information and available fixes.
Windows 11 Support Center. -
- HP Community
- Printers
- Printing Errors or Lights & Stuck Print Jobs
- Manage Custom Sizes is greyed out in OSX 10.12.6 for Model H...

Create an account on the HP Community to personalize your profile and ask a question
Your account also allows you to connect with HP support faster, access a personal dashboard to manage all of your devices in one place, view warranty information, case status and more.
Check some of the most frequent questions about Instant Ink: HP INSTANT INK, HP+ PLANS: INK AND TONER.
Check out our Black or Color Ink Not Printing, Other Print Quality Issues info about: Print quality and Cartridge Issues.

It has been a while since anyone has replied. Simply ask a new question if you would like to start the discussion again.
04-28-2019
08:16 AM
- last edited on
04-28-2019
11:19 AM
by
![]() Cheron-Z
Cheron-Z
 HP Recommended
I have tried this solution and it doesn't work. My custom page size is 110mm x 297mm. I have also tried this in Windows 10 as well, but I get the following error on printer:
"The paper size detected by the printer sensor does not match the paper size selected in software." To have a close match with standard paper sizes, I have tried selecting PRC Envelope #8 Rotated and Japanese Kaku #2, but both of them give me the same error.
I have also checked if there is a firmware upgrade available. Kindly suggest if there is a workaround to print on a custom page size.
5 REPLIES 5
04-29-2019 01:31 PM
HP Recommended
@cksachdev, Welcome to HP Support Community!
Have you tried creating the custom paper size from the Page Setup Menu?
If not, follow the steps below:
-
Load the custom-size paper into the paper input tray.
-
Open the item you want to print.
-
Click File, and then select Page Setup.
-
In Paper Size, select Manage Custom Sizes.
The Custom Paper Sizes window displays.
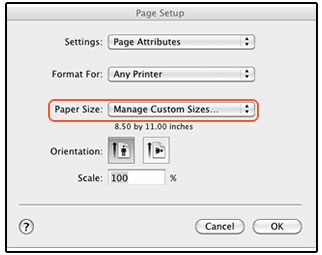
-
In the Custom Paper Sizes window, click the plus sign
 to create a new paper size, double-click the default untitled name, and then type a new name for the custom paper size.
NOTE:
Use a different, unique name for the new custom paper size. Do not use an existing paper size name for any new custom paper size names because it overrides the existing preset. For example, if a custom paper size is namedA4, then the existing A4 paper size is no longer available as a choice.

-
In the Paper Size section, type the dimensions of the custom paper in the Width and Height text boxes, and then set the margins, if desired.
-
Paper Size
-
Margins
-
-
Click OK.
-
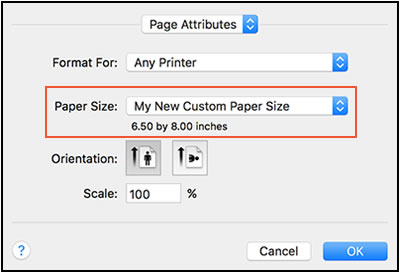
In the Page Setup window, select the new custom paper size, and then click OK.
-
Click File, and then select Print.
-
Change print settings, if desired, and then click OK or Print to print the document.
For the error message on your Windows computer, try following the troubleshooting steps from HP Printers - 'Paper Mismatch' Error (Windows) document.
Let me know the outcome.
Cheers 🙂
Please click “Accept as Solution” if you feel my post solved your issue, it will help others find the solution. Click the “Kudos/Thumbs Up" on the bottom right to say “Thanks” for helping!
TEJ1602
I am an HP Employee
04-29-2019 07:22 PM
HP Recommended
@TEJ1602
Thanks for sharing the steps. I am on macOS Mojave v 10.14.4. I opend a png file which is of dimension 110 x 297 mm in Preview application.I can't find an option for Page Setup. Then I tried GIMP application in which this image is created, there also I don't find an option for Page Setup.
Page Setup is available under the Print dialog, but the option to define custom paper size is greyed out, as mentioned in the original issue with screenshot. Kindly suggest the next steps on how to define a custom page dimension in this case or if you have any recommendation for 3rd party application, please suggest.
04-30-2019 03:01 PM
HP Recommended
Restart the devices and try again. If the issue persists, try removing and adding the printer back using AirPrint.
Follow the steps below:
Remove the printer-
Click the Apple menu, click System Preferences, and then click Print & Scan or Printers & Scanners
Click the printer name, click the minus - sign to delete the printer.
Add the printer-
Click the Apple menu, click System Preferences, and then click Print & Scan or Printers & Scanners
Click the plus + sign, click Add Printer or Scanner, click the printer name and then continue to the next step.
Confirm AirPrint or Secure AirPrint displays in the Use or Print Using menu, and then click Add
Try creating a custom size and print.
Let me know the outcome.
Cheers 🙂
Please click “Accept as Solution” if you feel my post solved your issue, it will help others find the solution. Click the “Kudos/Thumbs Up" on the bottom right to say “Thanks” for helping!
TEJ1602
I am an HP Employee
05-01-2019 03:18 AM
HP Recommended
@TEJ1602:
I have done the following:
- Removed the printer from "Printers and Scanners" under System Preferences
- Added the printer back again and ensured it use "AirPrint"
- Opened the file I want to print using "Preview" application
- In the print dialog, I still don't see an option to define a custom page size
Could you please share the steps with screenshot. Let me know if I should use any other app or different setting to add custom page size. As of now "Manage Custom Sizes.." as before is greyed out and I am not able to define custom page size.


05-07-2019 02:06 PM
HP Recommended
Update the printer firmware.
HP regularly releases new printer firmware versions with product enhancements or issue fixes. Depending on your printer, apps on the printer control panel might also receive updates.
Refer to this link for help.
Update the software on Mac
follow these steps to keep it up to date:
- Open the App Store app on your Mac.
- Click Updates in the App Store toolbar
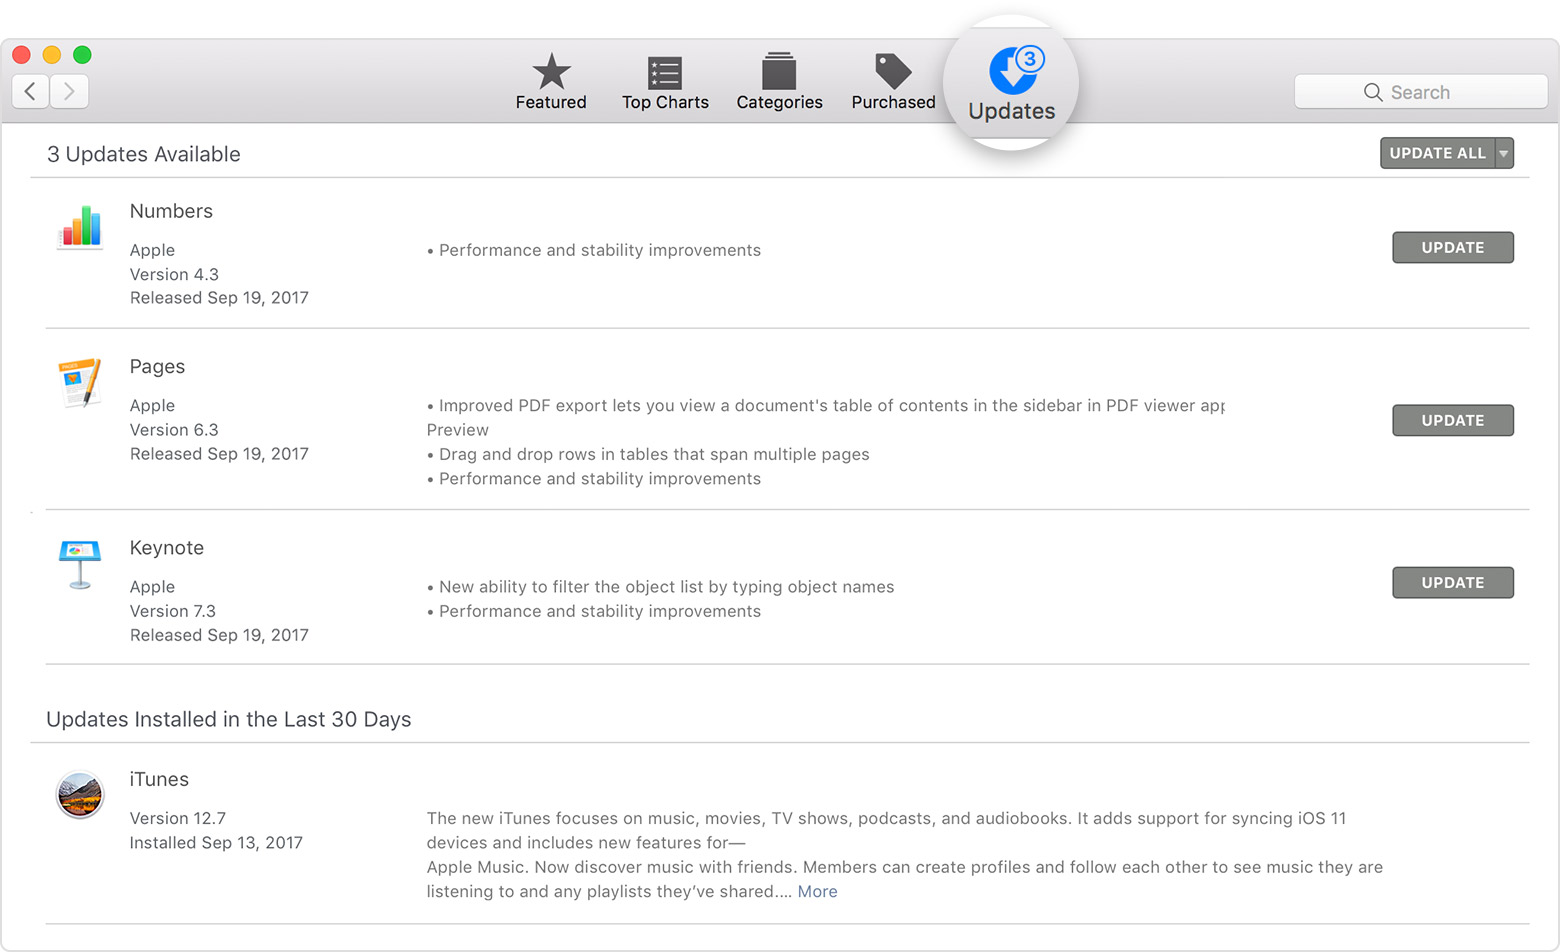
- Use the Update buttons to download and install any updates listed.
- When the App Store shows no more updates, your version of macOS and all of its apps are up to date. That includes Safari, iTunes, iBooks, Messages, Mail, Calendar, Photos, and FaceTime. Later versions are available by upgrading your macOS.
To automatically download updates in the future, choose Apple menu () > System Preferences, click App Store, then select ”Download newly available updates in the background.” Your Mac will notify you when updates are ready to install.
Repair a disk using Disk Utility on Mac
-
Print this page so you can refer to it later. (You don’t have access to the Disk Utility User Guide when you restart your computer in the next step.)
In the Disk Utility User Guide window, click the Share button
 , then choose Print.
 -
Choose Apple menu
 > Restart. After your Mac restarts (some Mac computers play a startup sound), press and hold the Command and R keys until the Apple logo appears, then release the keys.
 -
Click Disk Utility, then click Continue.
-
Choose View > Show All Devices.
-
In the sidebar, select the disk you want to repair.
-
Click the First Aid button

If Disk Utility tells you the disk is about to fail, back up your data and replace the disk. You can’t repair it. Otherwise, continue to the next step.
-
Click Run.
If Disk Utility reports that the disk appears to be OK or has been repaired, you’ve finished. You can click Show Details to see more information about the repairs. Otherwise, you may need to do one of the following.
-
If Disk Utility reports “overlapped extent allocation” errors, two or more files occupy the same space on your disk, and at least one of them is likely to be corrupted. You need to check each file in the list of affected files. Most of the files in the list have aliases in a DamagedFiles folder at the top level of your disk.
-
If you can replace a file or recreate it, delete it.
-
If it contains information you need, open it and examine its data to make sure it hasn’t been corrupted.
-
-
If Disk Utility can’t repair your disk or it reports “The underlying task reported failure”, try to repair the disk or partition again. If that doesn’t work, back up as much of your data as possible, reformat the disk, reinstall macOS, then restore your backed-up data.
-
Try adding a custom size now.
Keep me posted.
Cheers 🙂
Please click “Accept as Solution” if you feel my post solved your issue, it will help others find the solution. Click the “Kudos/Thumbs Up" on the bottom right to say “Thanks” for helping!
TEJ1602
I am an HP Employee
Be alert for scammers posting fake support phone numbers and/or email addresses on the community.
If you think you have received a fake HP Support message, please report it to us by clicking on "Flag Post".
† The opinions expressed above are the personal opinions of the authors, not of HP. By using this site, you accept the Terms of Use and Rules of Participation.


Didn't find what you were looking for?
Ask the community
† The opinions expressed above are the personal opinions of the authors, not of HP. By using this site, you accept the <a href="https://www8.hp.com/us/en/terms-of-use.html" class="udrlinesmall">Terms of Use</a> and <a href="/t5/custom/page/page-id/hp.rulespage" class="udrlinesmall"> Rules of Participation</a>.