• ×
    Information
    Need Windows 11 help?
    Check documents on compatibility, FAQs, upgrade information and available fixes.
    Windows 11 Support Center.
  • post a message
  • ×
    Information
    Need Windows 11 help?
    Check documents on compatibility, FAQs, upgrade information and available fixes.
    Windows 11 Support Center.
  • post a message
Guidelines
Experiencing 'Printer Blocked' or 'Printer Error' message? Click here for more information.
Check some of the most frequent questions about Instant Ink: HP INSTANT INK, HP+ PLANS: INK AND TONER.


Check out our Black or Color Ink Not Printing, Other Print Quality Issues info about: Print quality and Cartridge Issues.
HP Recommended
HP OfficeJet Pro 8600
Microsoft Windows 10 (32-bit)

The printer works fine as long as I have paper in it! I am not able to pull out the drawer far enough to load it with paper - it is stuck after an inch or so. Can anyone give me a tip on how to un jam the paper drawer? 

3 REPLIES 3
HP Recommended

@KatyO555,


Welcome to the HP Forums!


Thank you for posting your query on this forum, it's a great place to find answers.


I reviewed your post and I understand that the paper tray is stuck.


Don’t worry, I assure you I will try my best to get this sorted.


In order that I may provide you with an accurate solution, I will need a few more details.

  • When was the last time the printer was working fine?
  • Have you made any software or hardware changes on the computer?
  • Have you performed any troubleshooting steps before posting?

Meanwhile, I recommend you follow the below steps and check if it helps.


  1. Grasp the handle on the front of Tray 1, then pull the tray toward you to remove it.

    Figure : Pulling out Tray 1

    Image: Pulling out Tray 1.
  2. Slide out the paper width guides as far as possible.

    If you are loading larger-sized paper, pull out the input tray extender to lengthen the tray.

    Figure : Pulling out the input tray extender

    Image: Pulling out the input tray extender.
  3. Tap a stack of plain paper on a flat surface to align the edges.

  4. Make sure all the paper in the stack is the same size and type. Do not load mixed types of paper in the tray. The printer can process only one type of paper at a time.

       NOTE:

    Do not use paper with paper clips or staples attached. Do not use paper that is bent, torn, dusty, damp, wrinkled, curled, or paper that does not lie flat.

  5. With Tray 1 outside of the printer, load the stack of paper in portrait orientation with the print-side facing down in the center of the input tray, then slide the stack forward until it stops.

    Figure : Loading paper into Tray 1

    Image: Loading paper into Tray 1.
  6. Make sure the paper height does not exceed the maximum height lines on the sides of the tray.

    Figure : Examples of the paper fill guides inside Tray 1

    Image: Example of the paper fill guides inside Tray 1.
    1. Location of paper fill guides

    2. Maximum height for plain paper

    3. Maximum height for specialty paper

  7. Slide in the paper guides so that they rest against the edges of the paper, then push the tray into the printer until it clicks into place.

    Figure : Sliding in the paper guides and reinserting the tray into the printer

    Image: Sliding in the paper guides and reinserting the tray into the printer.
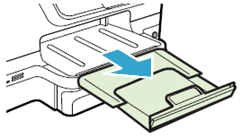
  8. Pull out the tray extender on the output tray, then lift the paper catch.

    Figure : Pulling out the tray extender on the output tray

    Image: Pulling out the tray extender on the output tray.

Load paper in optional Tray 2

Load plain paper into Tray 2 before you print.

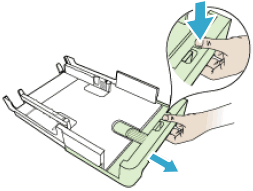
  1. Grasp the underside of Tray 2, then pull out the tray from the bottom of the printer.

    Figure : Pulling out the tray from the bottom of the printer

    Image: Pulling out Tray 2 from the bottom of the printer.
  2. Slide out the paper width guides as far as possible.

    If you are loading larger-sized paper, pull out the input tray extender to lengthen the tray.

    Figure : Pulling out the input tray extender

    Image: Pulling out the input tray extender.
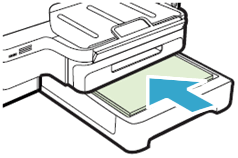
  3. With Tray 2 outside of the printer, load the stack of paper in portrait orientation with the print-side facing down in the center of the input tray, then slide the stack forward until it stops.

       CAUTION:

    Do not load paper while the printer is printing. Jams or paper feed issues might occur.

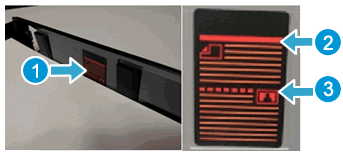
  4. Make sure the paper height does not exceed the maximum height line on the sides of the tray.

    Figure : Example of the paper fill guide inside Tray 2

    1. Location of paper fill guide

    2. Plain paper fill guide

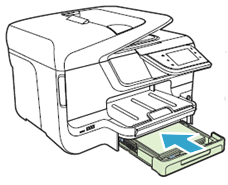
  5. Slide in the paper guides so that they rest against the edges of the paper, then push the tray into the printer until it clicks into place.

    Figure : Reinserting Tray 2 into the printer

    Image: Reinserting Tray 2 into the printer.
  6. Pull out the tray extender on the output tray, then lift the paper catch.

    Figure : Pulling out the tray extender on the output tray

    Image: Pulling out the tray extender on the output tray.

If the issue persists, I am sending you a private message with the instructions please follow the steps.


Let me know how it goes and you have a great day!


If you wish to show appreciation for my efforts, mark my post as Accept as Solution. Your feedback counts!


Cheers!

The_Fossette
I am an HP Employee

HP Recommended

Thank you for your reply but unfortunately it is not of help as I cannot even complete step 1 in your solution. Again, the issue is that the paper drawer will not pull out - it seems to be stuck and will not open any further than a few inches which is not enough for me to load more paper, the drawer also now will not close. Is there a way of opening the bottom of the printer to see if something came losse and is blocking the drawer from opening and closing properly? Or where can I get the printer serviced?


When was the last time the printer was working fine? a week ago
Have you made any software or hardware changes on the computer? no
Have you performed any troubleshooting steps before posting? yes I looked through the manual

HP Recommended

@KatyO555,


It is great to have you back and your patience is greatly appreciated.


I recommend you try opening the drawer using a little force and check. There are no manuals or screenshots for removing the drawer.


I suggest you follow the steps in the private message I have sent for the further course of action.


Let me know how it goes and you have a great day!


If you wish to show appreciation for my efforts, mark my post as Accept as Solution. Your feedback counts!


Cheers!

The_Fossette
I am an HP Employee

† The opinions expressed above are the personal opinions of the authors, not of HP. By using this site, you accept the <a href="https://www8.hp.com/us/en/terms-of-use.html" class="udrlinesmall">Terms of Use</a> and <a href="/t5/custom/page/page-id/hp.rulespage" class="udrlinesmall"> Rules of Participation</a>.